








Gratitude Journaling for a Healthier Mindset
Gratitude Journaling for a Healthier Mindset Ladies, let’s be honest: life is busy. Between work, family, workouts, meal prep and everything else on your plate, it’s so easy to focus on what went wrong today or what’s still left on your to-do list. That’s where a gratitude journal comes in. Gratitude journaling is one of the simplest self-care habits out there. It takes about five minutes, all you need is a notebook and a pen, and it gently trains your mind to notice the good things that are already in your life. With Thanksgiving around the corner, there’s no better time to start. What Is Gratitude Journaling? Gratitude journaling simply means writing down a few things you’re thankful for on a regular basis. They can be big (your health, your family, a new job) or small (a really good cup of coffee, a text from a friend, a sunny morning walk). The goal isn’t to pretend everything is perfect. It’s to make sure the good stuff gets noticed, too. Why Gratitude Is Good for You Researchers have studied gratitude for years, and many studies have found that people who regularly practice it tend to report feeling more positive and more satisfied with their lives. Here are a few of the ways a gratitude practice may help: A more positive outlook: Writing down good things helps shift your attention away from what’s missing and toward what you already have. Less stress in the moment: Taking a few quiet minutes to reflect can help you slow down, breathe and reset. Better sleep: Some research suggests that a few grateful thoughts before bed may help you fall asleep with a calmer mind. Stronger relationships: Noticing the people who show up for you makes it more likely you’ll tell them, and that brings you closer. Healthier habits: When you feel good about yourself and your life, it’s easier to keep showing up for your workouts and meals. Gratitude isn’t a cure-all, and it’s okay to have hard days. Think of it as one small, healthy habit that supports your mindset alongside everything else you do to take care of yourself. How to Start a Gratitude Journal 1. Pick Your Journal Any notebook works! Some women love a guided gratitude journal with daily prompts, while others prefer a blank notebook or the notes app on their phone. Choose whatever you’ll actually reach for. 2. Choose a Time That Fits Your Day Morning journaling sets a positive tone for your day, while evening journaling helps you wind down and reflect. Try linking it to something you already do, like your morning coffee or getting into bed. 3. Keep It Short Start with just three things you’re grateful for each day. That’s it. Five minutes is plenty, and a short habit is a habit you’ll keep. 4. Get Specific “My family” is great, but “My daughter made me laugh at dinner when she told us about her day” is even better. The more specific you are, the more you’ll actually feel the gratitude as you write. 5. Mix It Up If you find yourself writing the same things every day, try a prompt (we’ve got plenty below!) or focus on one area of your life, like your body, your relationships or your home. 6. Don’t Worry About Missing a Day Life happens. Even journaling two or three times a week can make a difference. If you miss a day (or a week), just pick your pen back up. No guilt allowed! 20 Gratitude Journal Prompts to Get You Started What made you smile today? Who is someone you’re thankful for, and why? What’s something your body did for you today? What’s a small comfort you enjoyed this week? What’s a challenge you’ve overcome that you’re proud of? What’s your favorite thing about this season? Who made your day a little easier recently? What’s something you have now that you once hoped for? What meal did you enjoy this week? What’s a lesson you’re grateful you learned? What’s something beautiful you noticed today? Which part of your home makes you feel the most at peace? What’s a skill or strength you’re thankful to have? Who is a friend you can always count on? What’s a memory that always makes you happy? What’s something you’re looking forward to? What’s a kind thing someone did for you? What’s something about yourself you appreciate? What’s a simple pleasure you’d hate to live without? If faith is part of your life, what’s a prayer or blessing you’re thankful for today? Make It a Healthy Habit Pair your gratitude journal with other habits that support your mind and body. Take a gratitude walk (try our Walking for Weight Loss: A 4-Week Plan for Women and think about what you’re thankful for with every step), or build it into your evening wind-down routine. For more ideas to take care of yourself, check out Self-Care Isn’t Selfish: How to Reclaim Your Peace of Mind. And if you’re feeling a little low as the days get shorter, our post on beating the seasonal slump has more simple ways to lift your mood this time of year. Grab a notebook tonight and write down three good things from your day. We’d love to hear what’s on your list, so share one in the comments! Here’s to noticing the good, ladies. You deserve it! Check out these items! SHOP NOW! SHOP NOW! SHOP NOW! SHOP NOW! SHOP NOW! SHOP NOW! Share: Facebook Pinterest Email Social Media Facebook-f Youtube Pinterest Instagram Tiktok Most Popular Get The Latest Updates Subscribe To Our Weekly Newsletter No spam, notifications only about new post, updates. Categories Related Posts
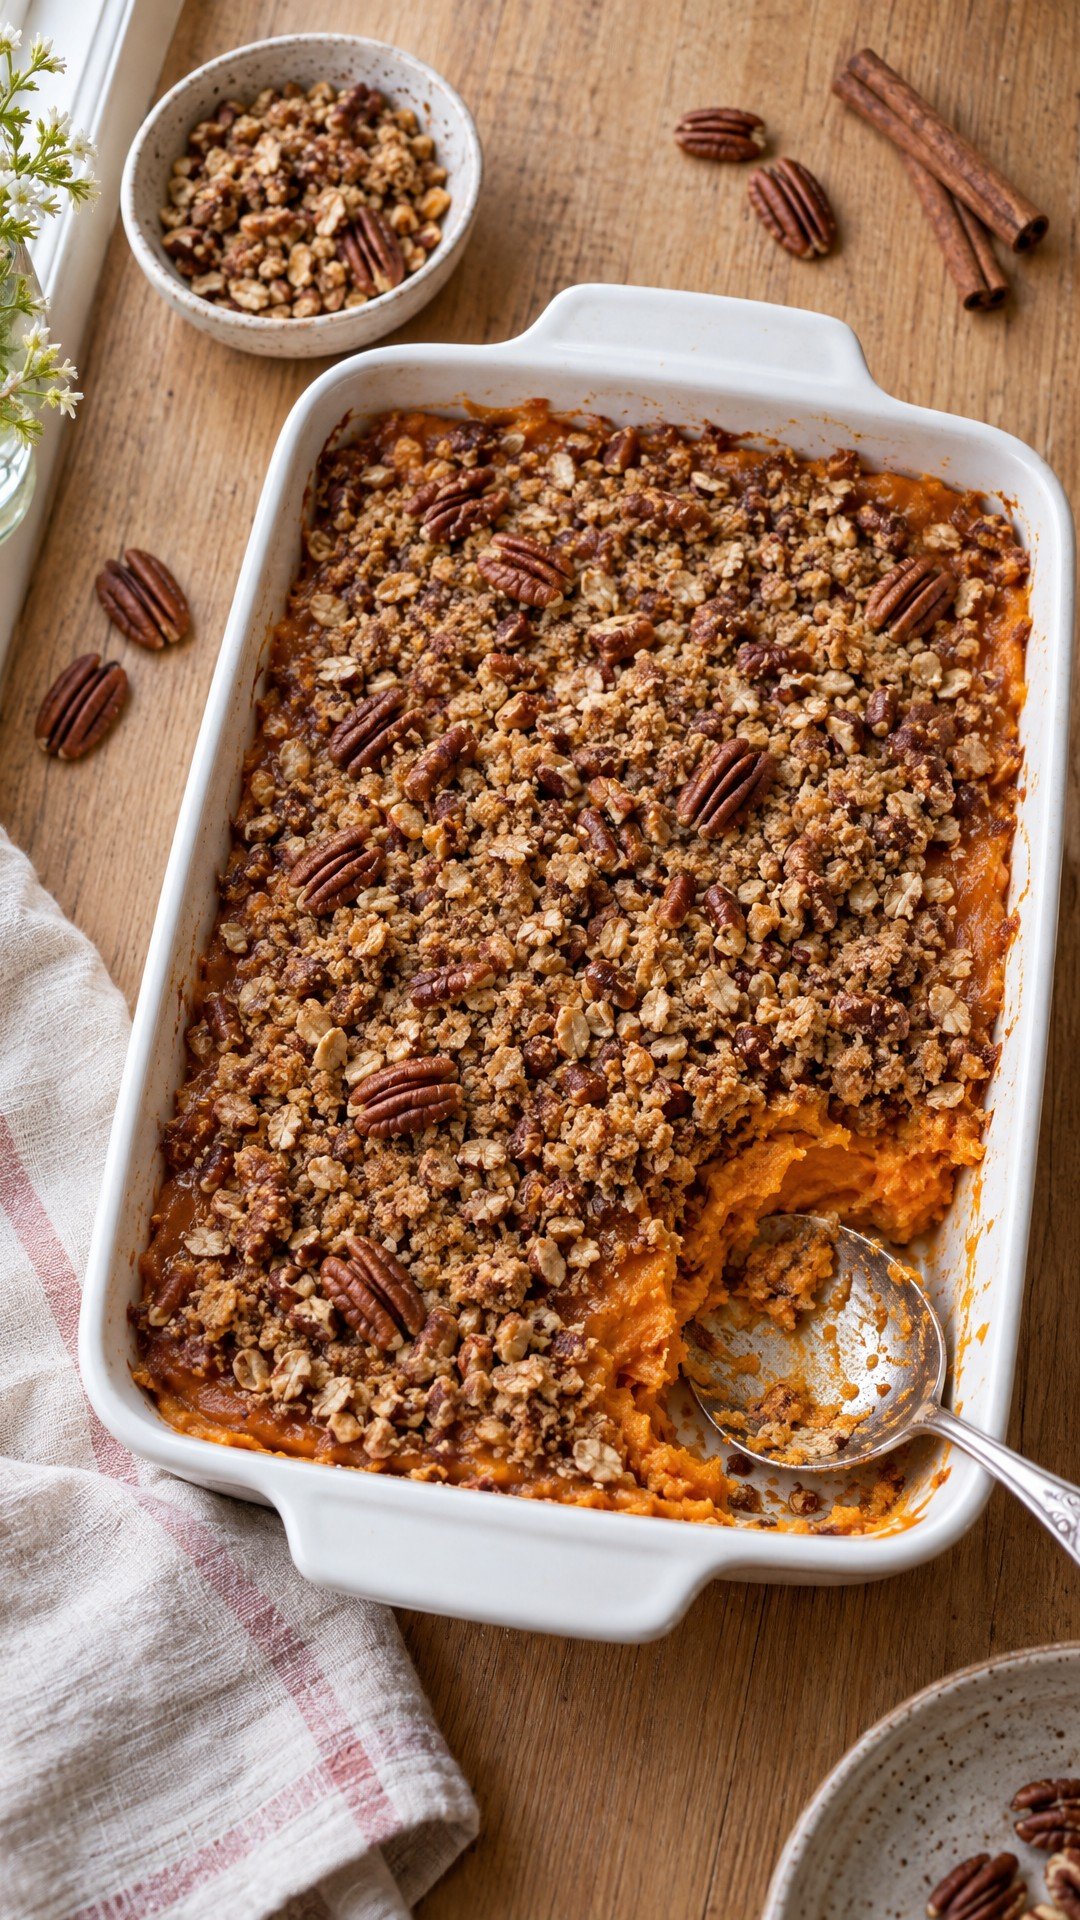
Healthier Sweet Potato Casserole (Lower Sugar)
Healthier Sweet Potato Casserole (Lower Sugar) Pin Print Healthier Sweet Potato Casserole (Lower Sugar) Serving 8 servingsPrep time 15 minutesCooking time 50 minutesCalories 335 kcal Sweet potato casserole is a holiday favorite for a reason. It’s creamy, cozy and tastes like dessert on your dinner plate. The classic version, though, usually comes loaded with brown sugar, butter and a full layer of marshmallows. This healthier sweet potato casserole keeps everything you love (the silky, cinnamon-spiced filling and a crunchy, buttery pecan topping) with far less added sugar. Greek yogurt adds creaminess and a little protein, and the naturally sweet potatoes do most of the work. Your family won’t miss a thing, ladies, and it’s the perfect make-ahead side for Thanksgiving. 🛒 Ingredients For the sweet potato filling: 3 lbs sweet potatoes (about 4 medium), peeled and cut into 1-inch chunks 1/2 cup plain nonfat Greek yogurt 2 large eggs 1/4 cup unsweetened almond milk (or any milk) 2 tablespoons pure maple syrup 1 tablespoon butter or coconut oil, melted 1 teaspoon vanilla extract 1 1/2 teaspoons ground cinnamon 1/4 teaspoon ground nutmeg 1/2 teaspoon salt For the pecan crumble topping: 3/4 cup chopped pecans 1/3 cup almond flour 1/3 cup old-fashioned rolled oats 2 tablespoons golden monk fruit sweetener (or 2 tablespoons coconut sugar) 1/2 teaspoon ground cinnamon Pinch of salt 2 tablespoons butter or coconut oil, melted 👩🏻🍳 Instructions Cook the Sweet Potatoes: Add the sweet potato chunks to a large pot and cover with cold water. Bring to a boil and cook for 15 to 20 minutes, until very tender when pierced with a fork. Drain well and let them steam dry in the colander for a few minutes. Preheat and Prep: Preheat your oven to 350°F. Lightly grease a 9×13-inch (or 2 1/2-quart) baking dish. Make the Filling: Return the sweet potatoes to the pot and mash until smooth. Add the Greek yogurt, eggs, almond milk, maple syrup, melted butter, vanilla, cinnamon, nutmeg and salt. Stir (or use a hand mixer) until creamy and well combined. Spread the filling evenly in the baking dish. Make the Topping: In a small bowl, mix the pecans, almond flour, oats, monk fruit sweetener, cinnamon and salt. Pour in the melted butter and stir until the mixture is crumbly. Sprinkle it evenly over the sweet potatoes. Bake: Bake for 25 to 30 minutes, until the filling is set around the edges and the topping is golden brown and fragrant. Rest and Serve: Let the casserole cool for 10 minutes before serving. Enjoy warm! Nutritional Information A Quick Note: The following nutritional information is an estimate for 1 serving (1/8 of the casserole). Actual values can vary based on the size of your sweet potatoes and the specific brands and ingredients you use. Calories: ~335 kcal Protein: ~9 g Fat: ~16 g Carbohydrates: ~42 g Fiber: ~7 g Sugar: ~11 g (only about 3 g is added sugar, from the maple syrup; the rest comes naturally from the sweet potatoes) Tips & Swaps Make it ahead: Prepare the filling and topping up to 2 days ahead and store them separately in the fridge. Assemble and add about 10 minutes to the baking time. Roast for deeper flavor: Instead of boiling, roast whole sweet potatoes at 400°F for 45 to 60 minutes, then scoop out the flesh. Want marshmallows? Scatter a small handful of mini marshmallows over half of the casserole for the last 5 minutes of baking. Everyone gets their favorite. Make it gluten-free: Use oats labeled gluten-free. Nut-free: Swap the pecans and almond flour for extra oats and pumpkin seeds. Leftovers: Keep covered in the fridge for up to 4 days. Reheat in the oven at 350°F or in the microwave. All the cozy holiday flavor with a lot less sugar. This one’s earning a permanent spot on your Thanksgiving table. Enjoy, ladies! Check out these items! SHOP NOW! SHOP NOW! SHOP NOW! SHOP NOW! SHOP NOW! SHOP NOW! Share: Facebook Pinterest Email SHOP NOW! SHOP NOW! Social Media Facebook-f Youtube Pinterest Instagram Tiktok Most Popular Get The Latest Updates Subscribe To Our Weekly Newsletter No spam, notifications only about new post, updates. Categories Related Posts

Shorter Days, Lower Mood? Beating the Seasonal Slump
Shorter Days, Lower Mood? Beating the Seasonal Slump Ladies, does this sound familiar? The clocks fall back, it’s dark by the time you leave work, and suddenly all you want to do is curl up on the couch with a blanket and a snack. Your energy dips, your motivation goes missing and your mood just feels a little… gray. If that’s you, you are definitely not alone. Lots of women notice a shift in how they feel when the days get shorter. The good news? There are simple, everyday habits that can help you feel more like yourself this season. Let’s talk about why it happens and what you can do about it. Why Shorter Days Can Affect How You Feel Your body runs on an internal clock (your circadian rhythm), and daylight is one of its biggest cues. When there’s less light in the mornings and evenings, that rhythm can get a little out of sync. Less sunlight can also affect the brain chemicals and hormones involved in mood, energy and sleep, like serotonin and melatonin. The result? Many people feel more tired, crave more comfort foods (hello, carbs!), sleep more but still feel sluggish, or just feel less motivated in the fall and winter. These “winter blues” are common and usually mild. Winter Blues vs. Seasonal Affective Disorder For some people, the seasonal shift is more than a slump. Seasonal affective disorder (often called SAD) is a type of depression that follows a seasonal pattern, most often starting in late fall or early winter. It’s more common in women and in people who live farther from the equator, where winter days are shorter. Some signs that it might be more than the winter blues: Feeling down, hopeless or empty most of the day, nearly every day Losing interest in things you usually enjoy Big changes in sleep or appetite Trouble concentrating or getting through your day Pulling away from friends and family If any of these sound familiar and they last for more than a couple of weeks or get in the way of your daily life, please talk to your doctor. Seasonal depression is real, it’s nothing to be ashamed of, and a healthcare provider can help you figure out what’s going on and what support is right for you. 9 Simple Ways to Beat the Seasonal Slump These everyday habits can help you feel more energized and balanced when the days get shorter. Pick one or two to start with and build from there. 1. Get Outside in the Morning Morning light is one of the best signals for your body clock. Try to get outside within an hour or two of waking up, even for 10 to 15 minutes. Drink your coffee on the porch, walk the dog or take a short walk around the block. Even on cloudy days, outdoor light is much brighter than indoor light. 2. Brighten Up Your Space Open your blinds as soon as you wake up, sit near a window when you can and turn on bright lights in the morning. Some people also use a light therapy lamp, which gives off bright light that’s similar to daylight. If you’re curious about one, ask your doctor whether it’s a good fit for you, especially if you have an eye condition or take medications that make you sensitive to light. 3. Keep Moving Exercise is one of the best mood boosters around, and it doesn’t have to be intense. A brisk walk, a short home workout or a dance party in your kitchen all count. Bonus points if you can move outside in the daylight. Need a plan? Our Walking for Weight Loss: A 4-Week Plan for Women is the perfect place to start. 4. Protect Your Sleep Schedule It’s tempting to hibernate, but sleeping in on weekends can throw your body clock off even more. Try to go to bed and wake up at about the same time every day, aim for 7 to 9 hours, and dim the lights and put your phone away for a little while before bed. 5. Eat for Steady Energy Craving carbs is normal this time of year. Instead of fighting it, build balanced meals with protein, fiber-rich carbs and healthy fats to help keep your energy steady. Think cozy soups, high-protein skillets, oatmeal with nuts and fruit, and plenty of veggies. Our post on Foods That Boost Your Mood has even more ideas. 6. Ask About Your Vitamin D Your body makes vitamin D when your skin is exposed to sunlight, so levels can dip in the darker months. You can get some from foods like salmon, eggs and fortified milk. Before you start a supplement, ask your doctor whether you should have your levels checked and how much is right for you. Learn more in The Importance of Vitamin D for Women. 7. Stay Connected When it’s cold and dark, it’s easy to cancel plans and stay home. But spending time with people you love is one of the best things you can do for your mood. Schedule a weekly walking date, a phone call with a friend or a cozy dinner night, and put it on the calendar so it actually happens. 8. Plan Something to Look Forward To Give yourself little things to be excited about: a new book, a fun class, a weekend day trip or a holiday get-together. Having something on the calendar can make the darker weeks feel a lot shorter. 9. Make Your Evenings Cozy, Not Gloomy Lean into the season! Warm lamps, a candle, a soft blanket, a cup of herbal tea and a good show can turn a dark evening into something you actually enjoy. Gentle stretching, journaling or a warm bath can help you wind down, too. When to Reach Out for Help Self-care habits can make a real difference, but they aren’t a replacement for professional care. If your mood is low most days, you’re struggling to get through your

High-Protein Turkey Taco Skillet
High-Protein Turkey Taco Skillet Pin Print High-Protein Turkey Taco Skillet Serving 4 servingsPrep time 10 minutesCooking time 20 minutesCalories 430 kcal Taco night just got a high-protein glow-up, ladies! This High-Protein Turkey Taco Skillet has everything you love about tacos (seasoned meat, beans, corn, peppers and melty cheese) all made in one pan in about 30 minutes. Each serving has around 36 grams of protein and plenty of fiber, so it actually keeps you full. Scoop it into tortillas, pile it on a salad, serve it over rice or eat it straight from a bowl. It also makes amazing meal-prep lunches for the week. 🛒 Ingredients 1 tablespoon olive oil 1 lb 93% lean ground turkey 1 small yellow onion, diced 1 red or green bell pepper, diced 2 cloves garlic, minced 2 tablespoons reduced-sodium taco seasoning (or 1 packet) 1 can (15 oz) pinto or black beans, drained and rinsed 1 can (10 oz) diced tomatoes with green chiles, undrained 1 cup frozen or canned corn (drained) 1/2 cup water or low-sodium chicken broth 3/4 cup shredded reduced-fat Mexican-style cheese 1/2 cup plain nonfat Greek yogurt (for topping, instead of sour cream) Fresh cilantro, sliced green onions and lime wedges, for serving Optional for serving: high-fiber tortillas, brown rice, cauliflower rice, romaine lettuce cups, sliced avocado or salsa 👩🏻🍳 Instructions Brown the Turkey: Heat the olive oil in a large (12-inch) skillet over medium-high heat. Add the ground turkey and cook for 5 to 6 minutes, breaking it into small crumbles, until browned and no longer pink. Add the Veggies: Add the onion and bell pepper and cook for 3 to 4 minutes, until softened. Stir in the garlic and cook for 30 seconds, until fragrant. Season: Sprinkle in the taco seasoning and stir until the turkey and veggies are evenly coated. Simmer: Add the beans, diced tomatoes with green chiles (with their juices), corn and water or broth. Bring to a simmer, then lower the heat to medium-low and cook for 6 to 8 minutes, stirring now and then, until the sauce thickens. Get Melty: Sprinkle the cheese evenly over the top, cover the skillet and cook for 1 to 2 minutes, until the cheese melts. Top and Serve: Finish with a dollop of Greek yogurt, fresh cilantro, green onions and a squeeze of lime. Serve on its own or with your favorite taco fixings. Nutritional Information A Quick Note: The following nutritional information is an estimate for 1 serving (1/4 of the skillet) including 2 tablespoons of Greek yogurt, without tortillas, rice or avocado. Actual values can vary based on the specific brands and ingredients you use. Calories: ~430 kcal Protein: ~36 g Fat: ~17 g Carbohydrates: ~32 g Fiber: ~7 g Sugar: ~6 g Tips & Swaps Swap the protein: Lean ground chicken or 95% lean ground beef work great here, too. Make it gluten-free: Use a taco seasoning labeled gluten-free and serve it in corn tortillas or over rice. Turn up the heat: Add a diced jalapeño with the onion, or use a “hot” can of tomatoes and green chiles. Meal prep: Divide into containers and keep in the fridge for up to 4 days. Add the yogurt and fresh toppings when you’re ready to eat. Freezer friendly: Freeze cooled portions (without toppings) for up to 3 months and reheat on the stove or in the microwave. One pan, 30 minutes and big taco flavor with every bite. Taco Tuesday is officially sorted. Enjoy, ladies! Check out these items! SHOP NOW! SHOP NOW! SHOP NOW! SHOP NOW! SHOP NOW! SHOP NOW! Share: Facebook Pinterest Email SHOP NOW! SHOP NOW! Social Media Facebook-f Youtube Pinterest Instagram Tiktok Most Popular Get The Latest Updates Subscribe To Our Weekly Newsletter No spam, notifications only about new post, updates. Categories Related Posts