
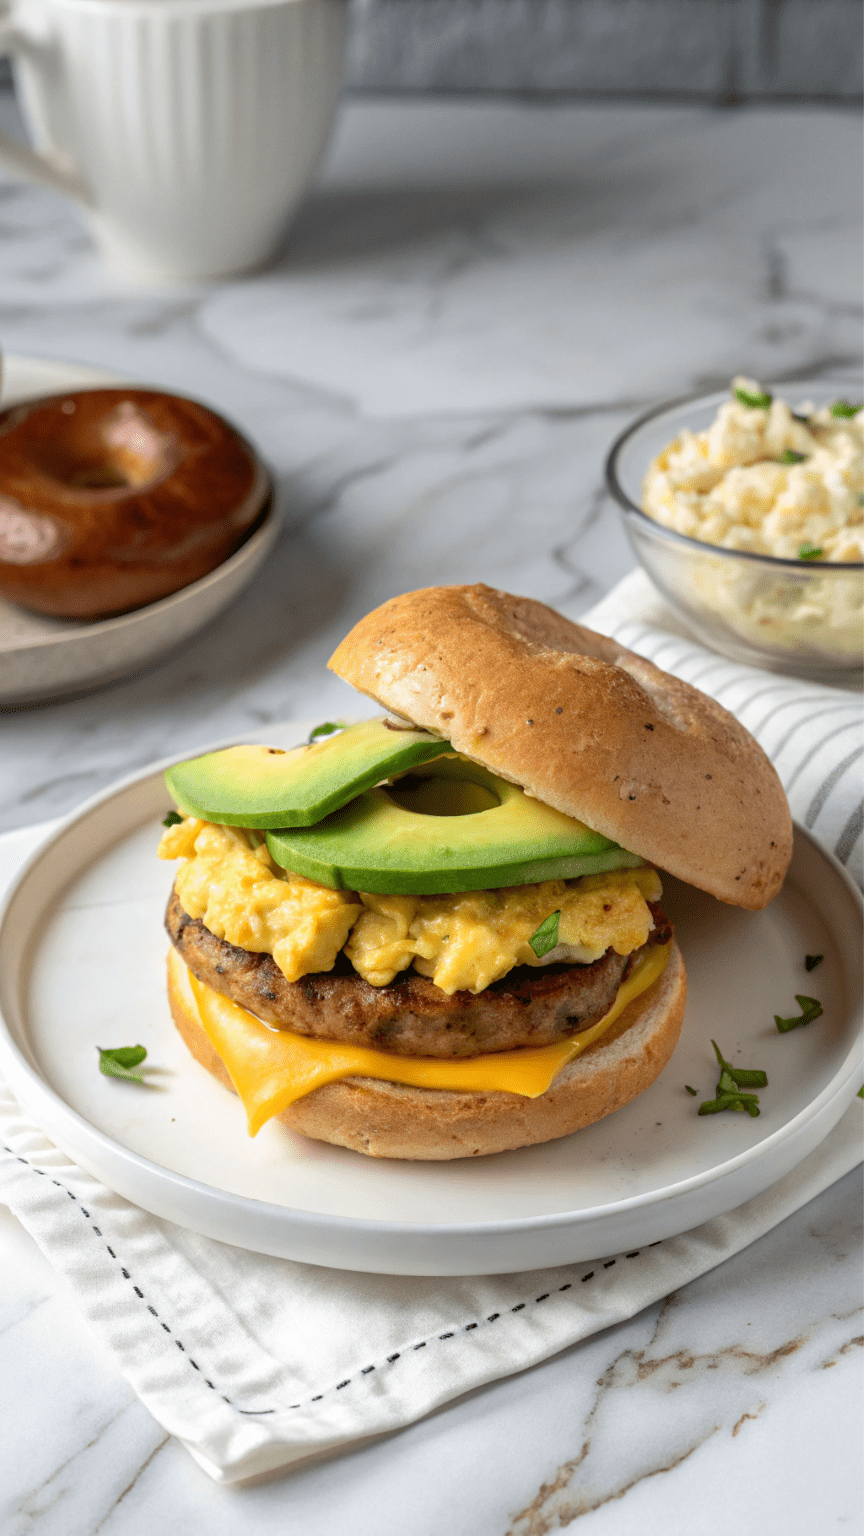
Upgrade your morning with the ultimate high-protein breakfast bagel! This recipe stacks a toasted bagel with a cheesy cottage cheese egg scramble, savory sausage, and creamy avocado for over 40g of protein.
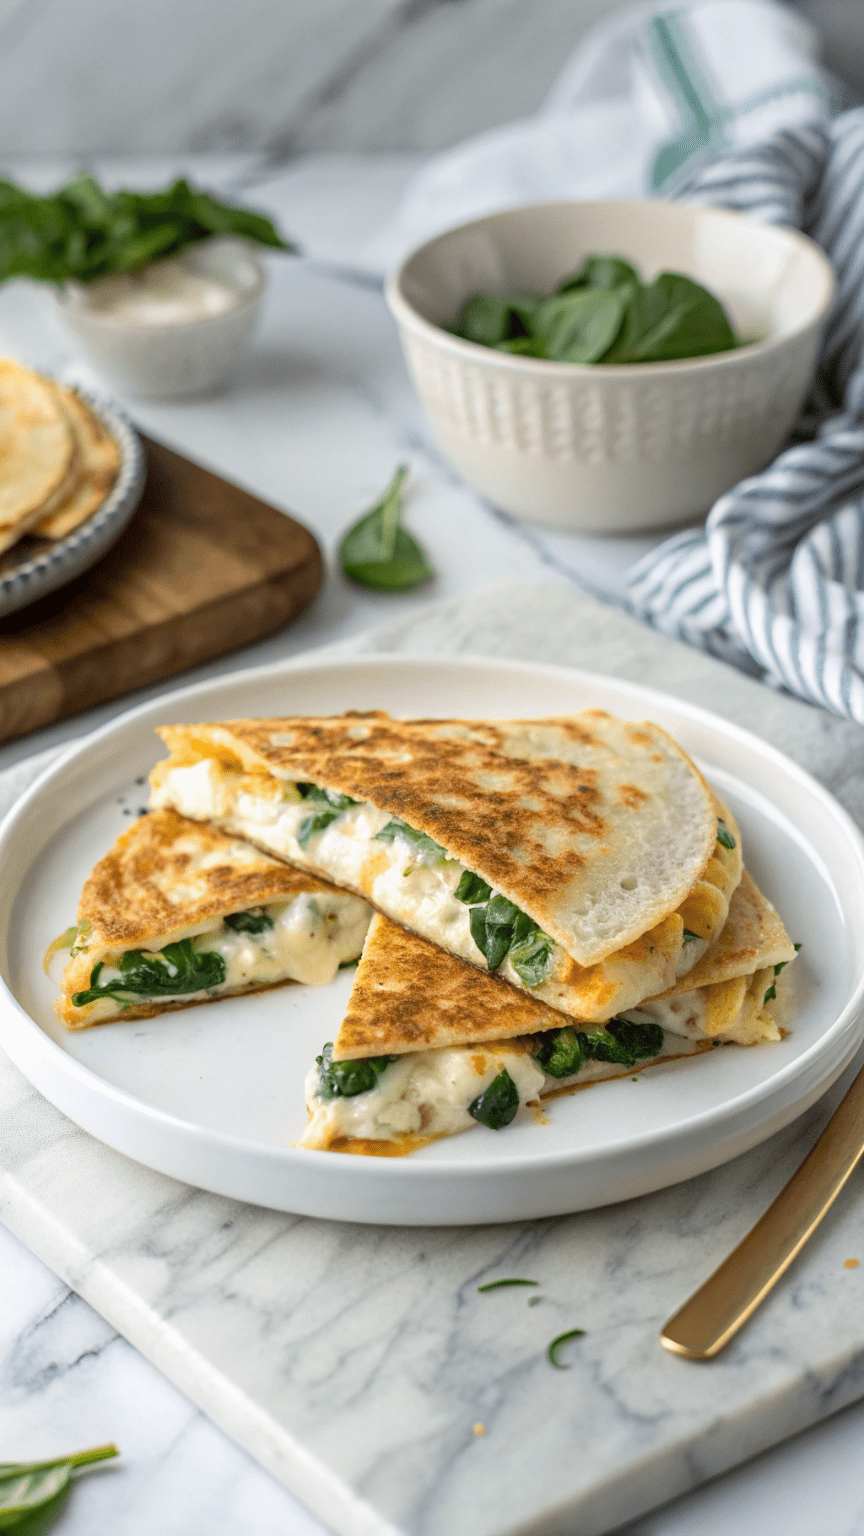
High-Protein Cheesy Spinach & Egg White Quesadilla
Ditch boring breakfasts! Make this high-protein Cheesy Spinach & Egg White Quesadilla in under 10 minutes. A healthy, delicious, and easy way to fuel your busy morning.
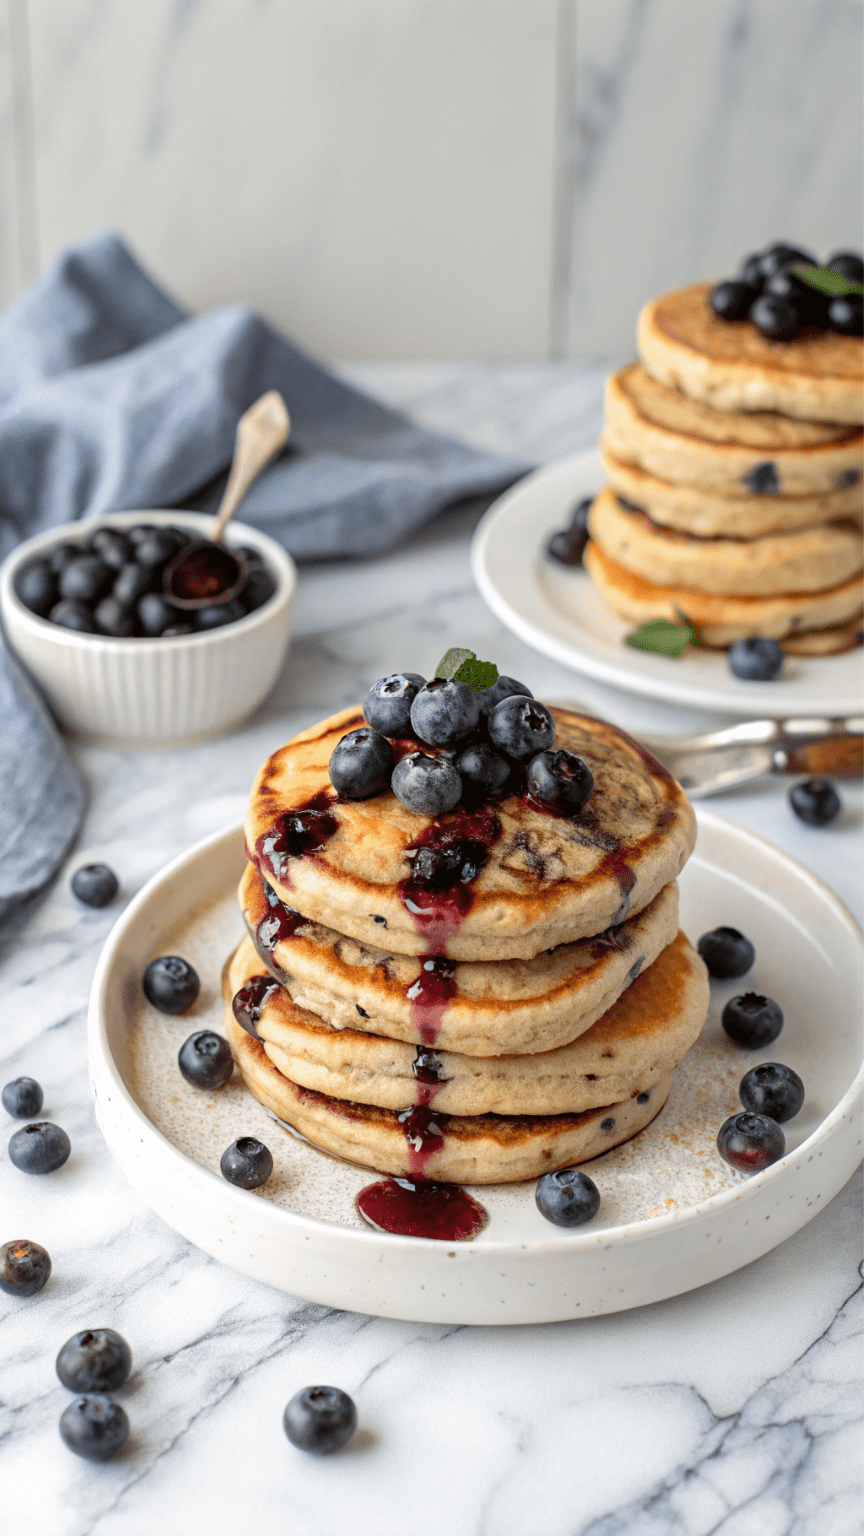
Fluffy Vegan Blueberry Protein Pancakes
Start your day strong with the best vegan blueberry protein pancakes! This easy, fluffy recipe is packed with over 25g of plant-based protein and bursting with juicy blueberries. Perfect for a healthy, satisfying breakfast.
Sheet-Pan Lemon-Herb Chicken & Asparagus
Need a healthy and simple dinner idea? Try this sheet-pan lemon-herb chicken with asparagus and potatoes. A complete, balanced, and delicious meal all on one pan!
One-Pan Lemon & Herb Baked Feta with Veggies
Discover the magic of one-pan meals with this easy baked feta recipe! Creamy feta, roasted tomatoes, and lemon create a delicious vegetarian dinner with minimal cleanup.
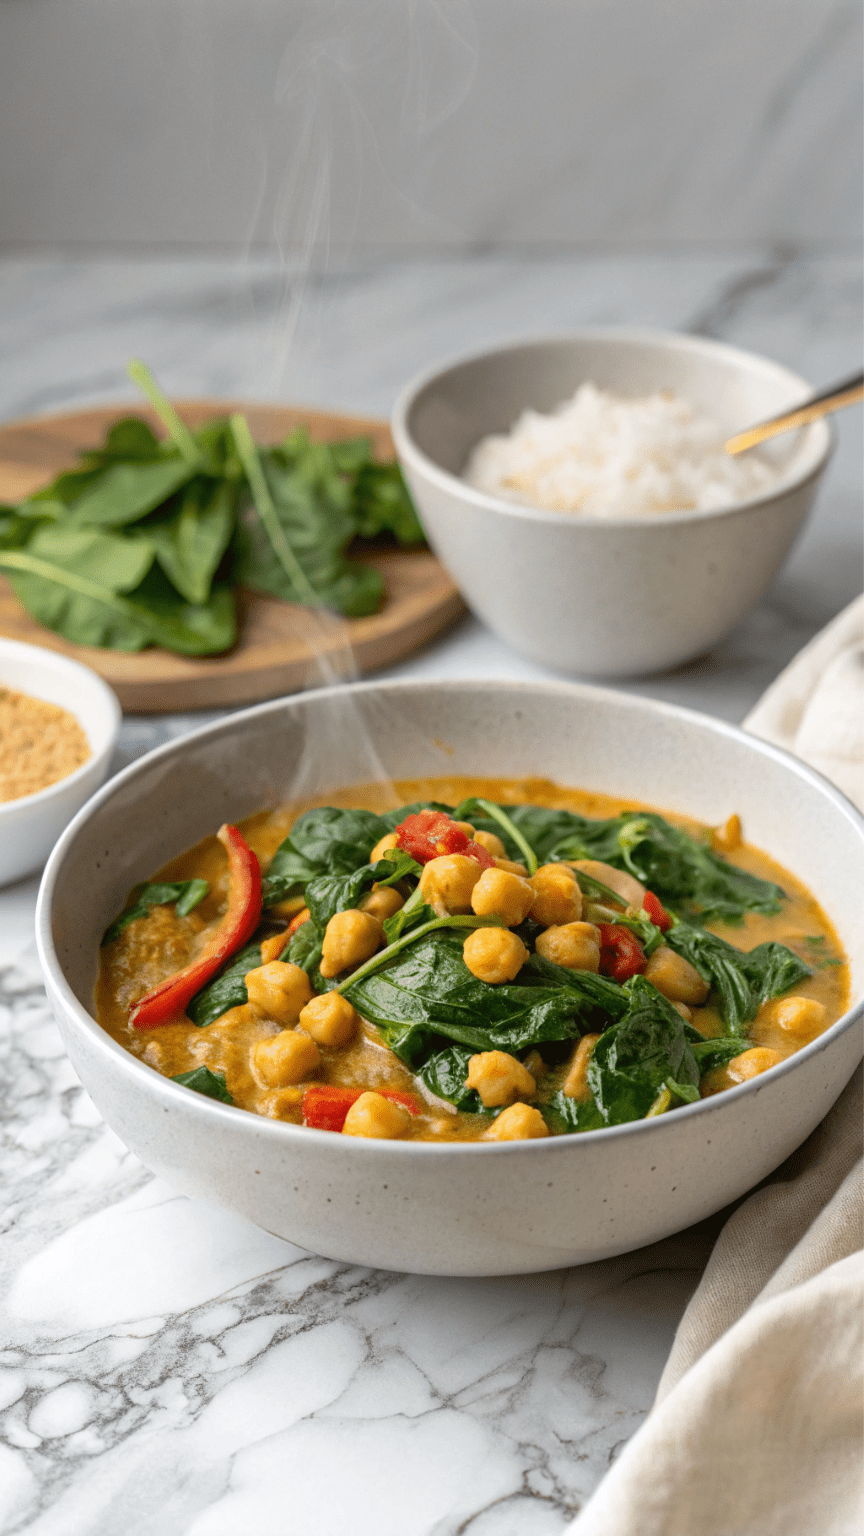
20-Minute Coconut Chickpea & Spinach Curry
Craving a fast and flavorful vegan meal? Make this creamy coconut chickpea and spinach curry in just 20 minutes! A healthy, one-pot recipe for the perfect weeknight dinner.
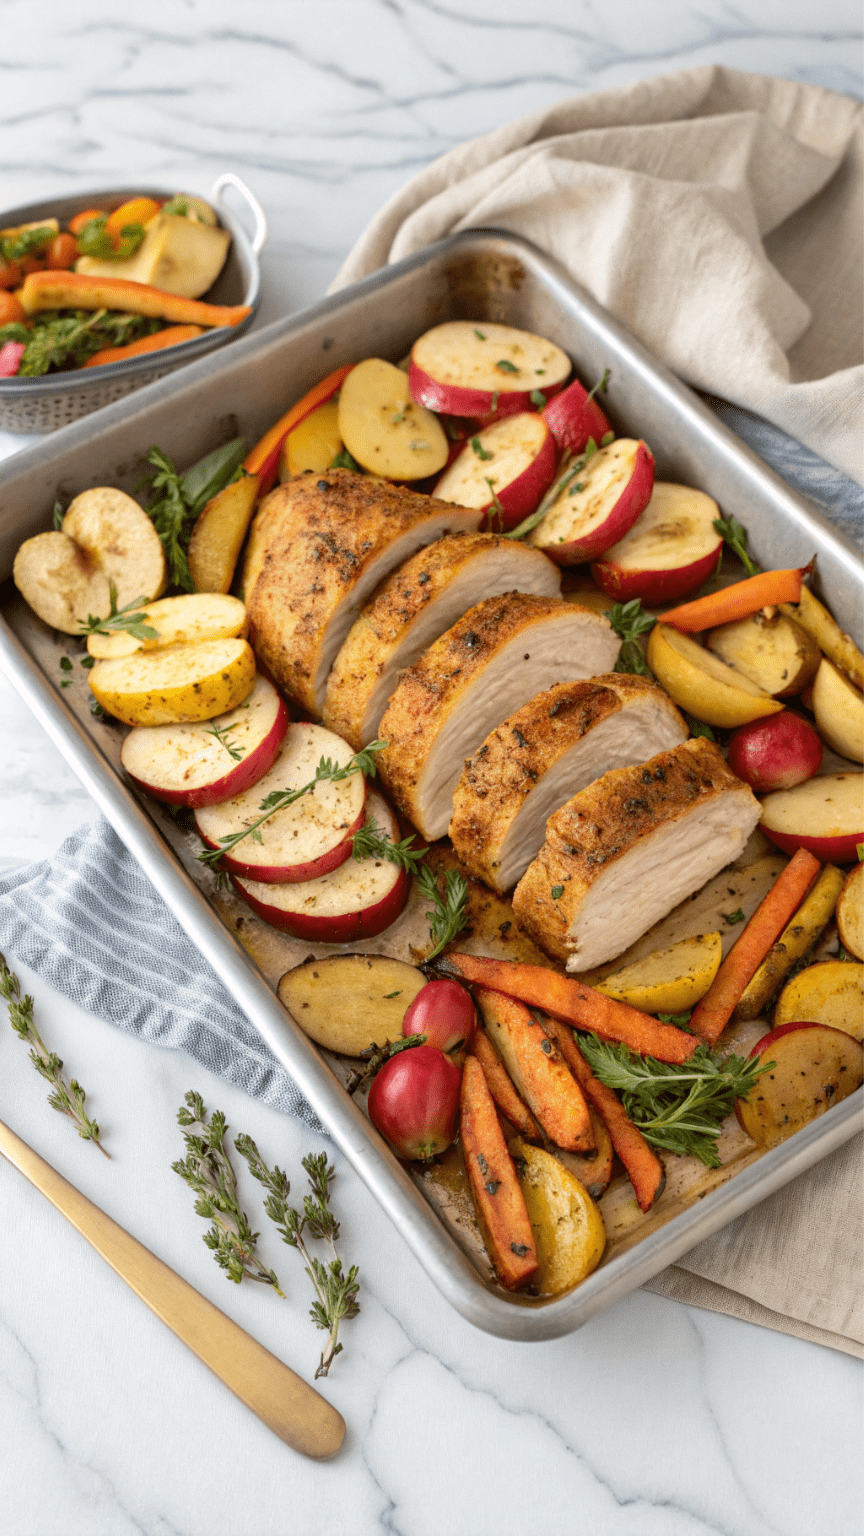
Sheet Pan Pork Tenderloin with Roasted Apples & Root Vegetables
Simplify your weeknight with this elegant Sheet Pan Pork Tenderloin recipe featuring roasted apples and root vegetables. A perfect one-pan meal with a delicious sweet and savory maple-mustard glaze. Healthy, easy, and impressive!

Mediterranean Chickpea & Halloumi Bake
Enjoy a taste of the Mediterranean with this easy one-pan Chickpea & Halloumi Bake! This healthy, gluten-free vegetarian recipe is packed with roasted vegetables, savory halloumi, and fresh herbs. Perfect for a quick weeknight dinner.
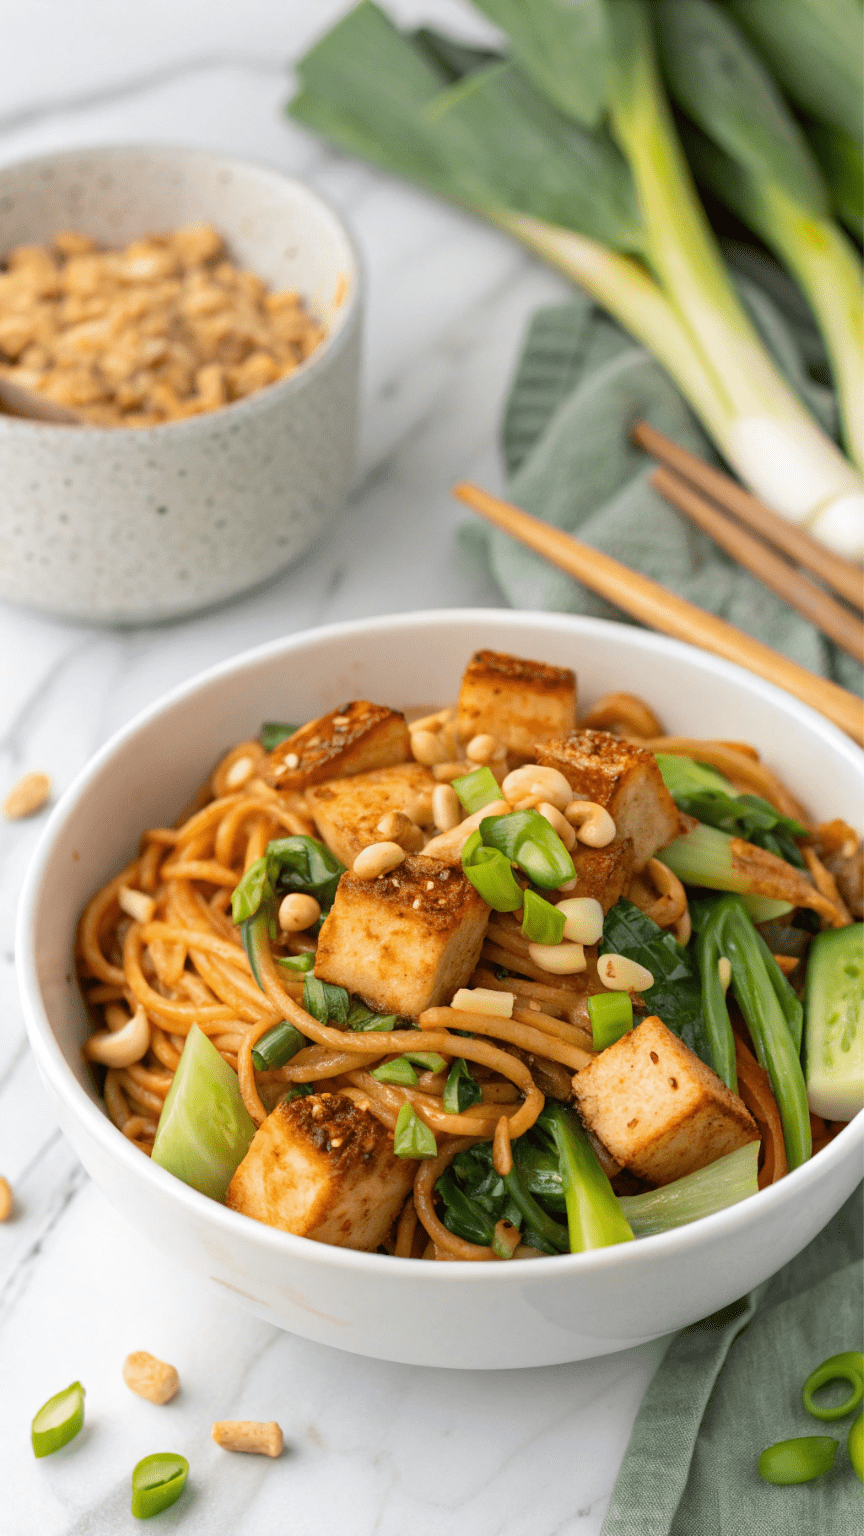
Spicy Peanut Noodles with Crispy Tofu & Bok Choy
Discover a delicious, high-protein vegan recipe for Spicy Peanut Noodles with Crispy Tofu & Bok Choy. This easy-to-make dish features a creamy, savory peanut sauce, perfectly crispy tofu, and fresh vegetables for a satisfying weeknight meal. Get the full recipe and nutritional info here!
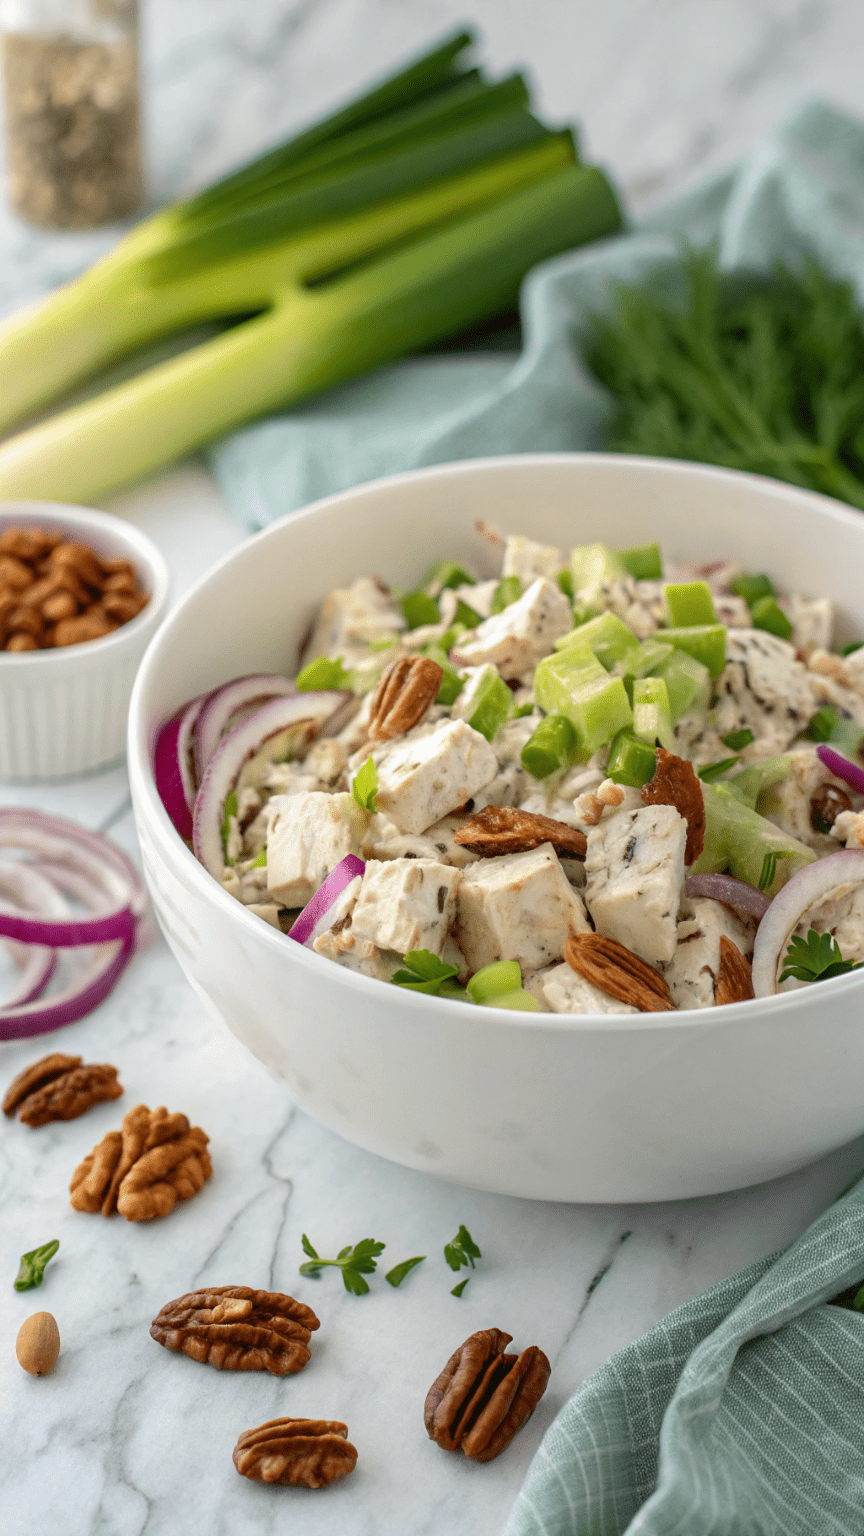
Easy & Classic Chicken Salad
Whip up the best classic chicken salad with this quick and easy recipe! Perfect for lunch, light dinners, and meal prep. Get the simple steps for a creamy, flavorful, and satisfying dish.
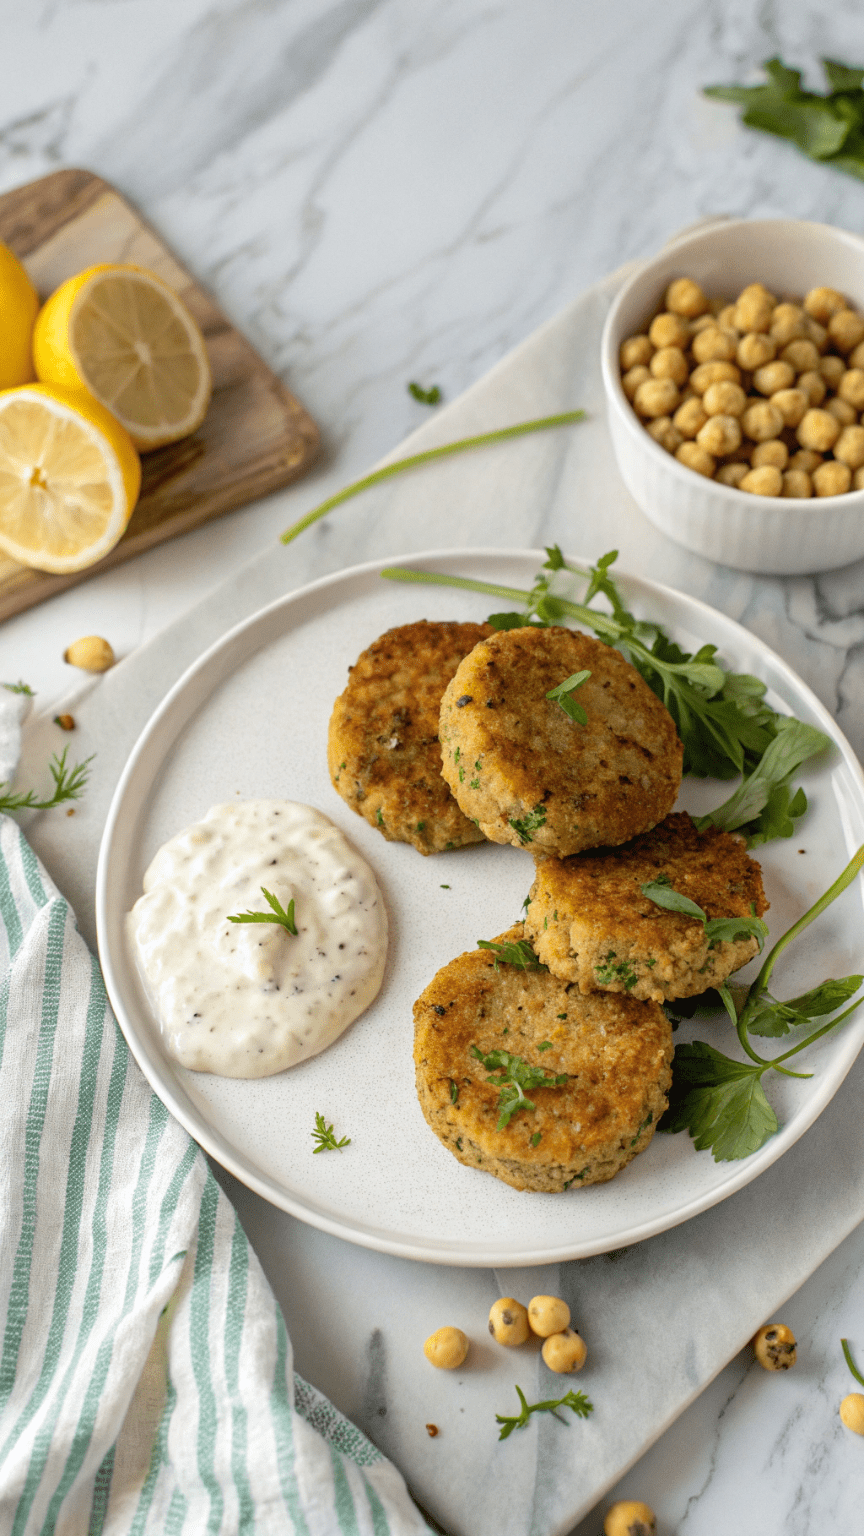
Mediterranean Lemon Chickpea Patties with Yogurt Sauce
Craving a healthy and flavorful meal? Try our easy Mediterranean lemon chickpea patties! Packed with plant-based protein and fresh herbs, and served with a creamy yogurt sauce. Get the simple recipe!
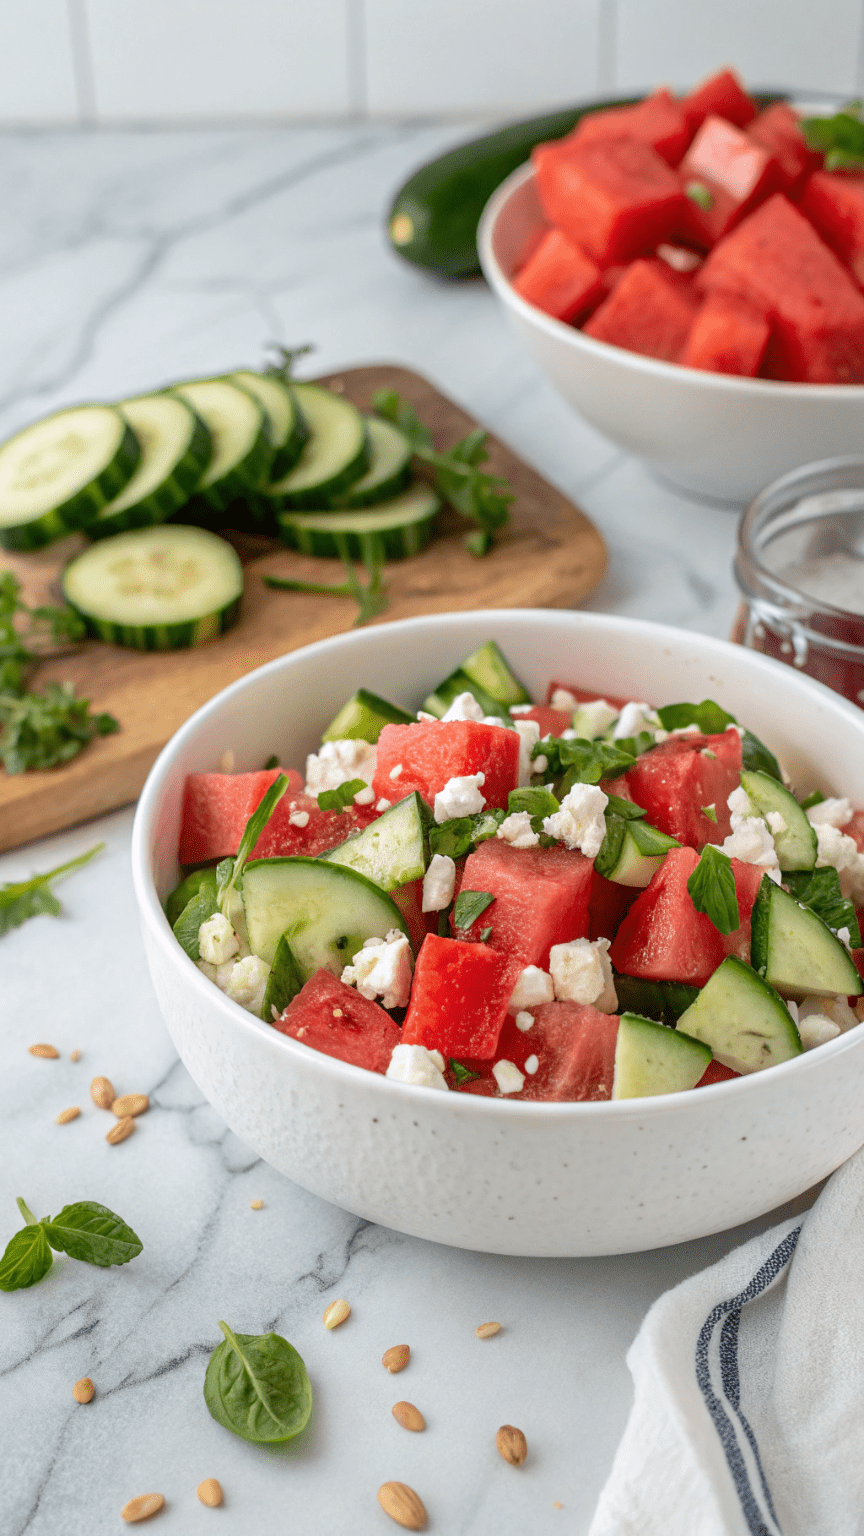
Easy Vegan Watermelon Salad with Fresh Mint
Stay cool with this refreshing vegan watermelon salad recipe! A simple mix of sweet watermelon, cucumber, fresh mint, and a tangy lime dressing. Healthy, delicious, and ready in 10 minutes.
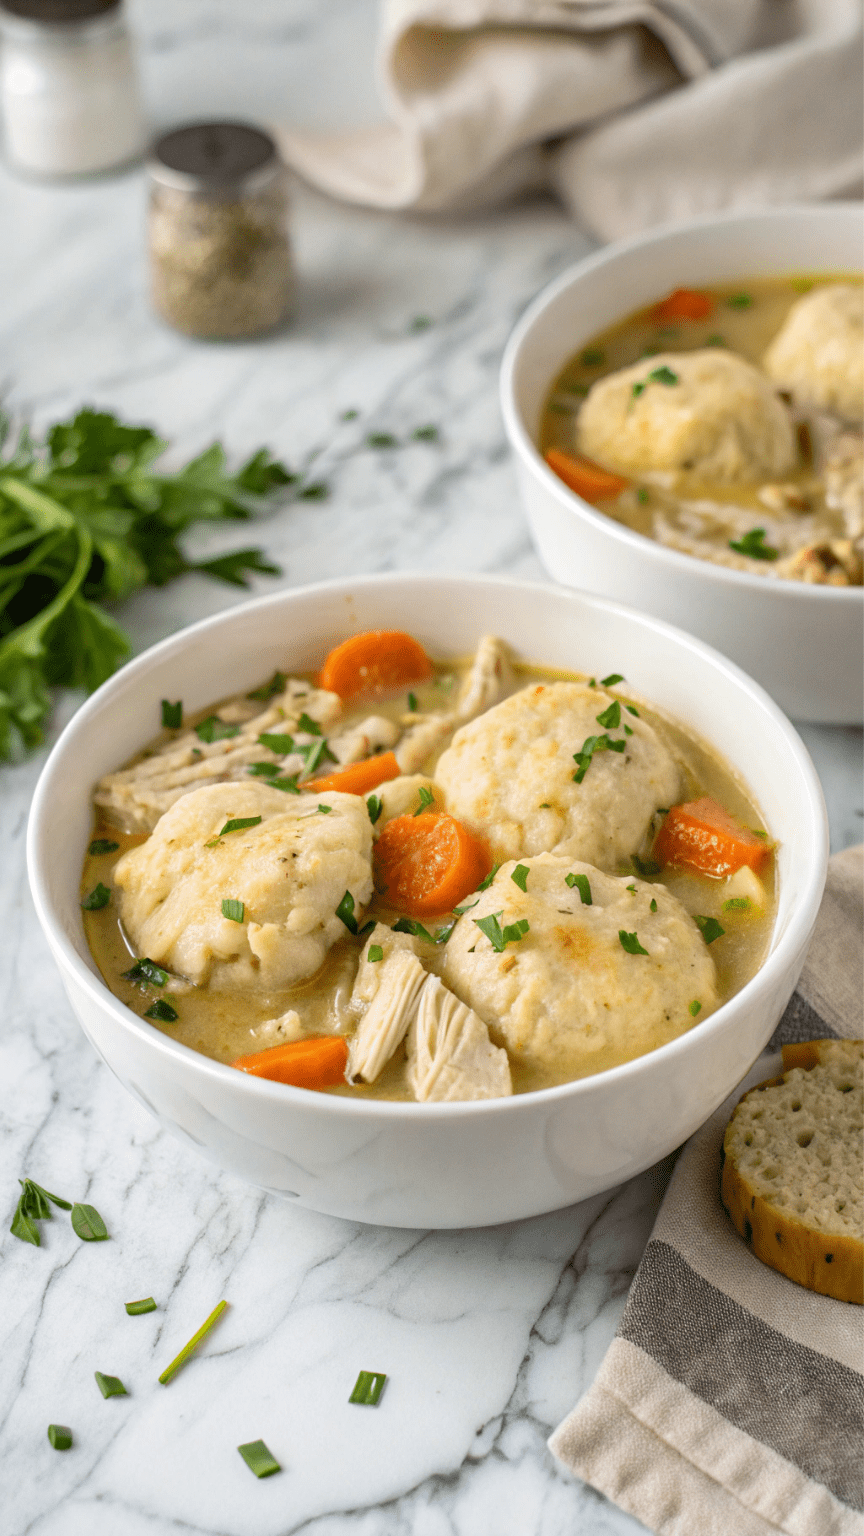
Homestyle Chicken and Dumplings
Enjoy cozy comfort food with this Homestyle Chicken and Dumplings recipe. Packed with tender chicken, veggies, and fluffy dumplings in a savory broth—perfect for family dinners and cold nights.
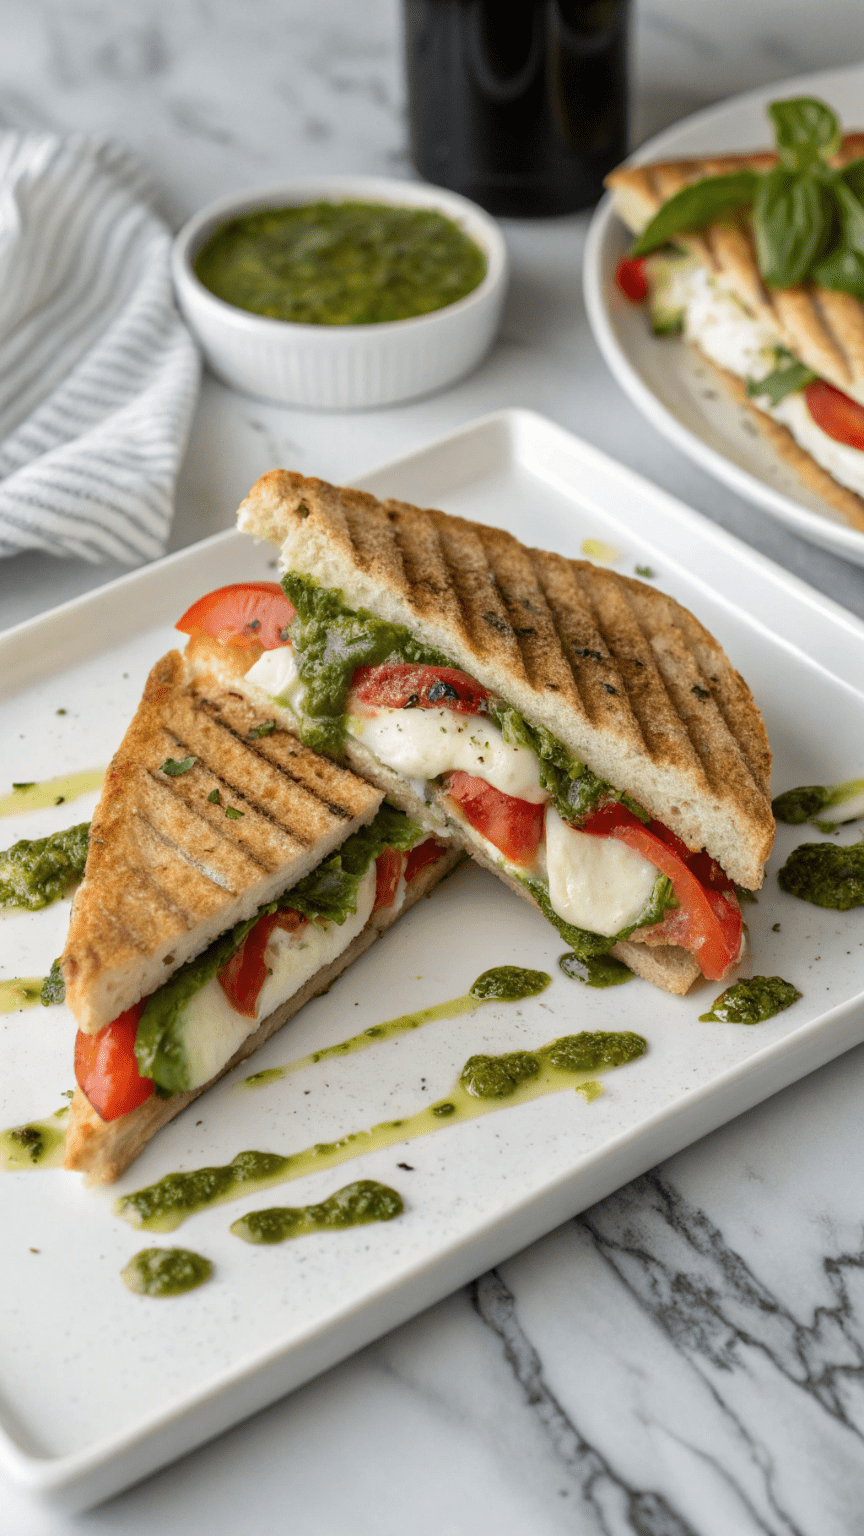
Caprese Panini with Pesto
Enjoy a gourmet twist on a classic Italian favorite with this Caprese Panini with Pesto. Perfectly grilled sourdough, fresh mozzarella, tomatoes, and basil pesto make it an easy, healthy vegetarian lunch idea.
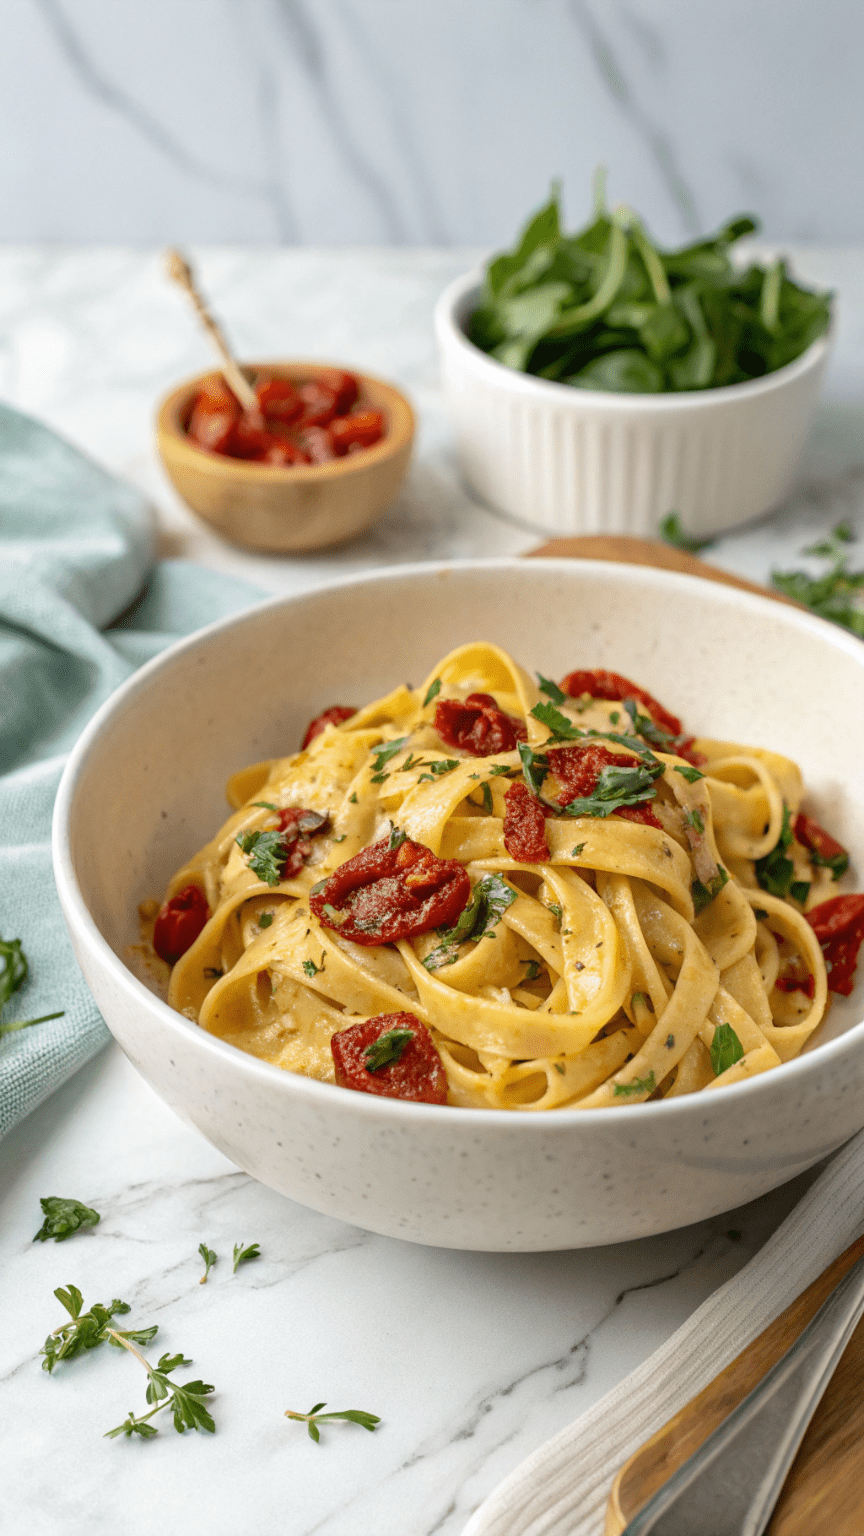
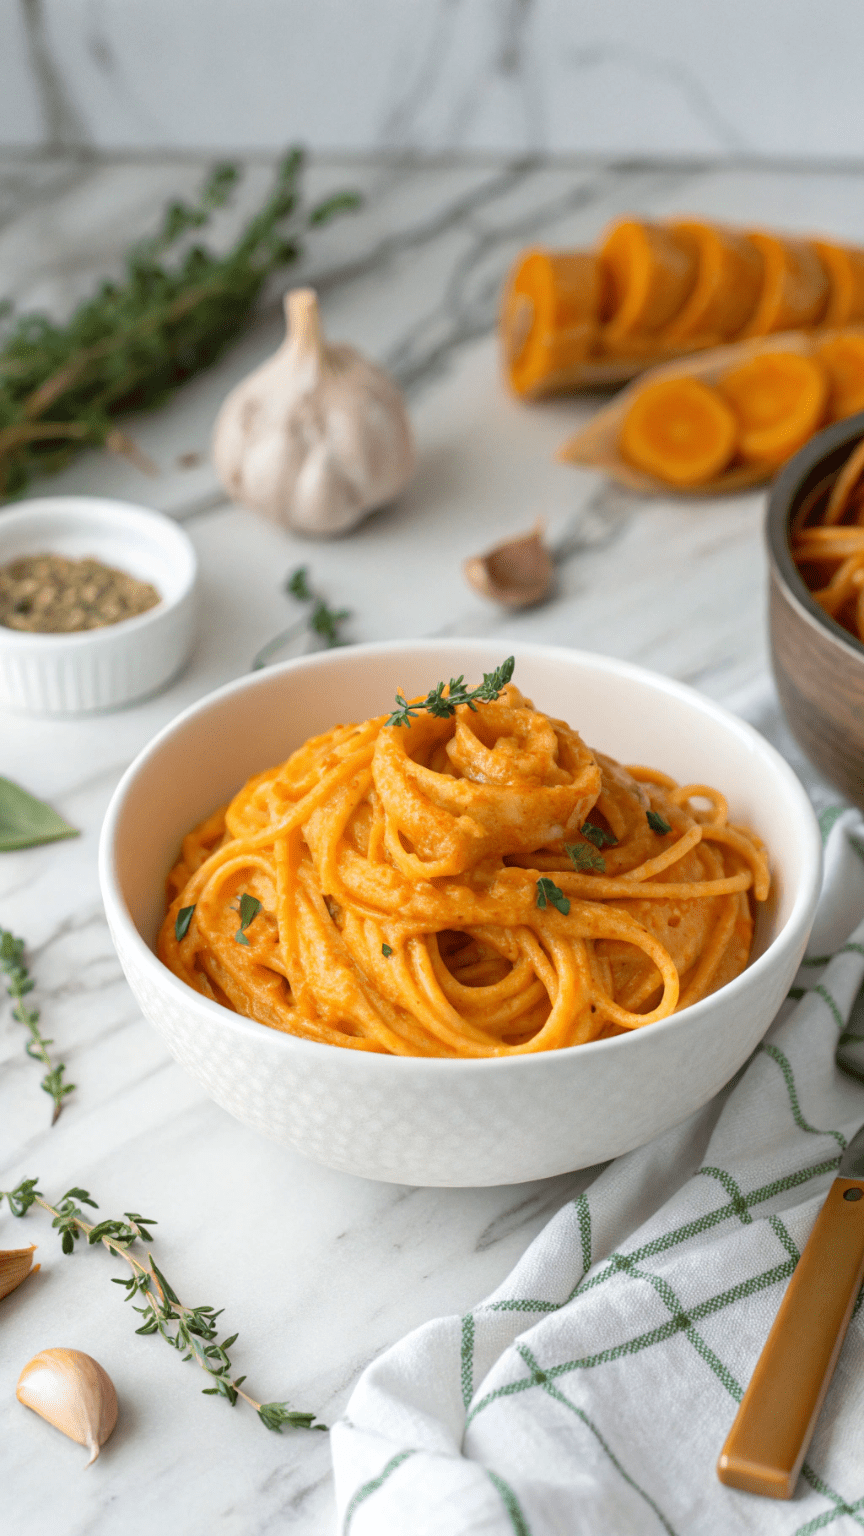
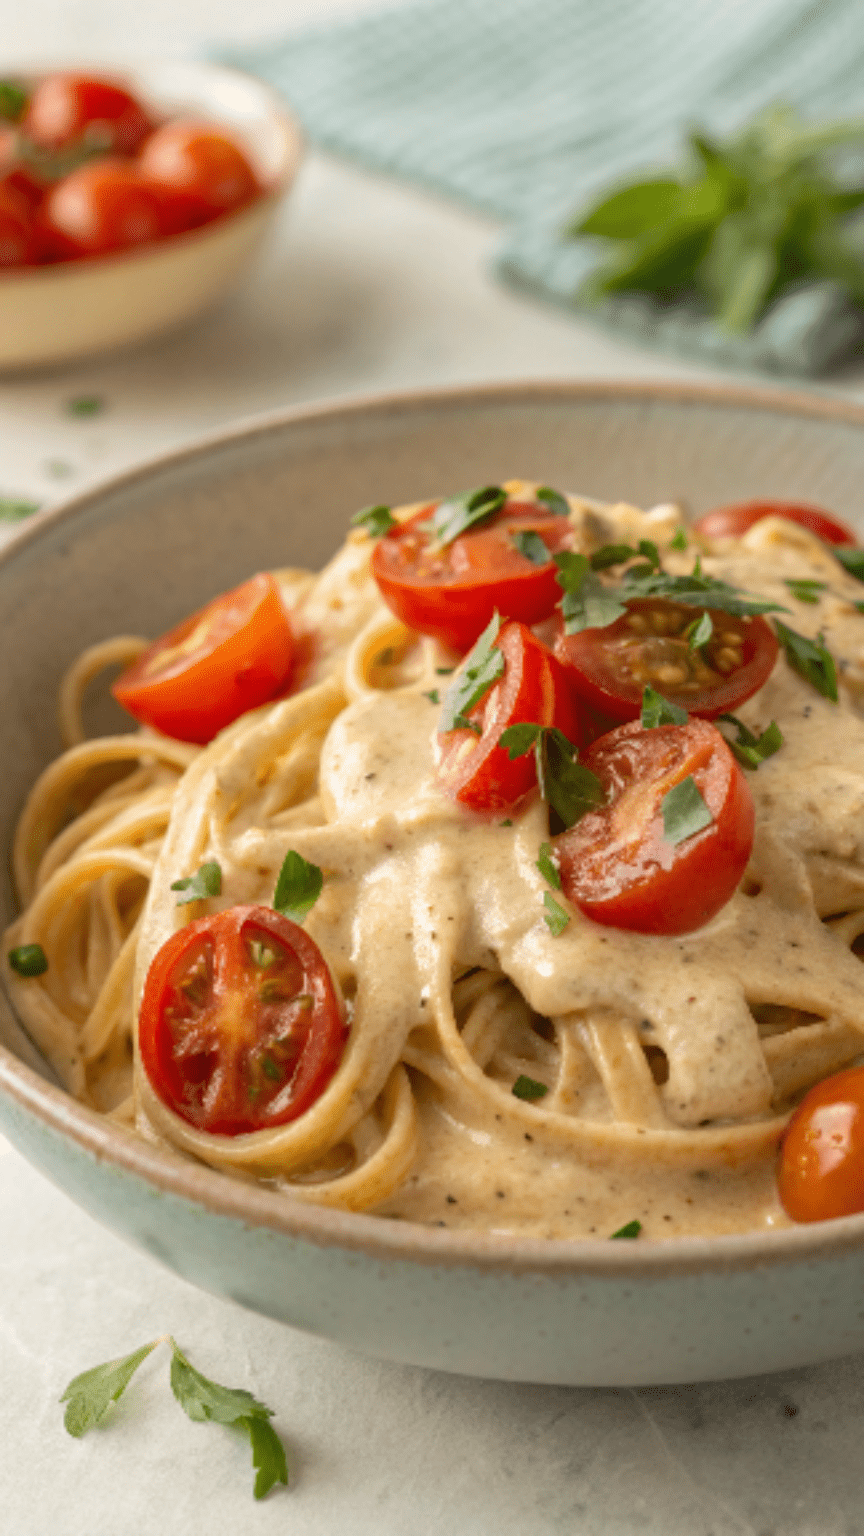
Vegan Creamy Tuscan Sun-Dried Tomato Pasta
This Creamy Tuscan Sun-Dried Tomato Pasta combines garlic-Parmesan sauce, spinach, and sun-dried tomatoes for a rich, comforting meal you can make in 30 minutes. Perfect for date night or a cozy dinner at home.
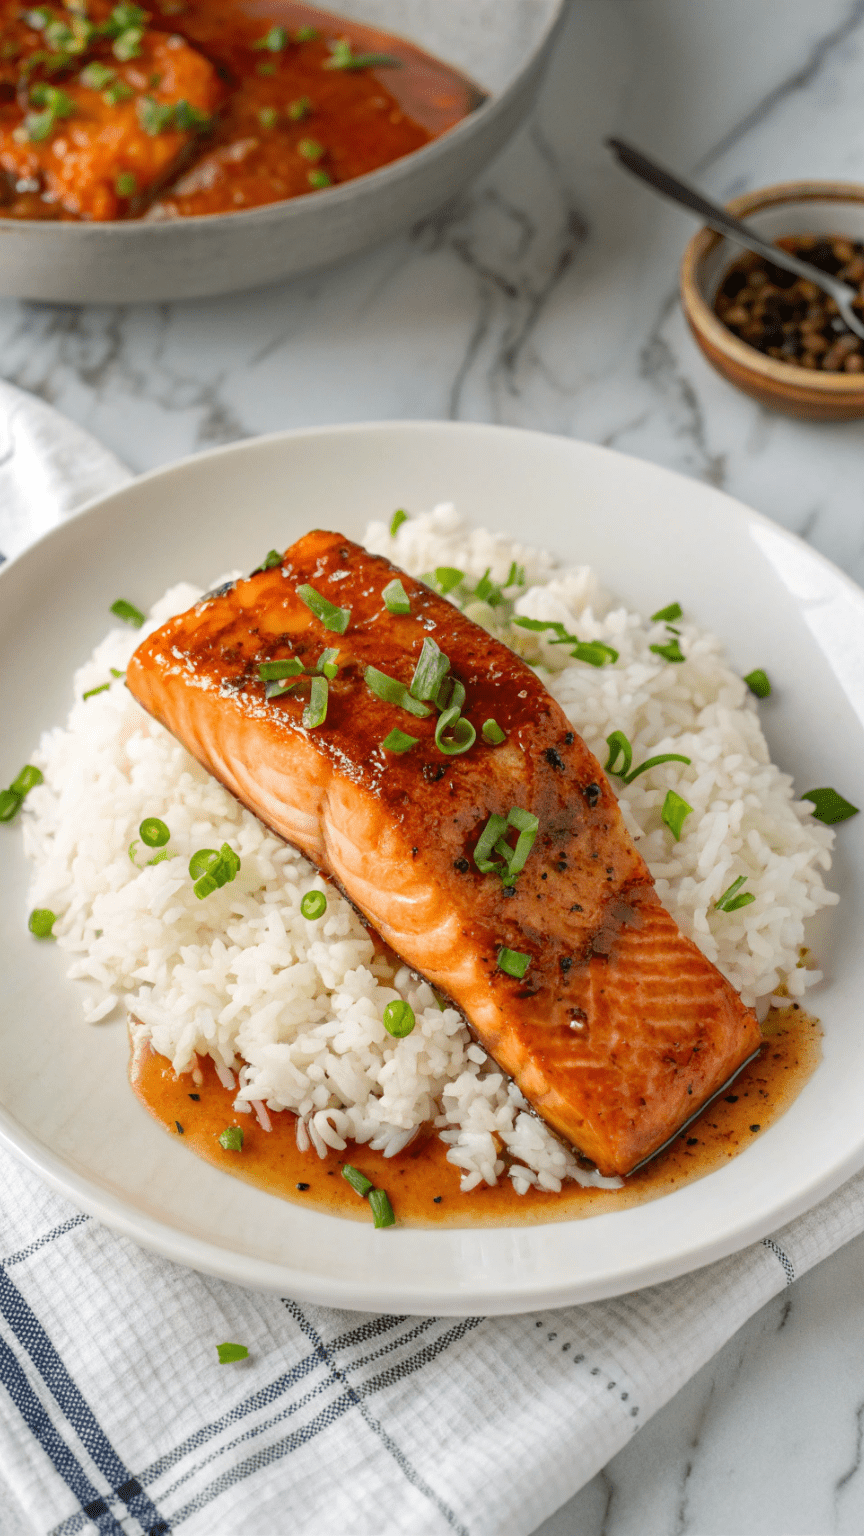
Honey Garlic Salmon with Rice
This quick and easy honey garlic salmon with rice is sweet, savory, and packed with protein. A healthy weeknight dinner ready in under 30 minutes!
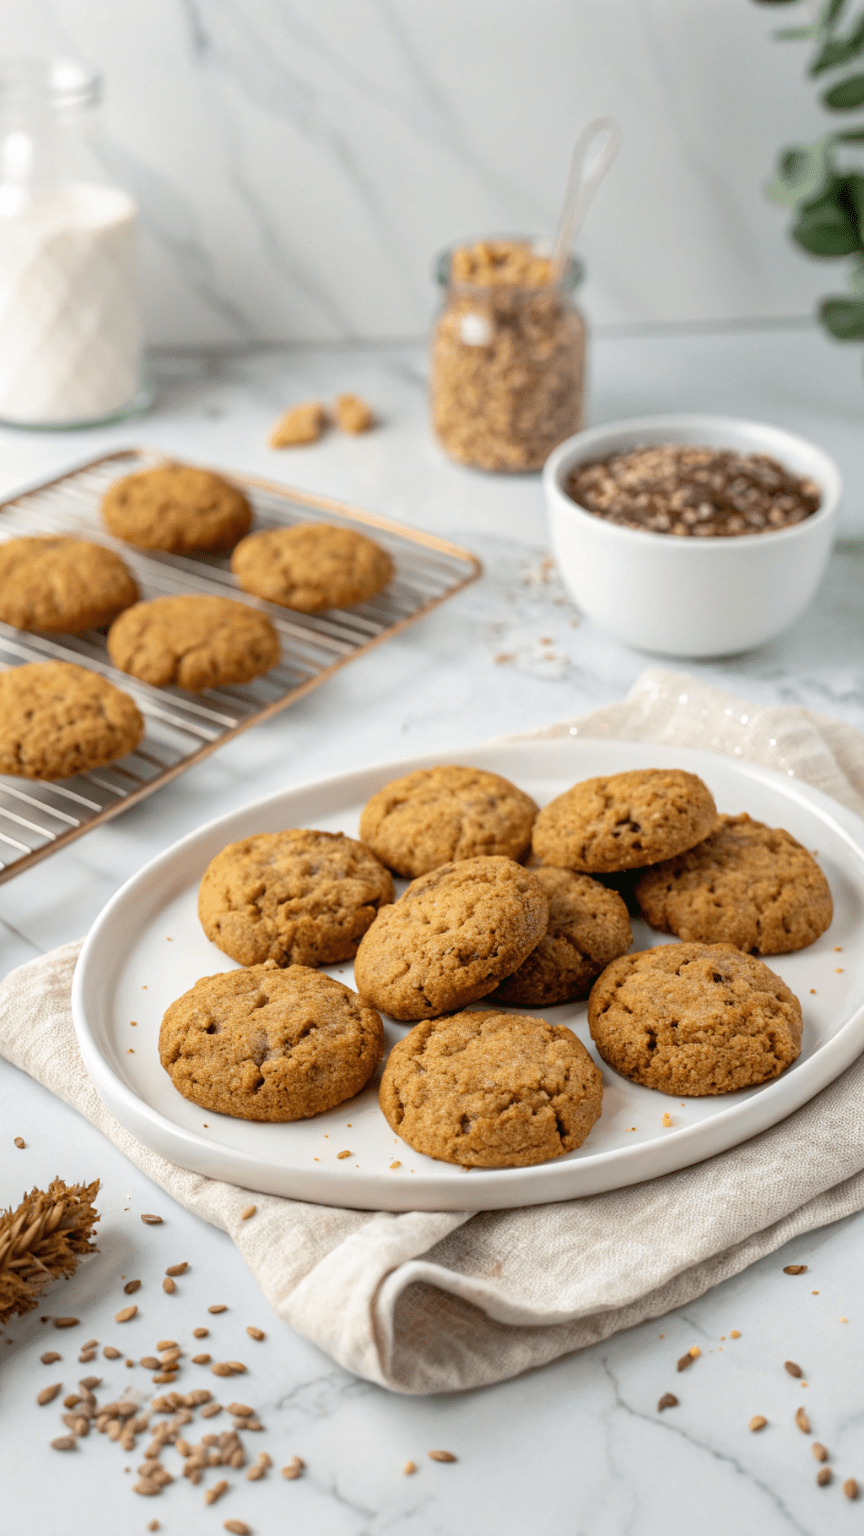
Flaxseed Cookies
hese chewy flaxseed cookies are a healthy, fiber-packed treat perfect for snacking. Made with simple ingredients, they’re gluten-free, naturally sweetened, and delicious!

Vegan Chili Soup
This easy vegan chili is packed with protein-rich beans, veggies, and bold spices. Perfect for a cozy, healthy, one-pot meal. Gluten-free, dairy-free, and meal-prep friendly!
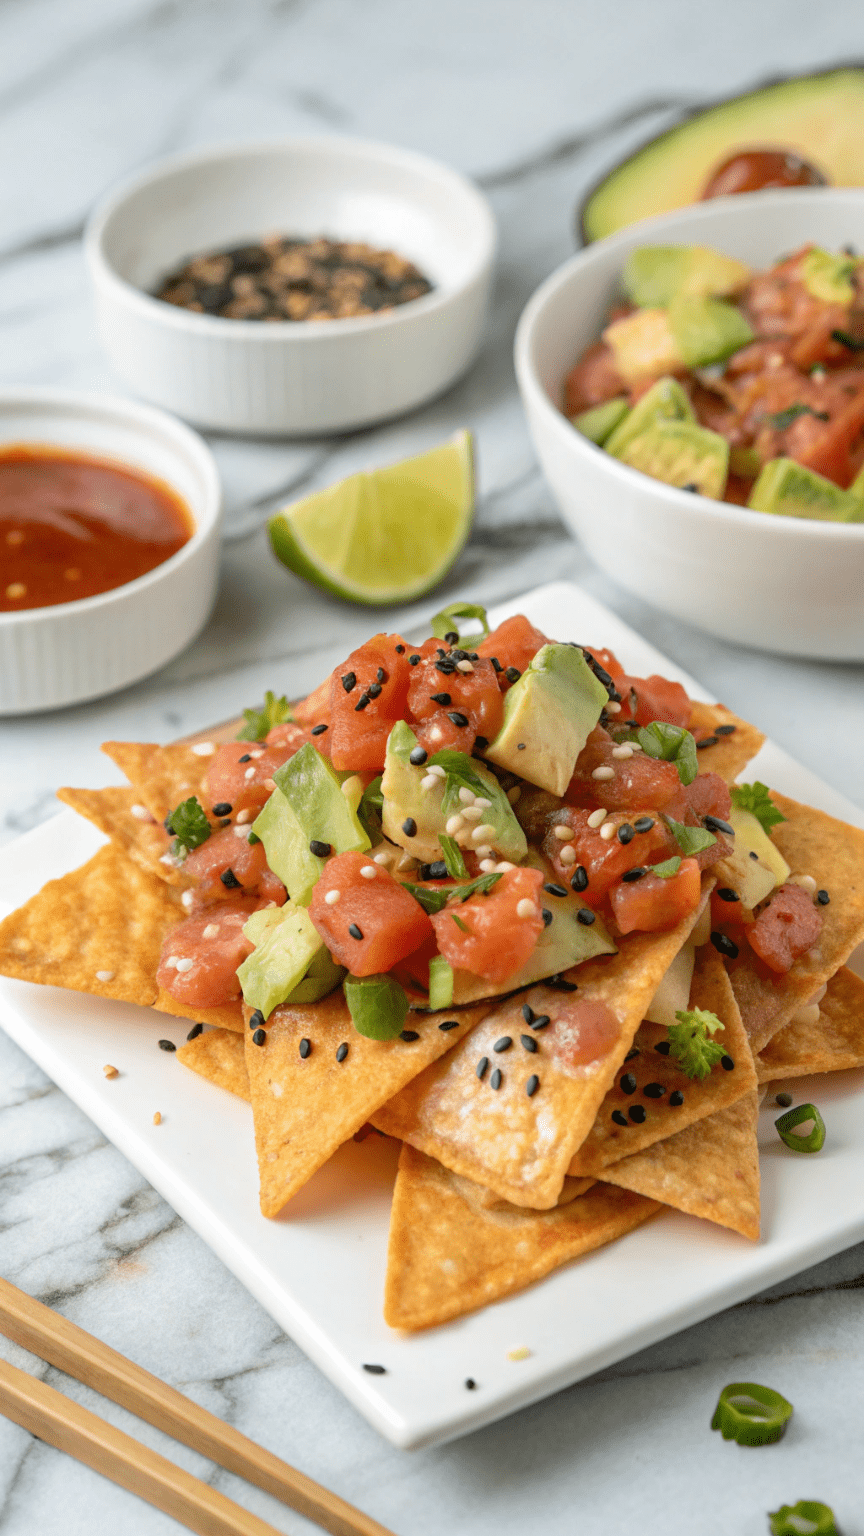
Spicy Tuna Poke Nachos
Try these Spicy Tuna Poke Nachos for a bold, healthy twist on your favorite appetizer! Packed with protein, omega-3s, and fresh toppings, it’s the perfect fusion of crunch and spice.
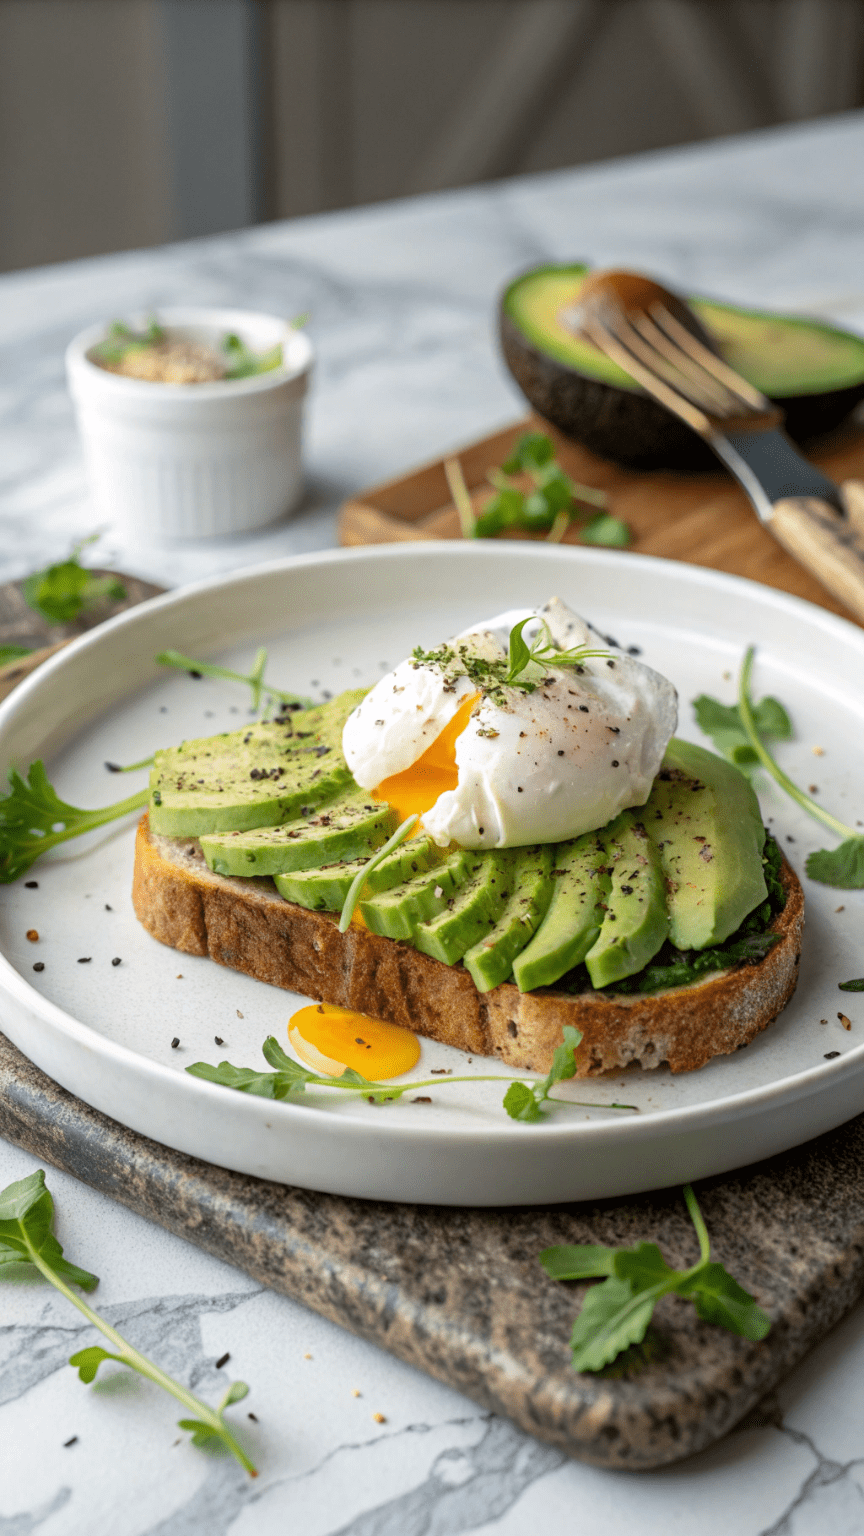
Avocado Toast with Poached Egg
Start your day with this nutritious and delicious Avocado Toast with Poached Egg. Packed with healthy fats, protein, and fiber, it’s the perfect balanced breakfast or brunch.
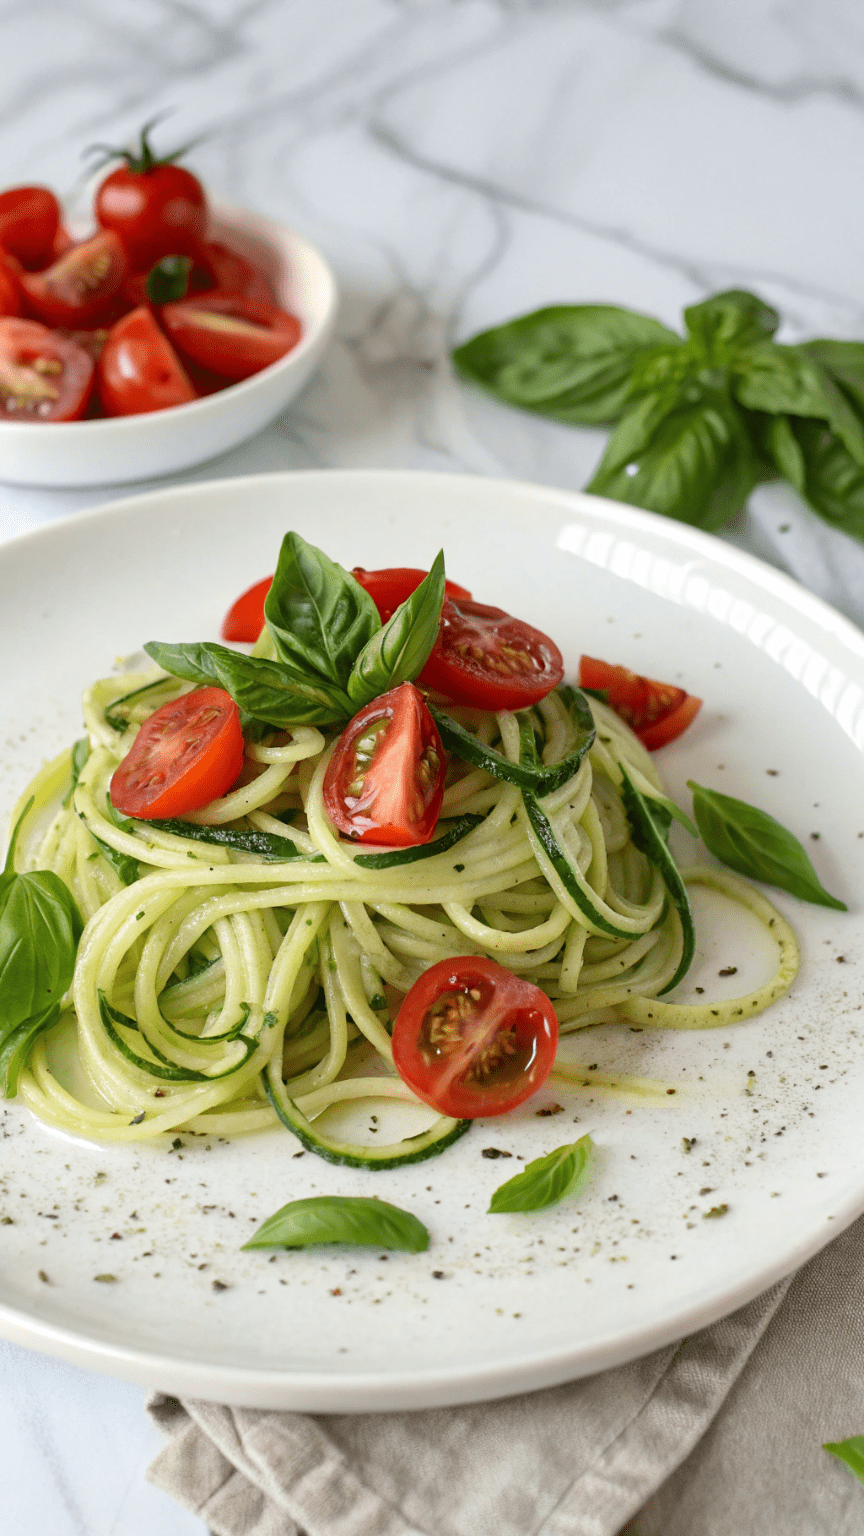
Zucchini Noodles with Tomato & Basil
Enjoy a light, fresh, and low-carb meal with Zucchini Noodles tossed in juicy tomatoes, garlic, and fresh basil. A healthy, gluten-free alternative to pasta that’s quick and full of flavor!
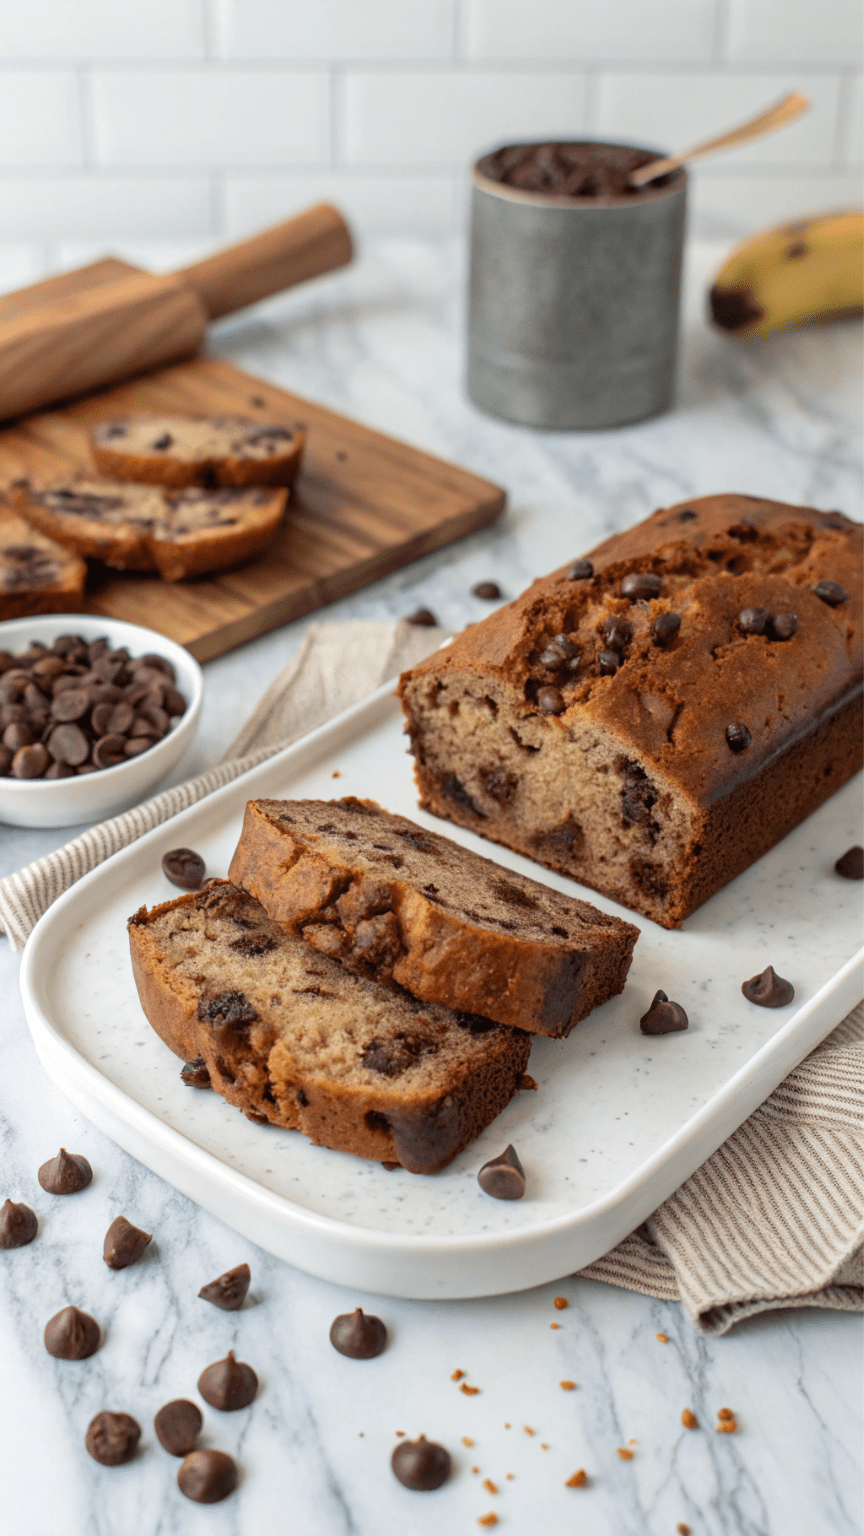
Chocolate Chip Banana Bread (Gluten-Free & Dairy-Free)
This Healthy Chocolate Banana Bread is rich, moist, and made with wholesome ingredients like oats, bananas, and cocoa powder. Perfect for a nutritious snack or guilt-free dessert!
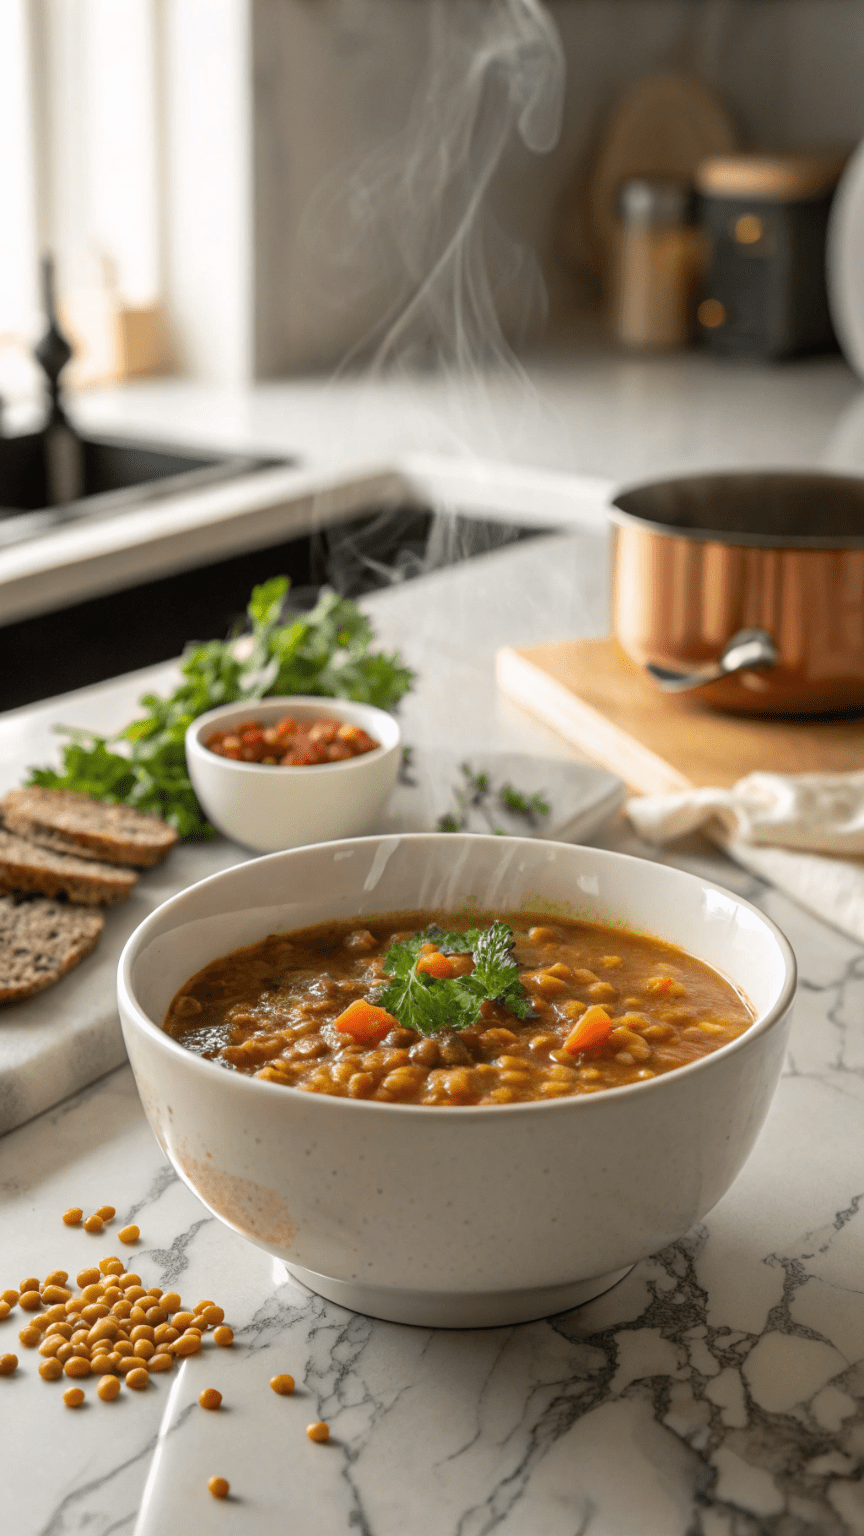
10-Minute Lentil Soup
This hearty and healthy 10-minute lentil soup is vegan, protein-packed, and perfect for busy weeknights. Wholesome, comforting, and ready in a flash!
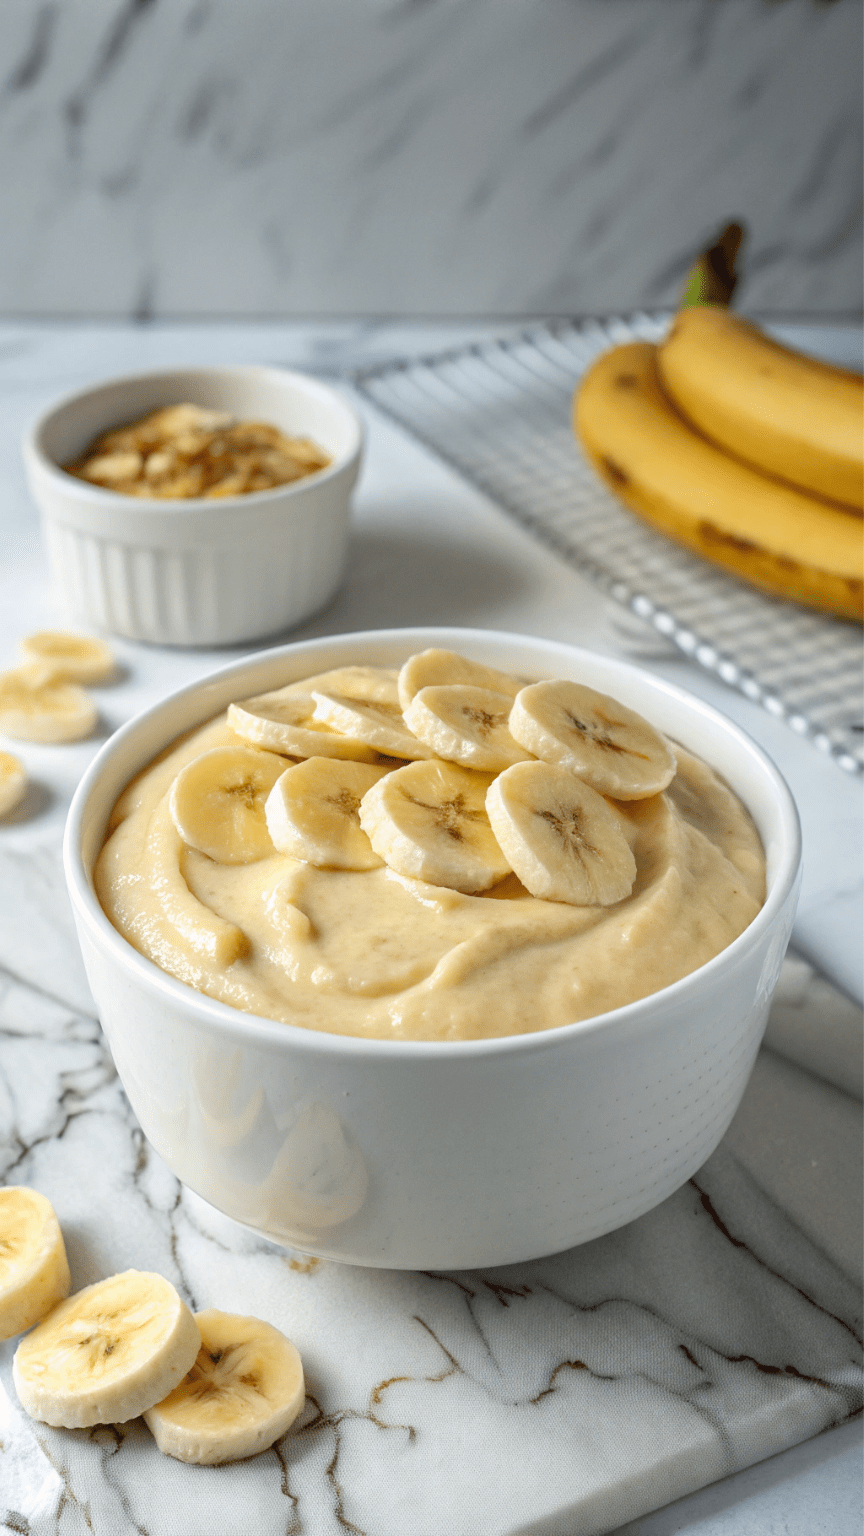
Vegan Banana Pudding
This creamy Vegan Banana Pudding is dairy-free, egg-free, and full of nostalgic flavor. Made with plant-based ingredients, it’s the perfect comfort dessert for any occasion.
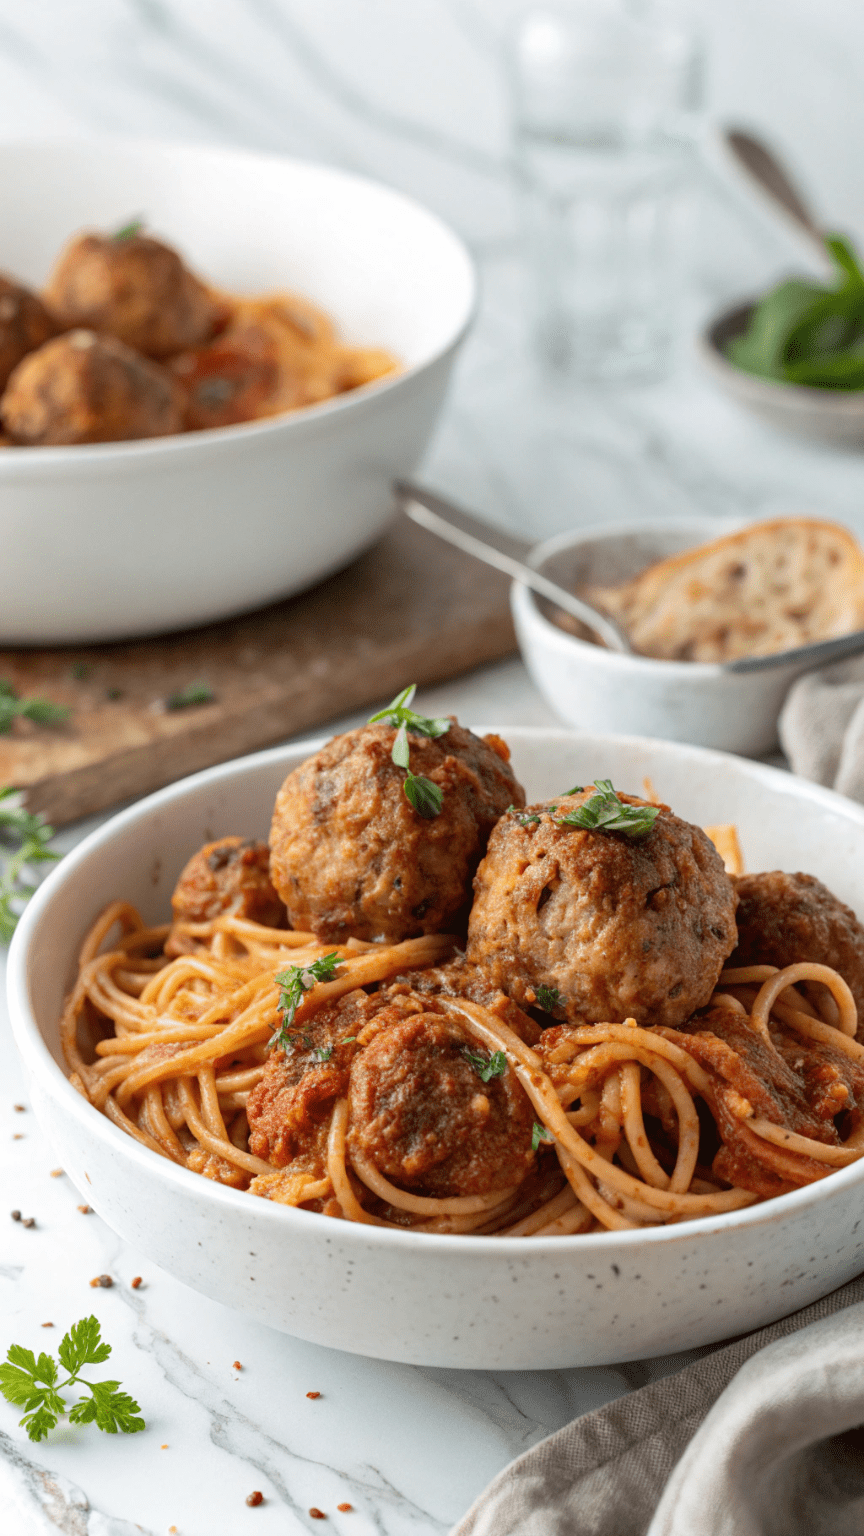
Baked Italian Meatballs and Spaghetti
Enjoy this classic comfort food made healthier! These oven-baked Italian meatballs served over spaghetti are juicy, flavorful, and perfect for a family-friendly dinner.
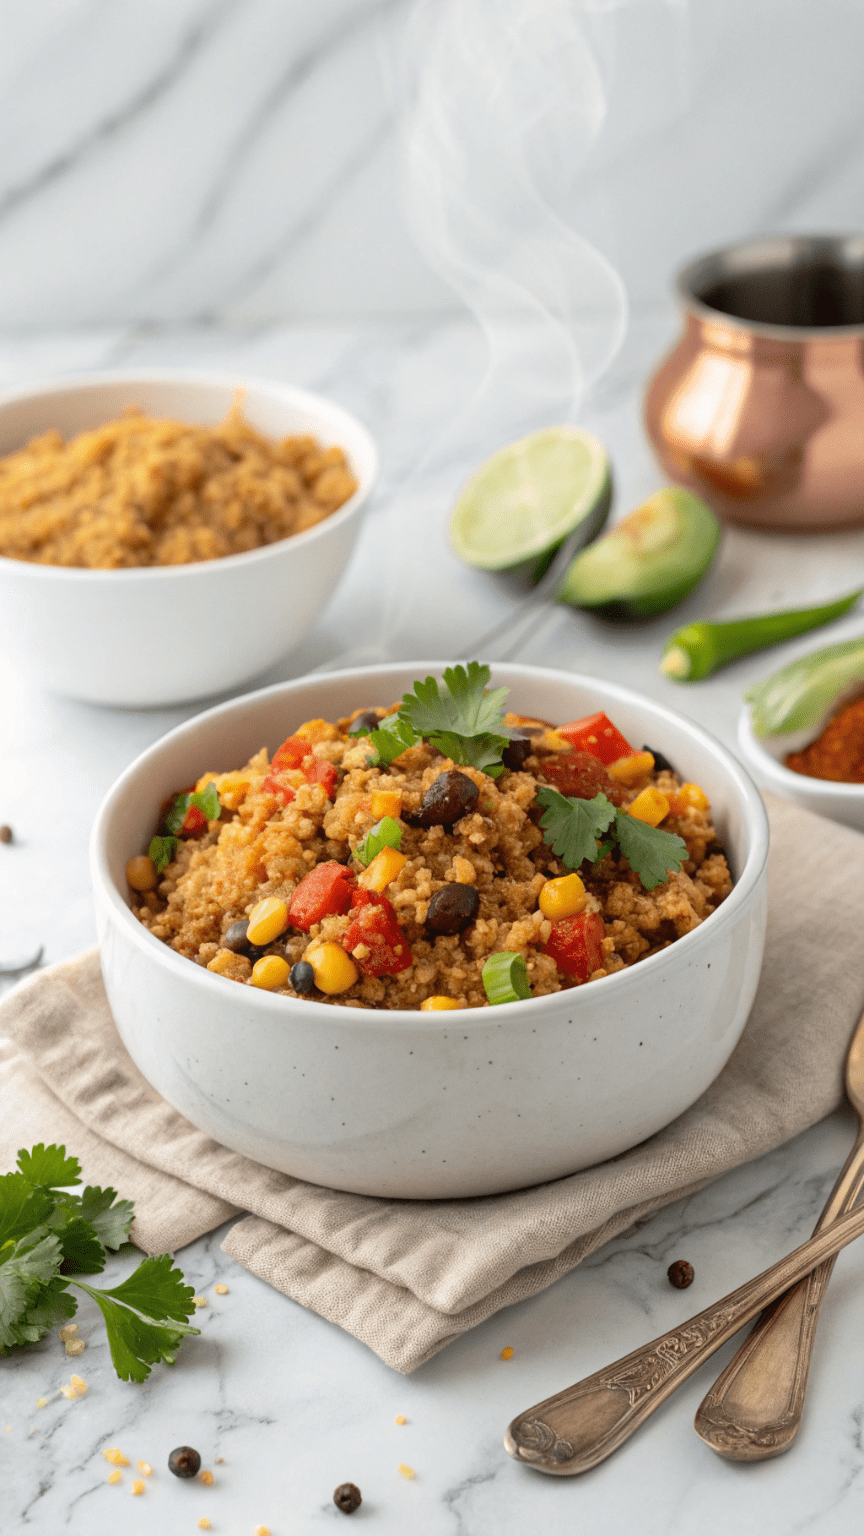
Instant Pot Mexican Quinoa
This one-pot Instant Pot Mexican Quinoa is a quick, healthy, and protein-packed vegan meal bursting with bold flavor. Perfect for meal prep or busy weeknights!
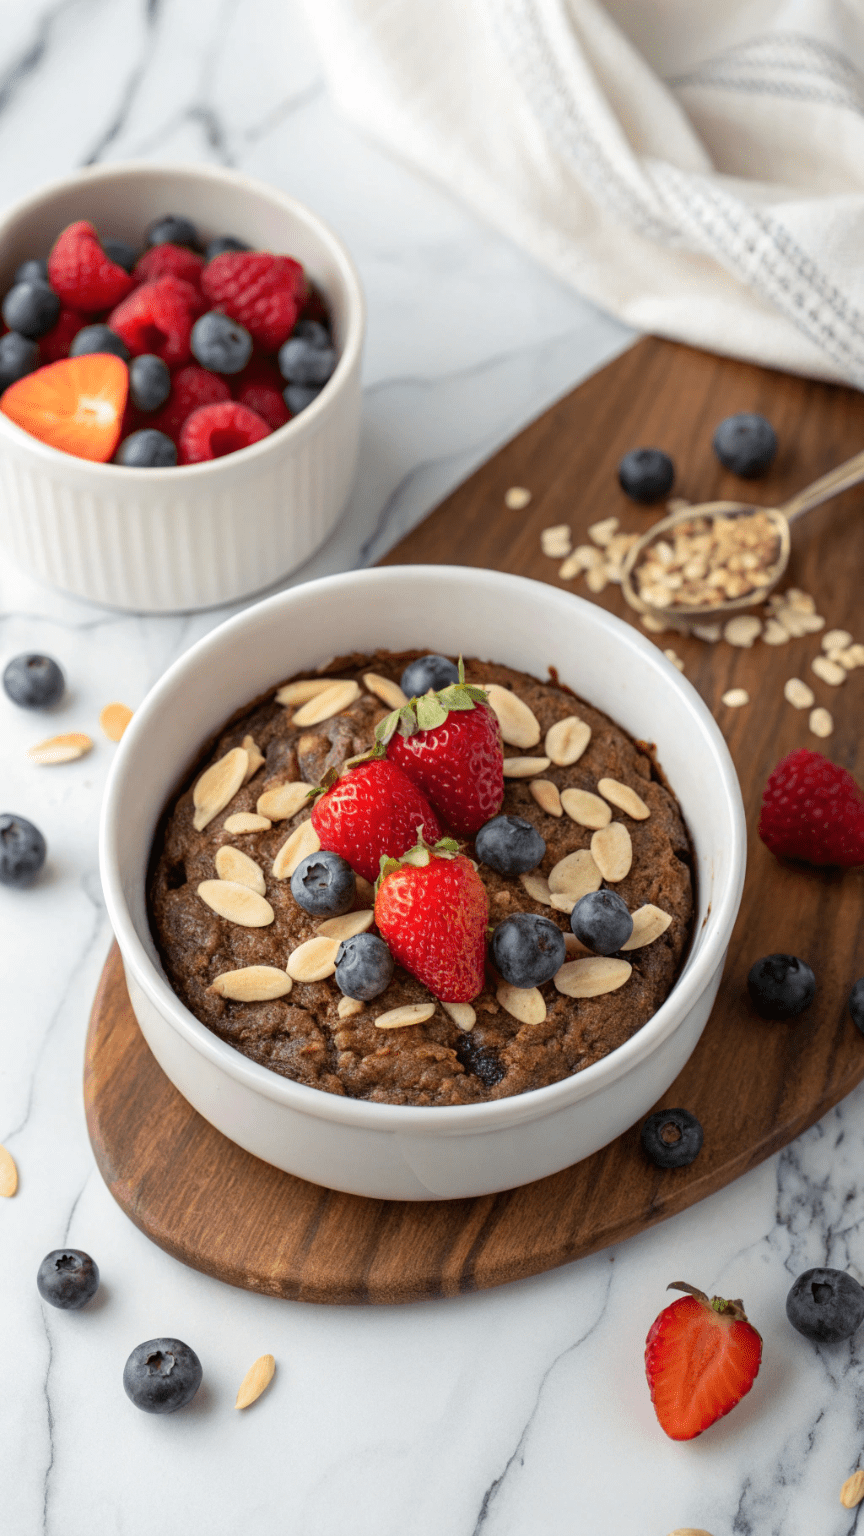
Vegan Brownie Baked Oatmeal
Craving something chocolatey and nourishing? This Vegan Brownie Baked Oatmeal is rich, fudgy, and packed with wholesome ingredients—perfect for a healthy breakfast or guilt-free dessert.
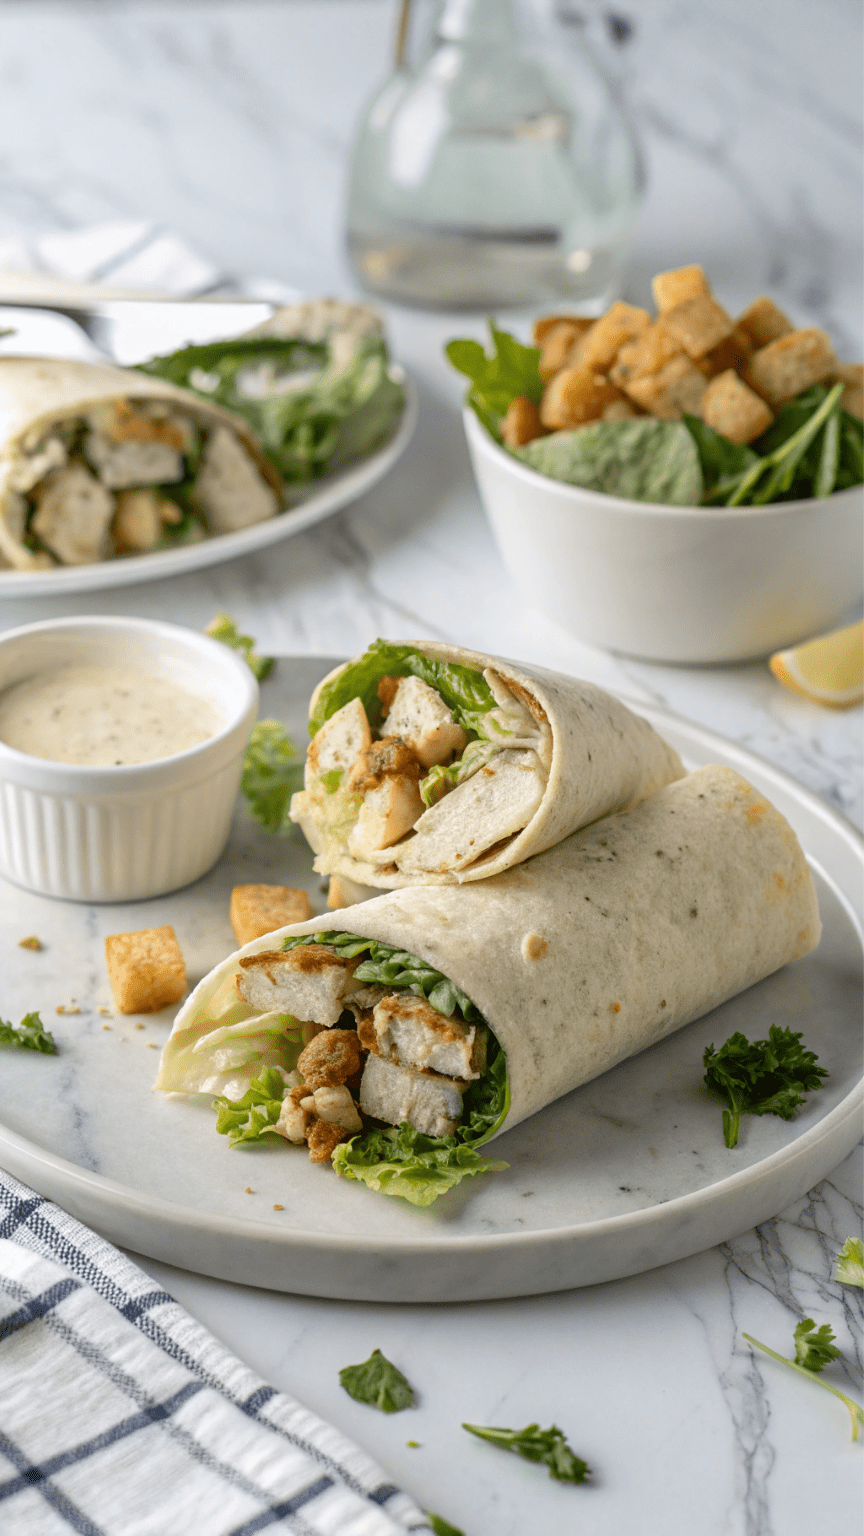
Chicken Caesar Salad Wrap
Try this easy Chicken Caesar Salad Wrap recipe—packed with protein, crisp lettuce, and creamy dressing in a whole wheat wrap. Perfect for a healthy lunch or dinner!
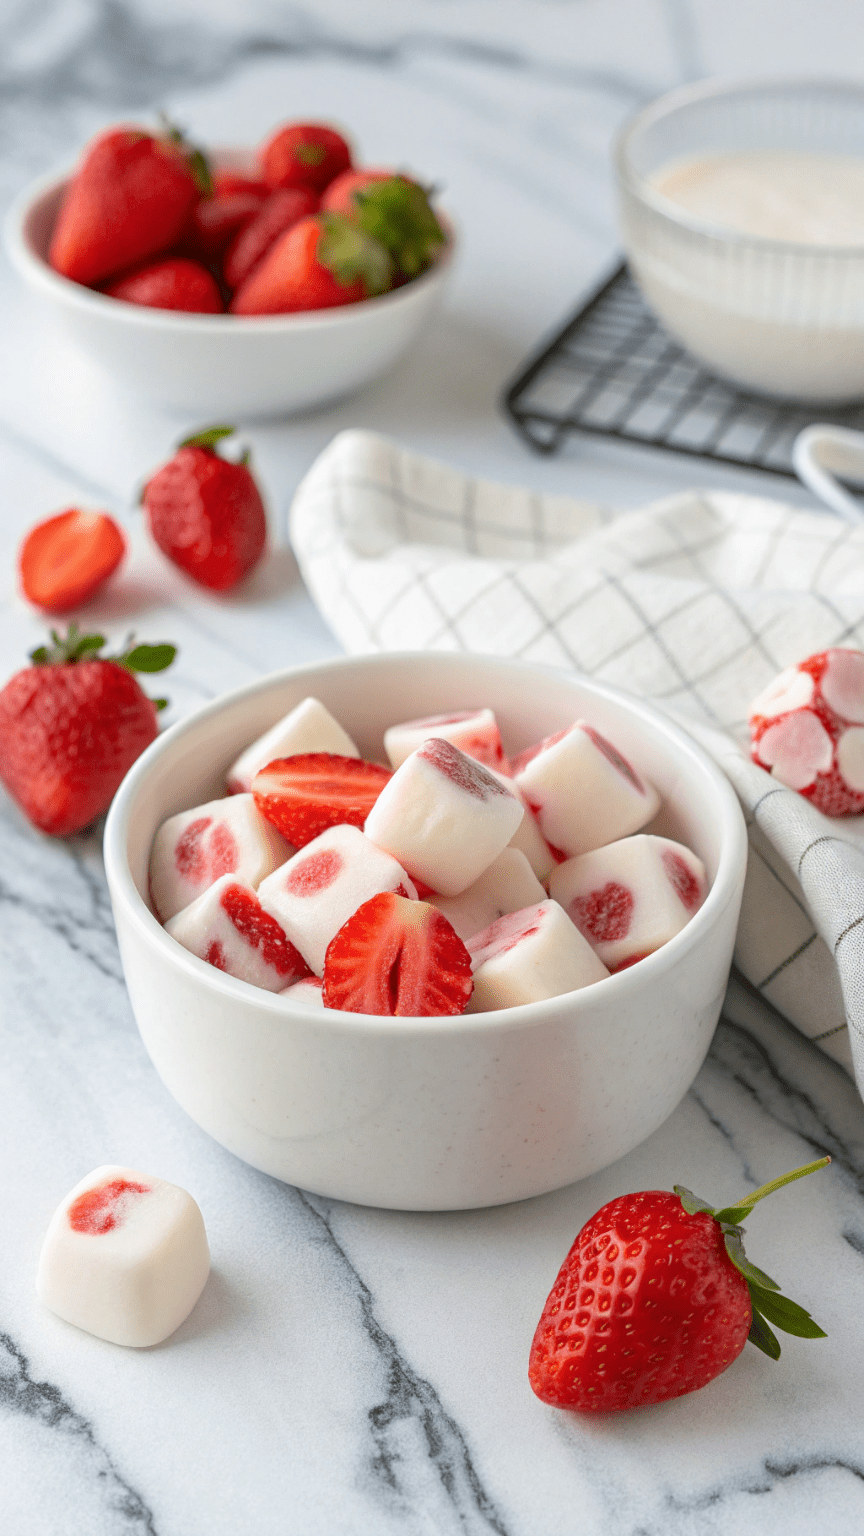
Strawberry Yogurt Bites
Cool down with these easy Strawberry Yogurt Bites made with Greek yogurt and fresh fruit. A healthy, protein-packed snack perfect for kids and adults alike!
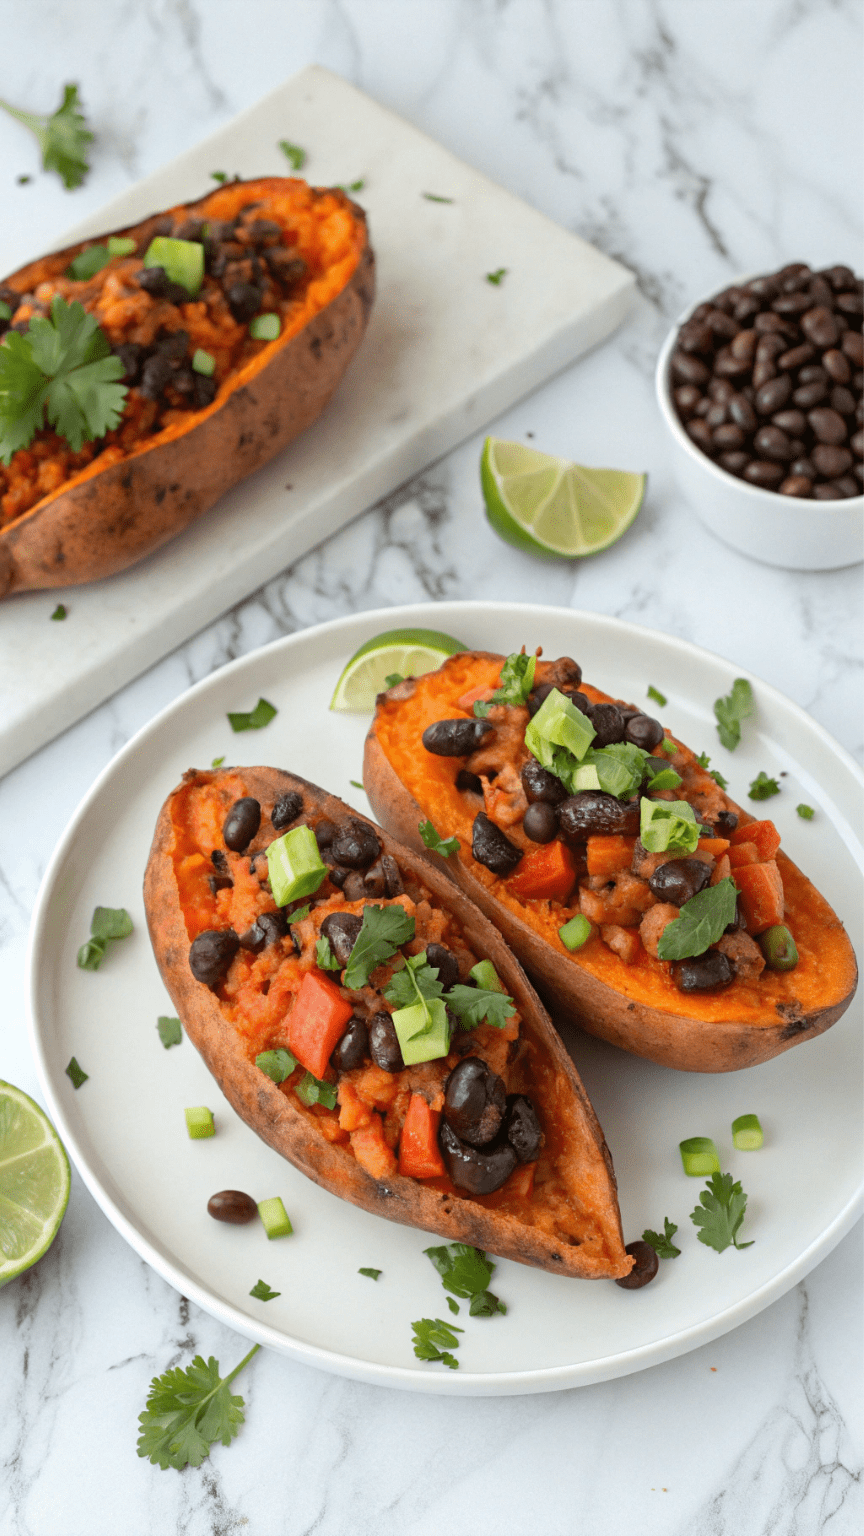
Mexican Stuffed Sweet Potatoes
Try these flavorful Mexican Stuffed Sweet Potatoes packed with black beans, corn, and avocado. A healthy, high-fiber, plant-based meal perfect for lunch or dinner!
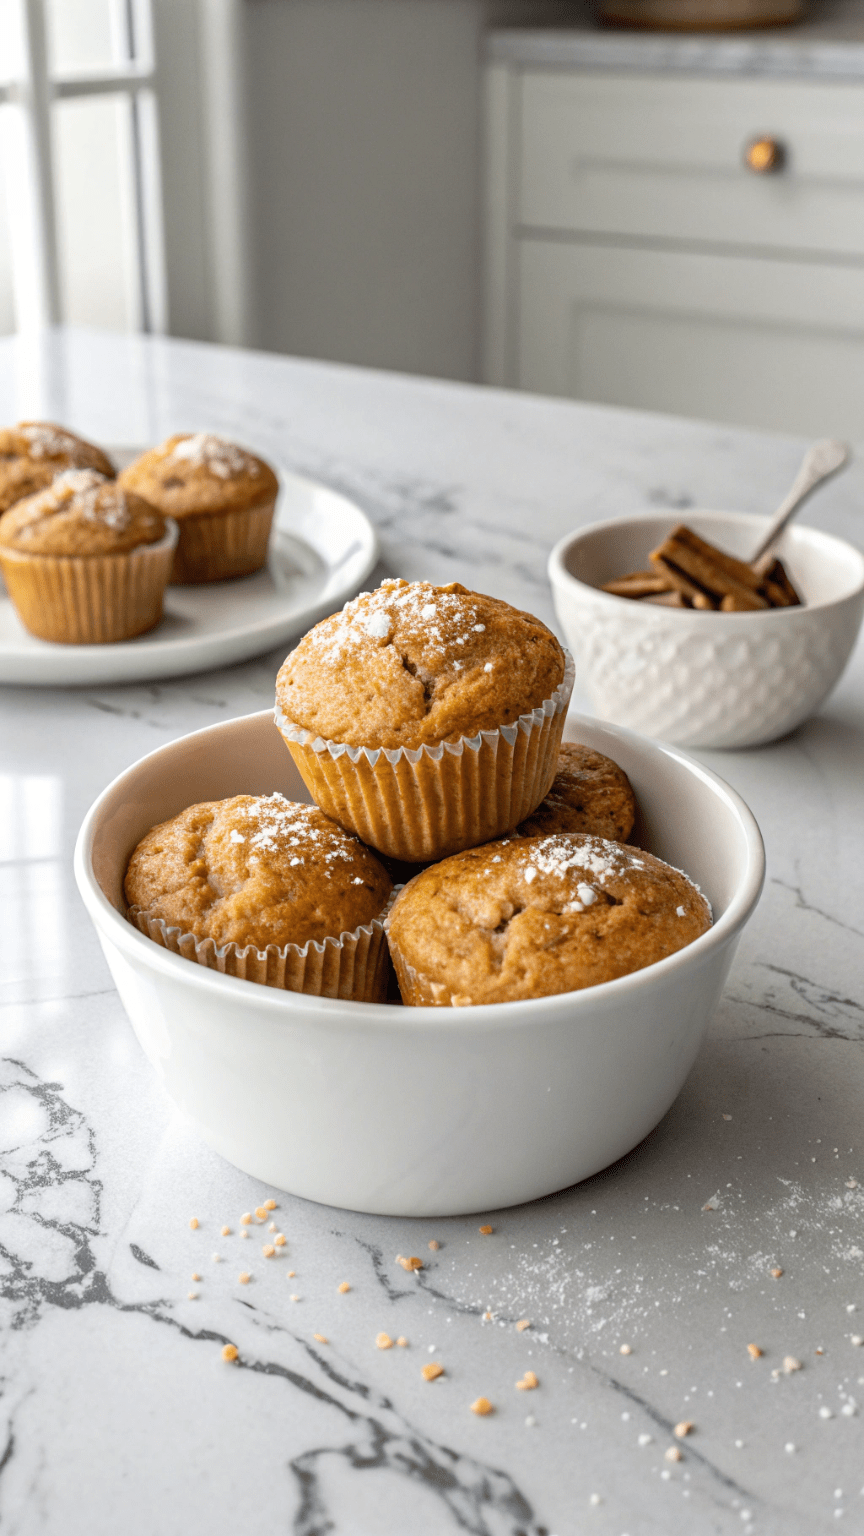
Greek Yogurt Protein Muffins
Wholesome and delicious Greek Yogurt Protein Muffins packed with protein and perfect for breakfast or a post-workout snack. Moist, fluffy, and easy to make!
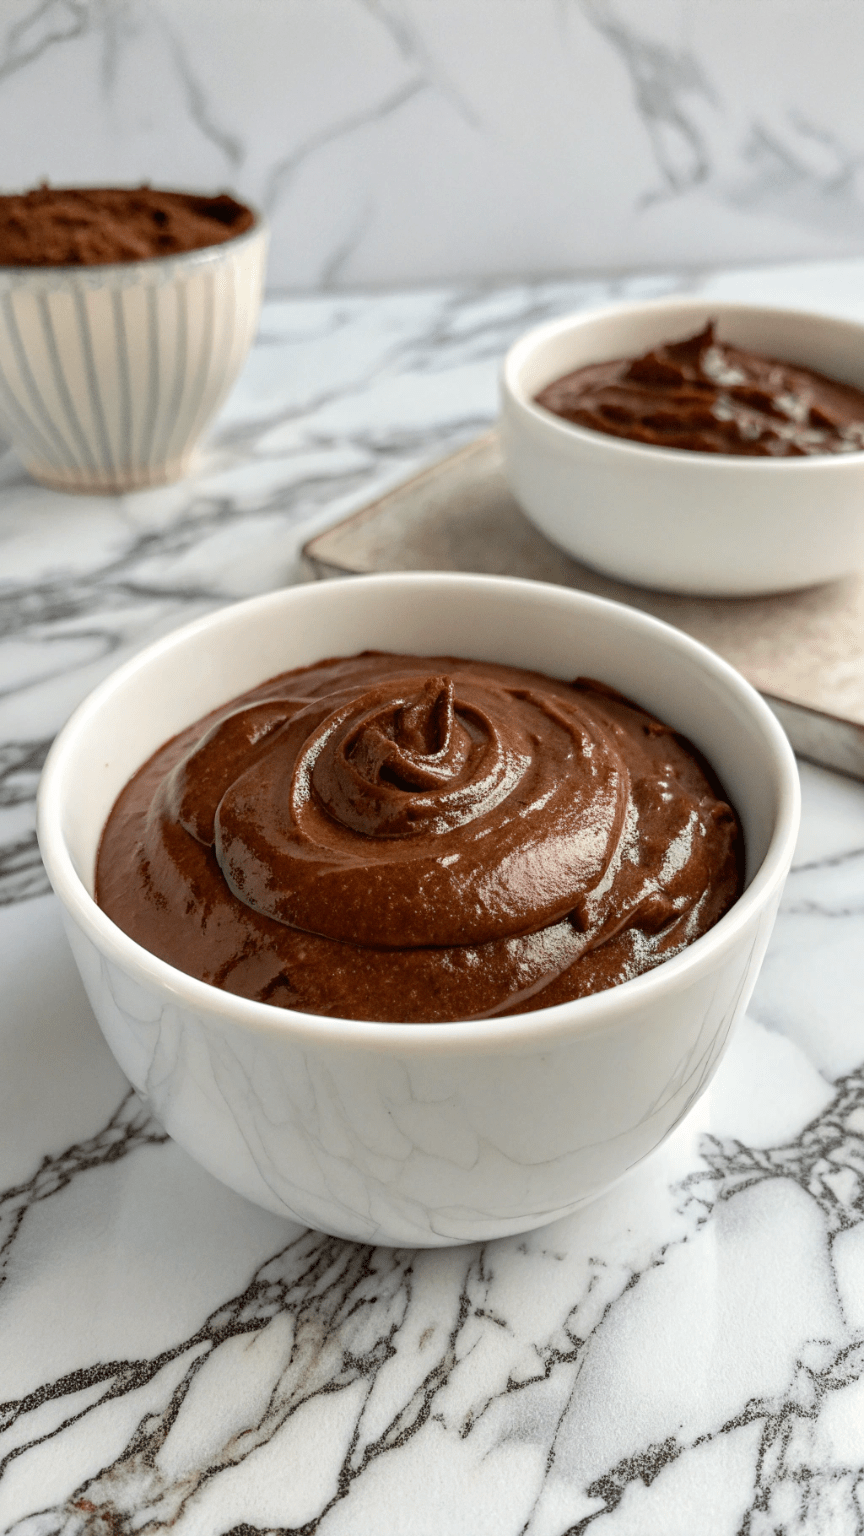
Chocolate Protein Pudding
Rich, creamy, and packed with protein, this Chocolate Protein Pudding is a delicious and healthy dessert or post-workout snack. Ready in just minutes!
Vegan Butternut Squash Sauce Pasta
Creamy and delicious Vegan Butternut Squash Pasta that’s perfect for cozy dinners! This healthy, plant-based dish is rich, satisfying, and packed with flavor.
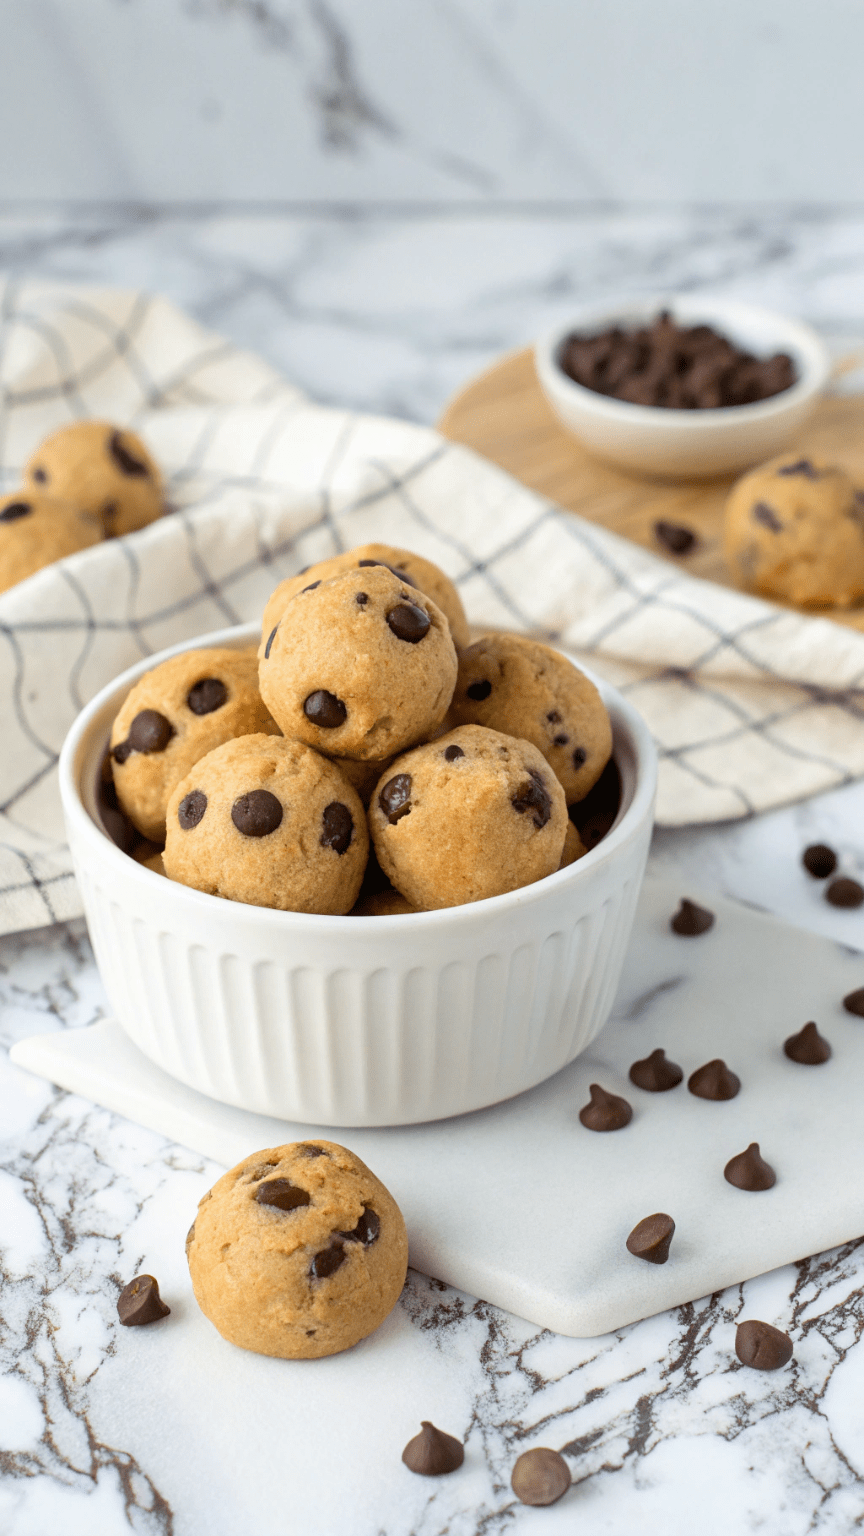
Protein Chocolate Chip Cookie Dough Bites
These no-bake Protein Chocolate Chip Cookie Dough Bites are a healthy, high-protein snack made with almond flour, nut butter, and protein powder—perfect for satisfying your sweet tooth without the guilt.
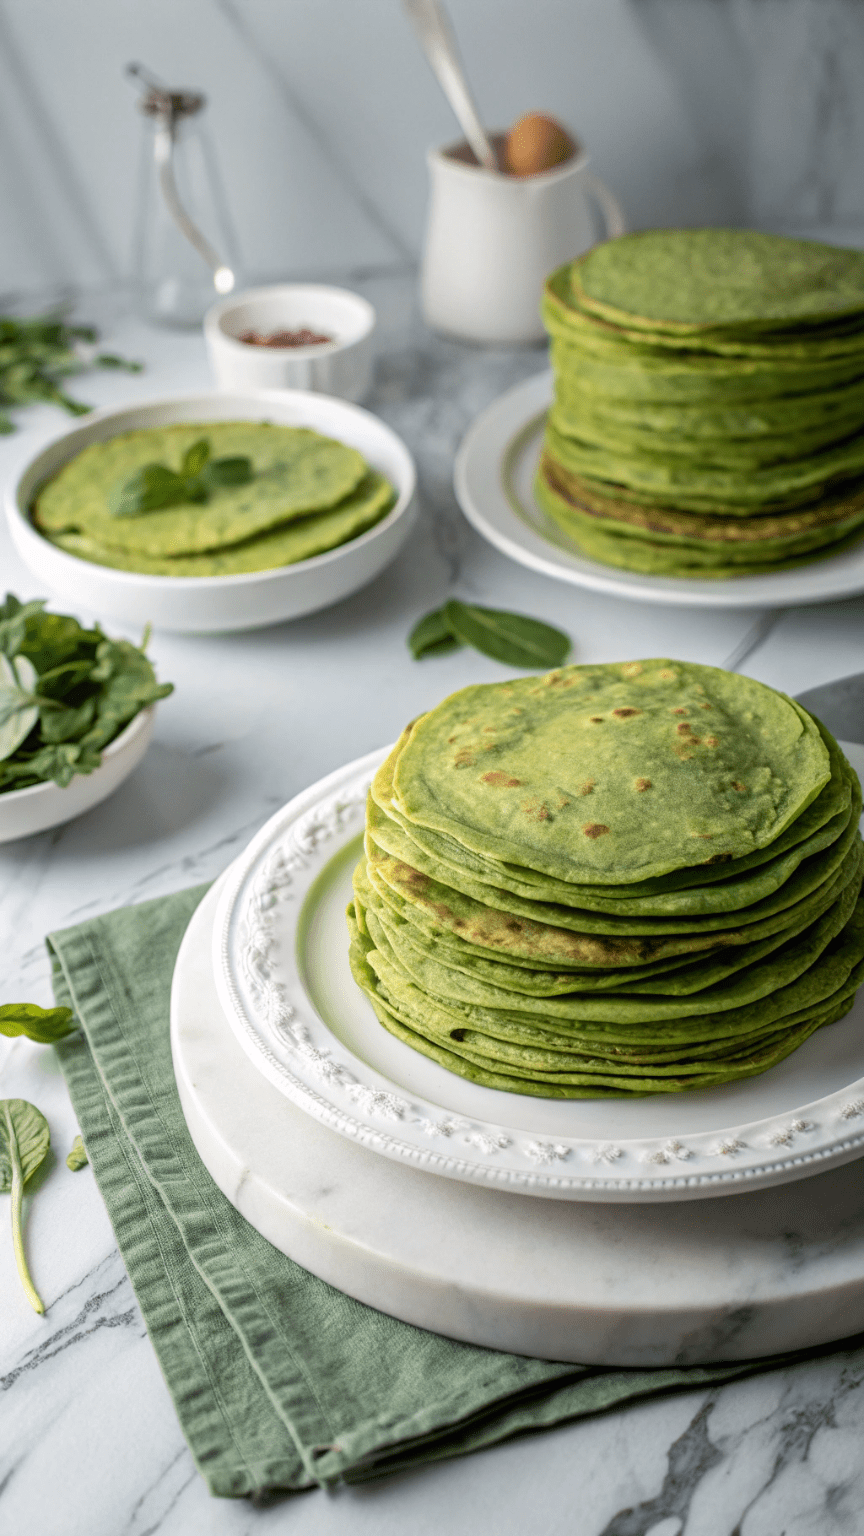
Low Carb Spinach Tortillas
Enjoy these easy, low carb spinach tortillas made with wholesome ingredients like eggs, almond flour, and fresh spinach. Perfect for keto-friendly lunches or healthy meal prep!
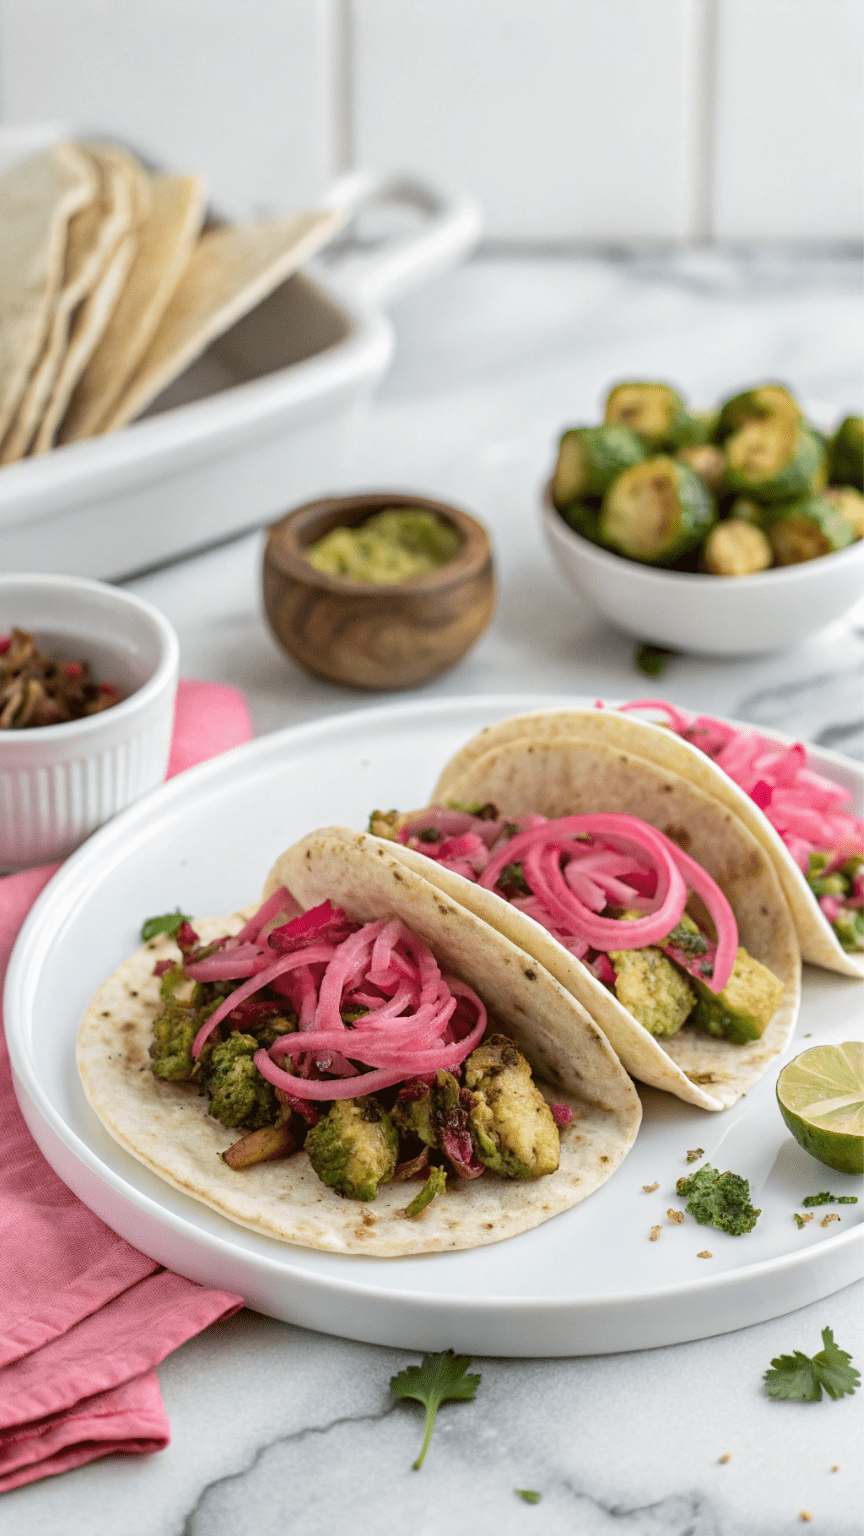
Spicy Brussel Sprout Tacos
Turn up the heat with these Spicy Brussels Sprout Tacos! Roasted sprouts, bold spices, and creamy toppings make this vegetarian taco recipe a weeknight winner.
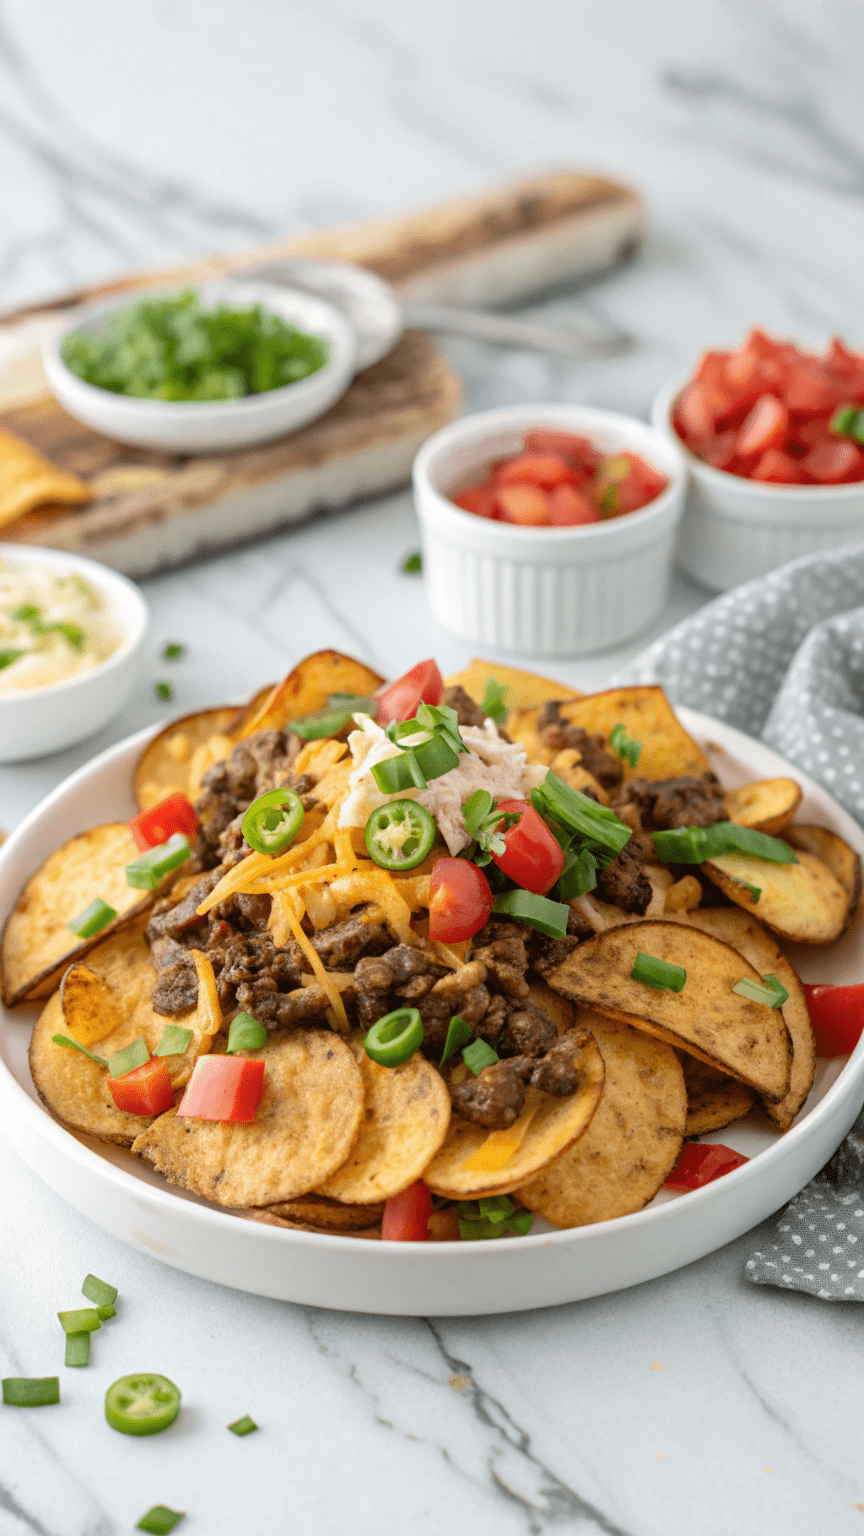
Loaded Potato Beef Nachos
Craving comfort food? Try these hearty Loaded Potato Beef Nachos—crispy potato rounds topped with seasoned beef, cheese, and all your favorite fixings. Includes full nutrition facts!
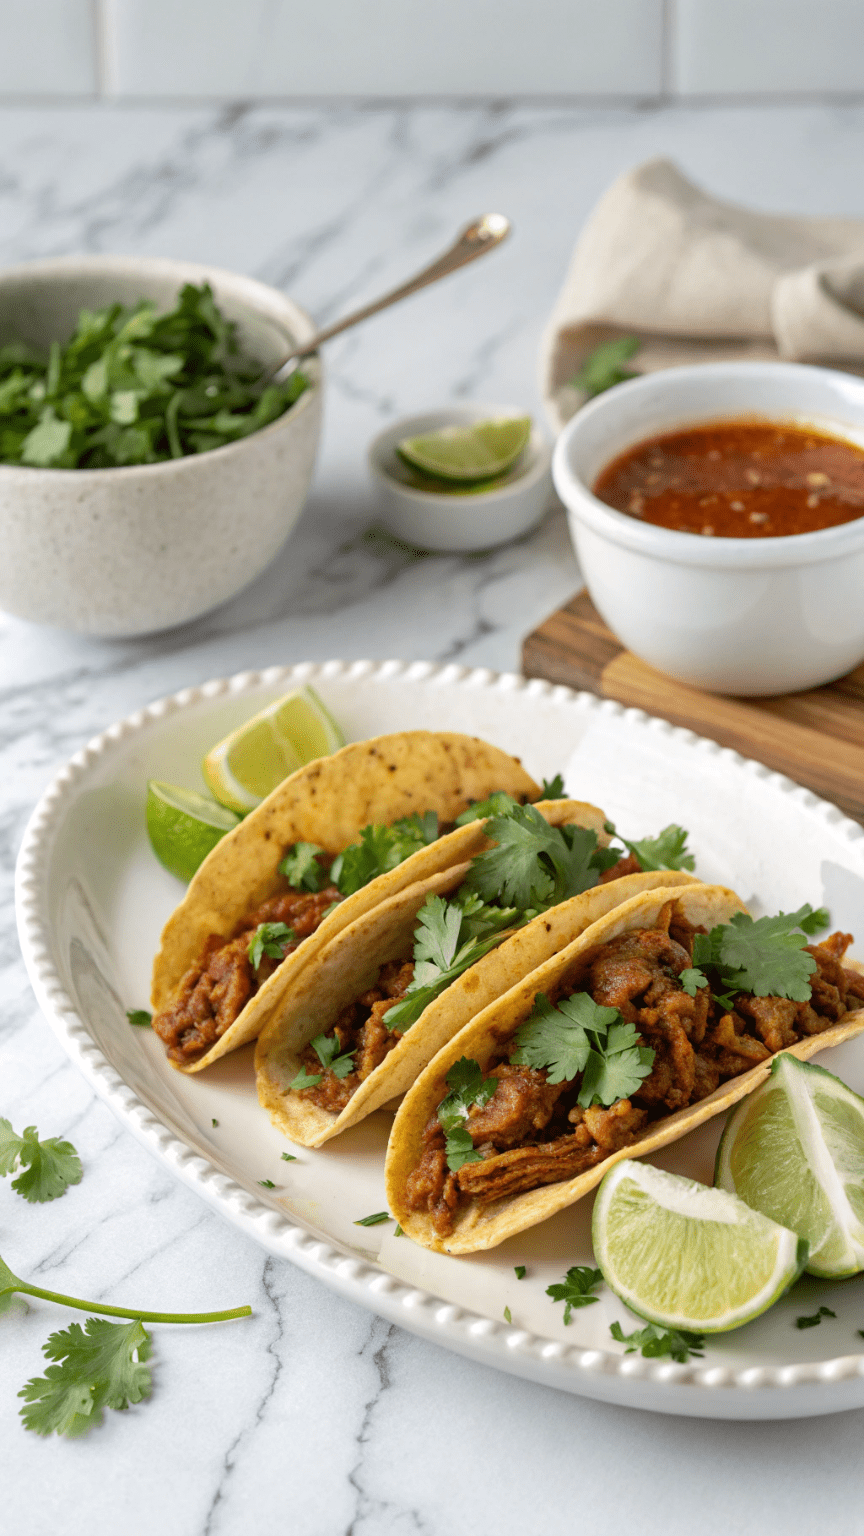
Vegan Birria Tacos with Consommé
Savor the bold, smoky flavor of Vegan Birria Tacos made with jackfruit and mushrooms. A plant-based twist on a classic Mexican favorite—with rich consommé and impressive nutrition.
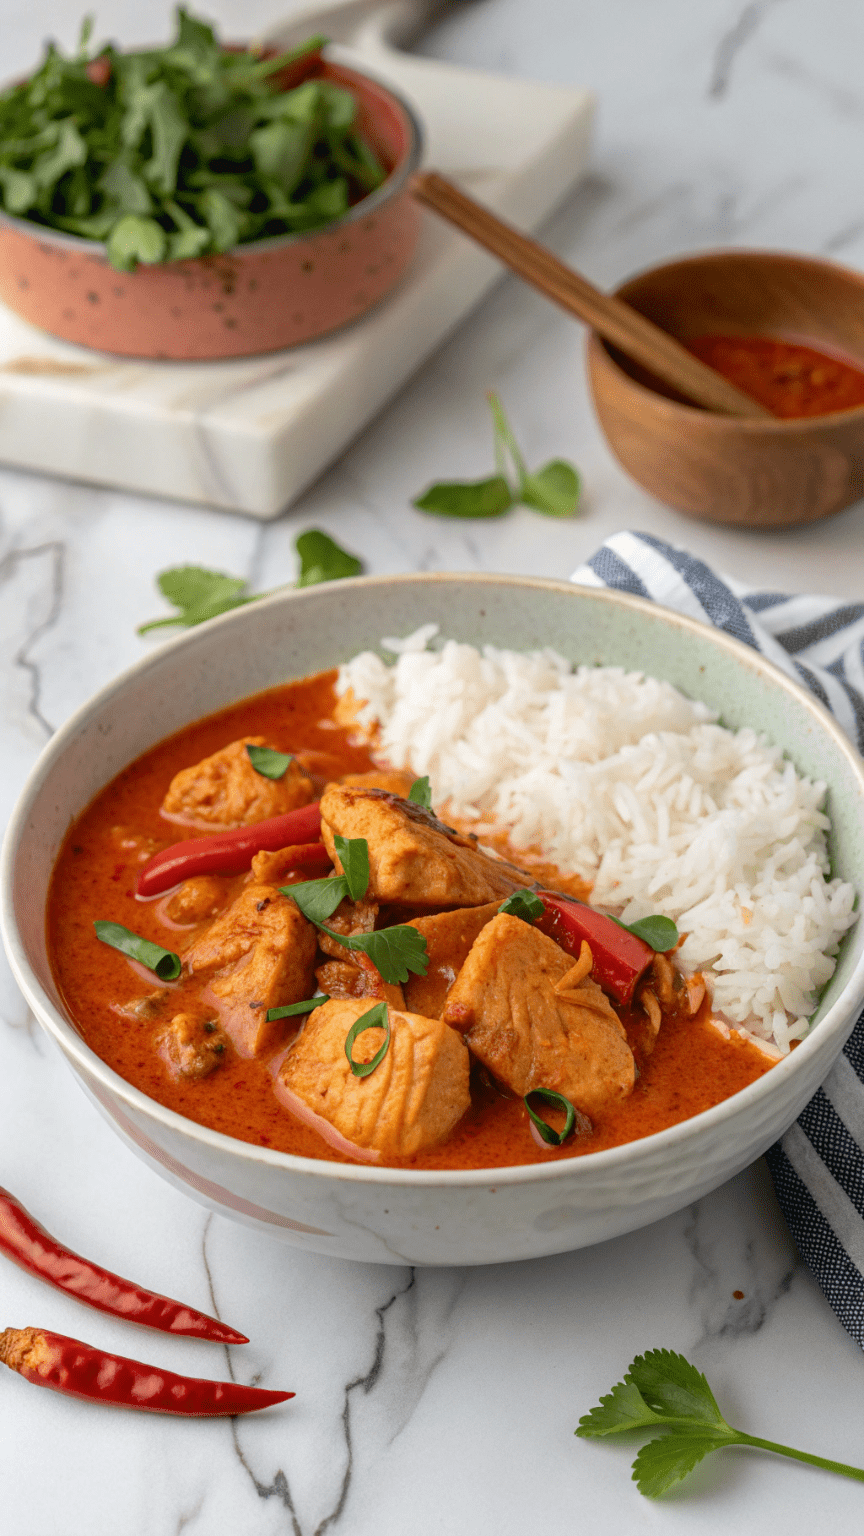
Thai Red Curry Chicken with Rice
This Thai red curry chicken with rice recipe is rich, creamy, and full of bold flavors. A quick and satisfying one-pan meal that’s perfect for weeknight dinners.
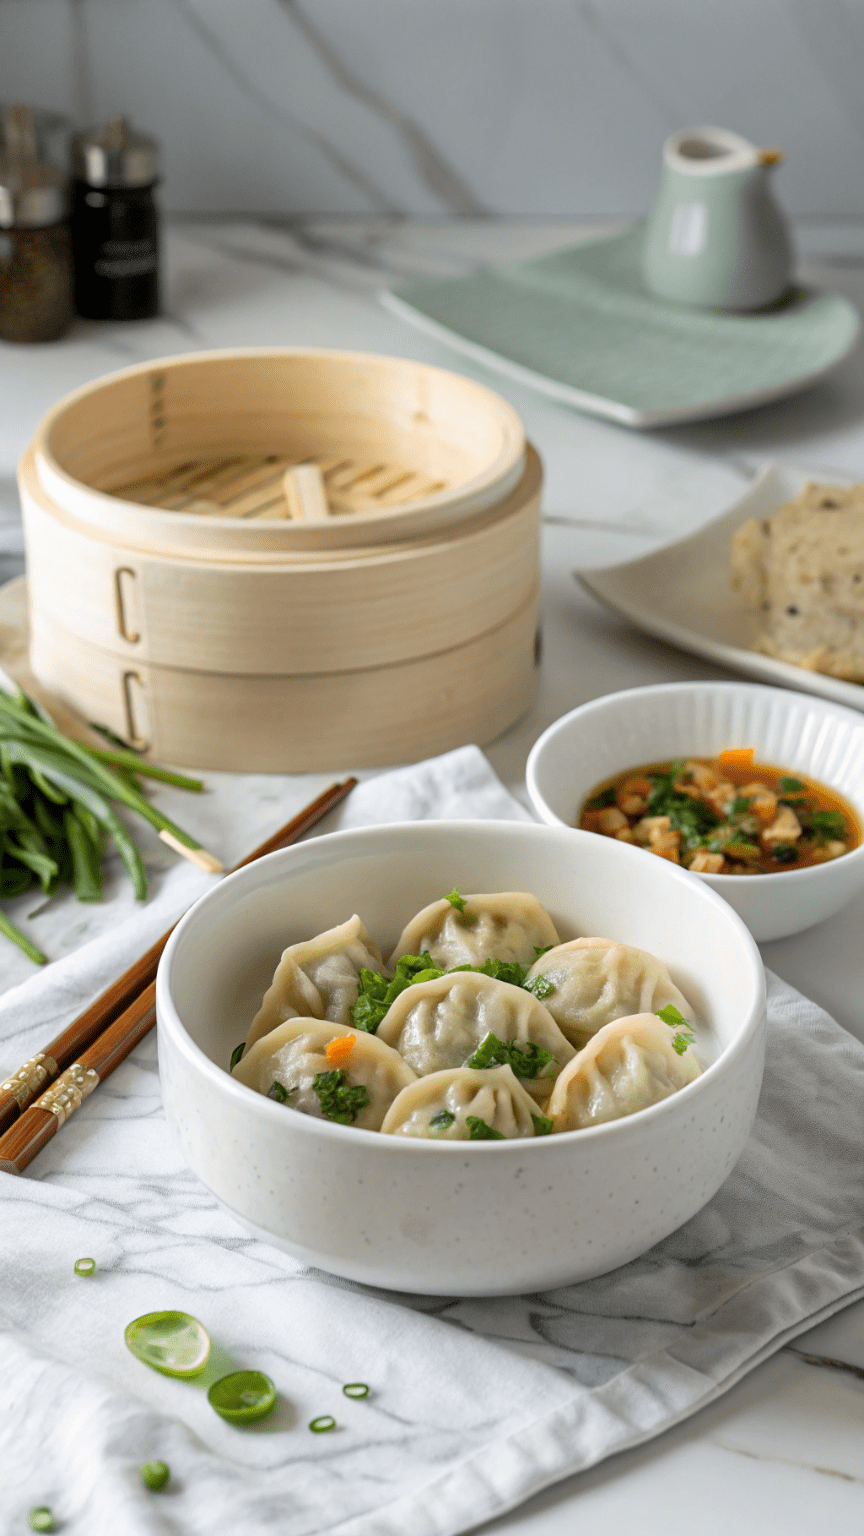
Vegetable Dumplings
Make your own delicious vegetable dumplings at home with this easy recipe. Packed with fresh veggies and flavor, these dumplings are perfect for a healthy appetizer or meatless meal.
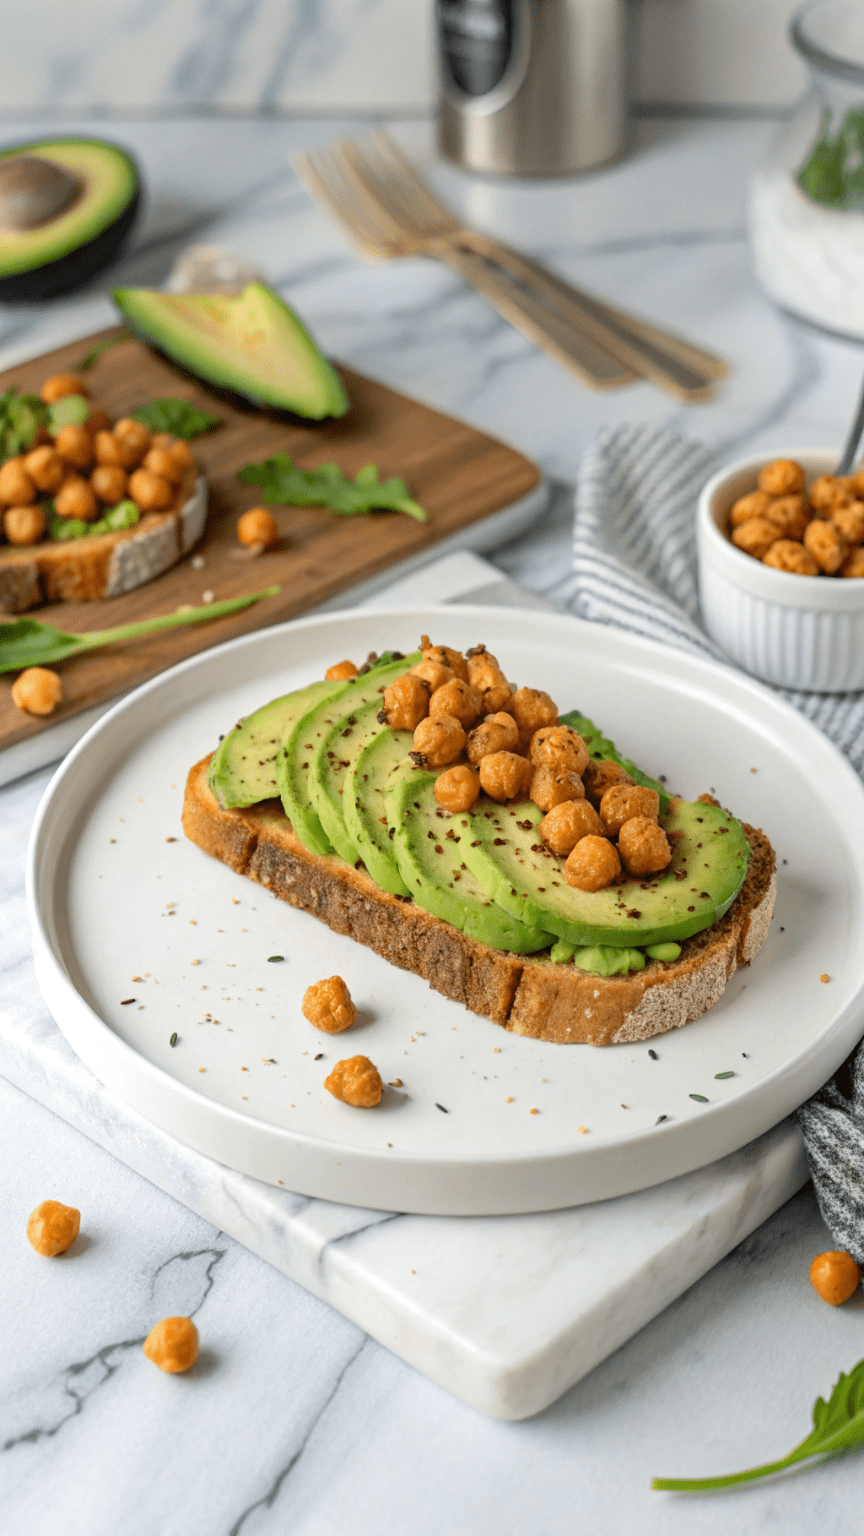
Avocado & Chickpea Toast
Try this delicious and protein-packed avocado and chickpea toast—perfect for a quick, healthy breakfast or snack. Loaded with fiber, flavor, and plant-based goodness.
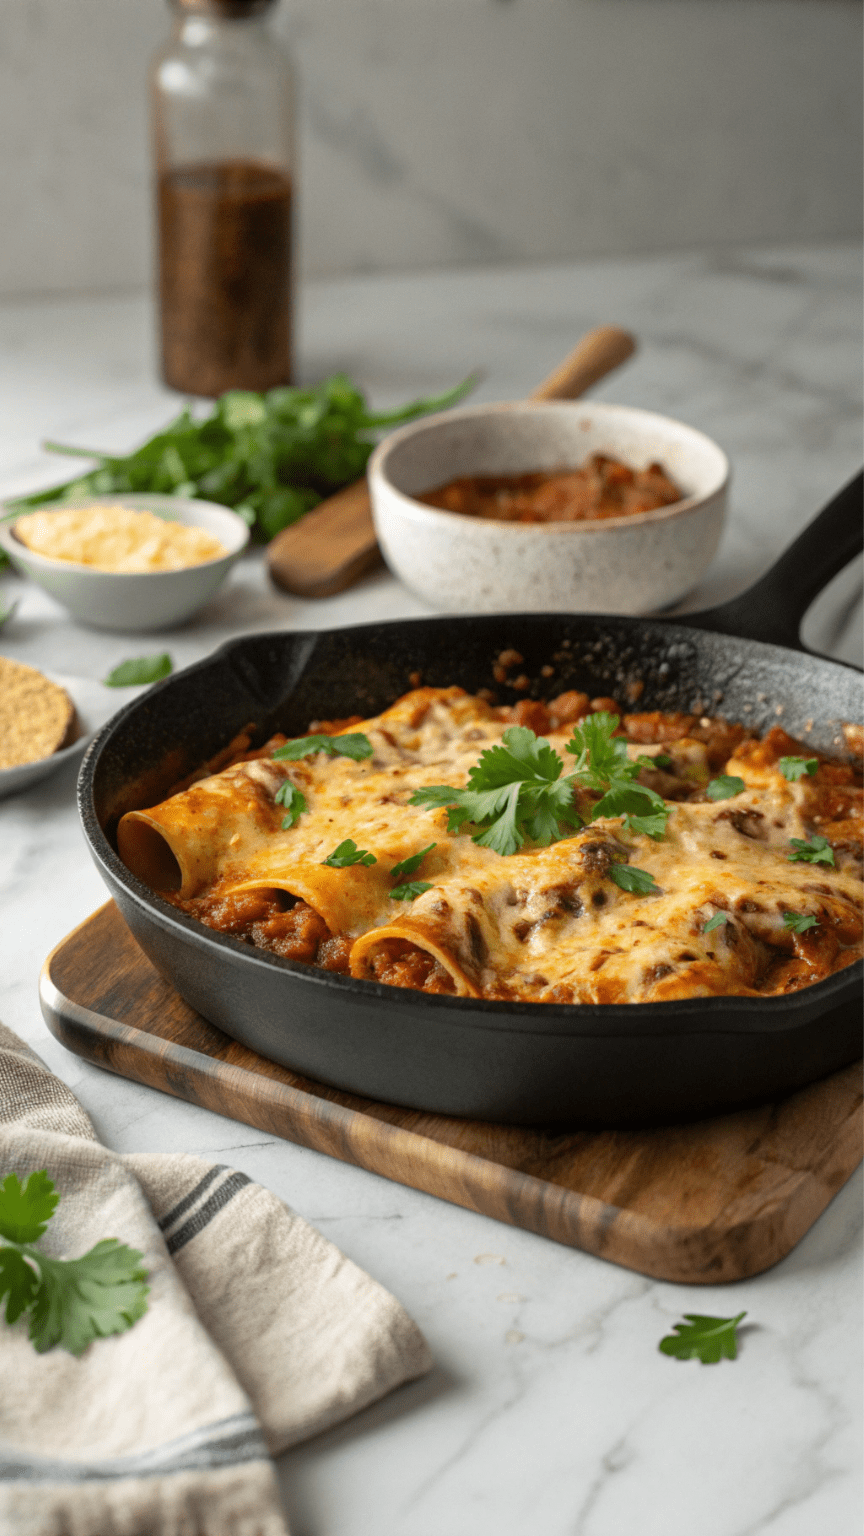
Enchilada Skillet
This one-pan Enchilada Skillet is a quick, hearty, and flavorful twist on traditional enchiladas—ready in just 30 minutes! Packed with protein, veggies, and bold spices, it’s a perfect weeknight dinner.
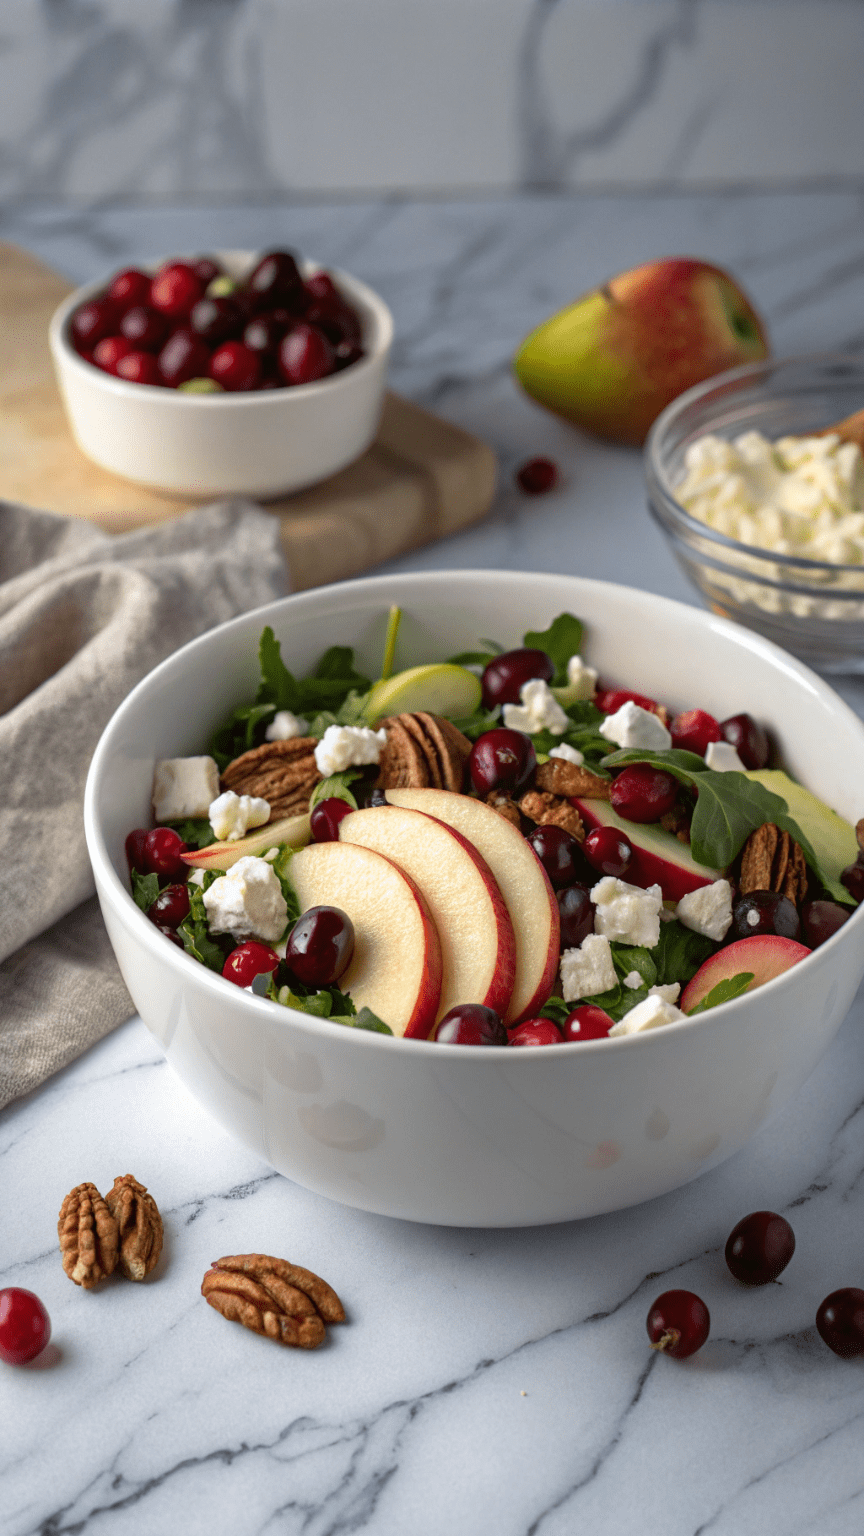
Cranberry Apple Salad
This fresh and vibrant Cranberry Apple Salad is the perfect blend of sweet, tart, and crunchy! Packed with nutrients and ready in minutes, it’s an ideal side dish or light lunch.
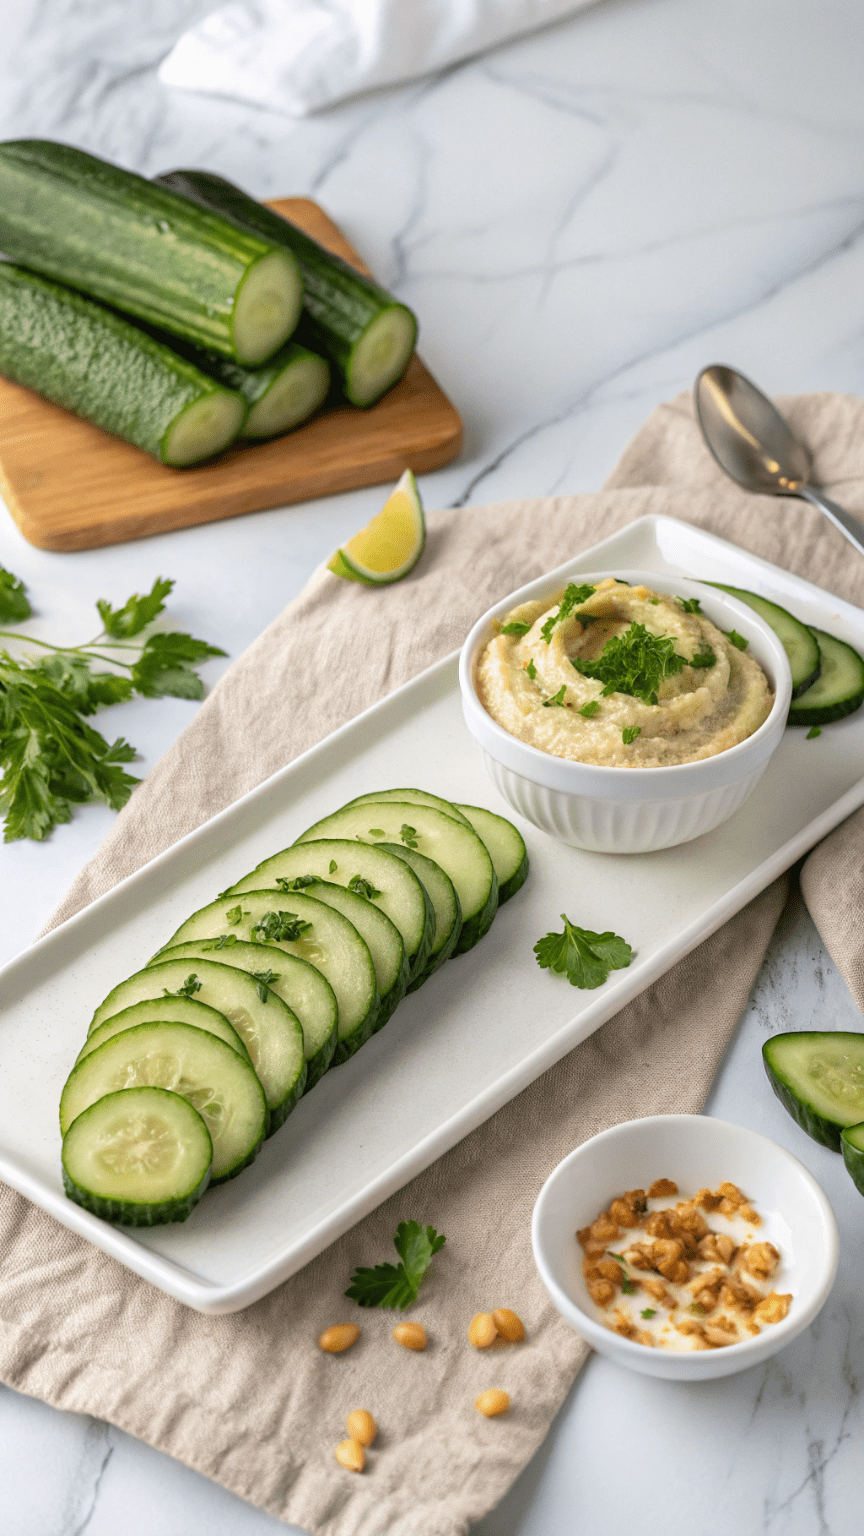
Quick & Super Easy Cucumber & Hummus
Stay energized with this fresh and healthy Cucumber & Hummus snack! Perfect for a quick bite, it’s low-calorie, nutrient-rich, and takes just 5 minutes to make.
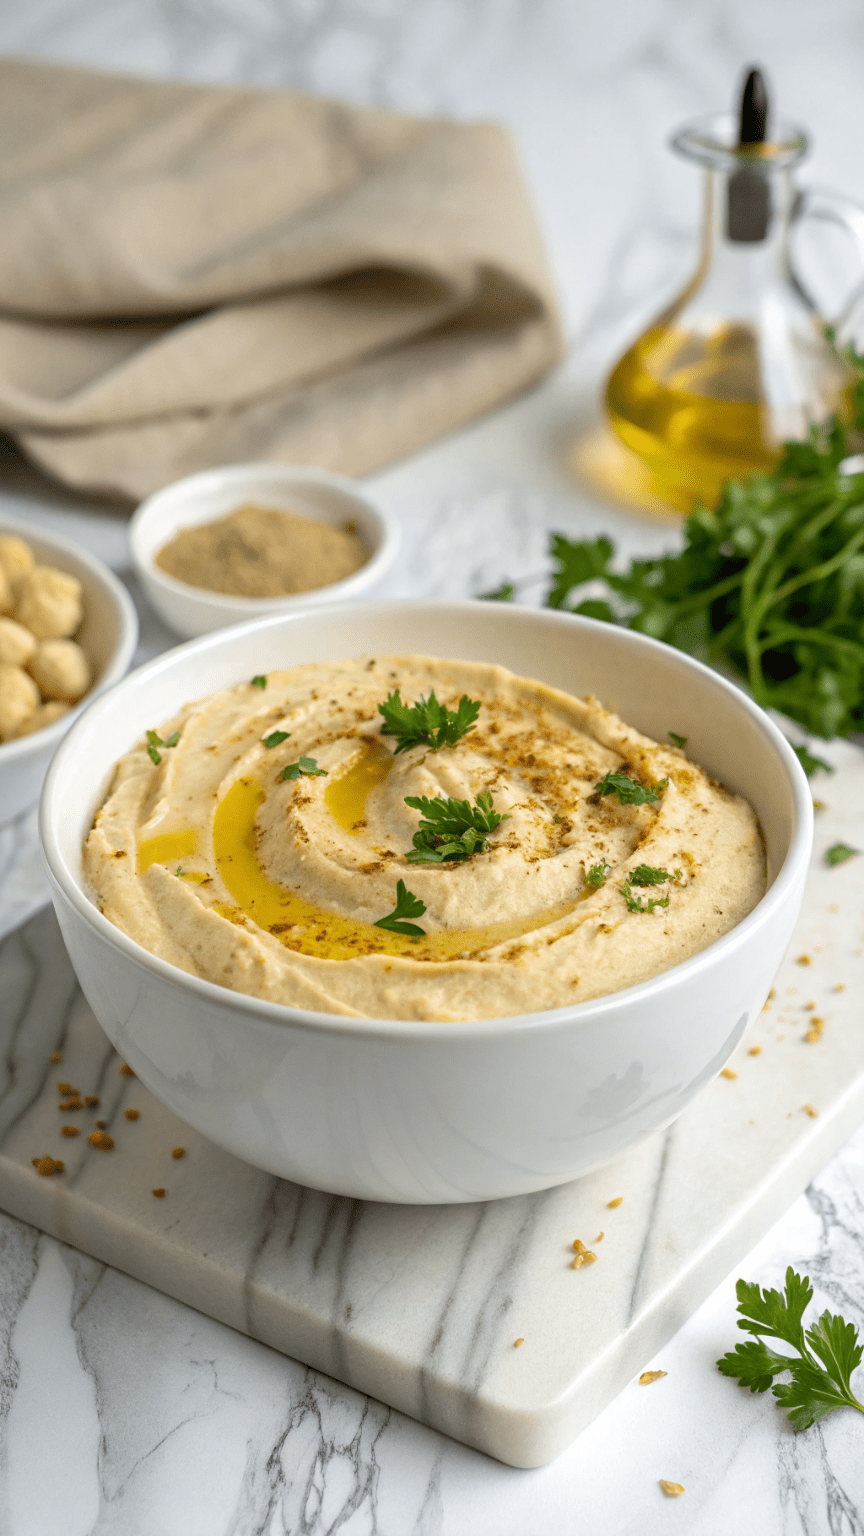
Easy Homemade Hummus
Creamy, smooth, and delicious—this easy homemade hummus recipe is packed with plant-based protein, healthy fats, and bold Mediterranean flavor. Perfect for dipping or spreading!
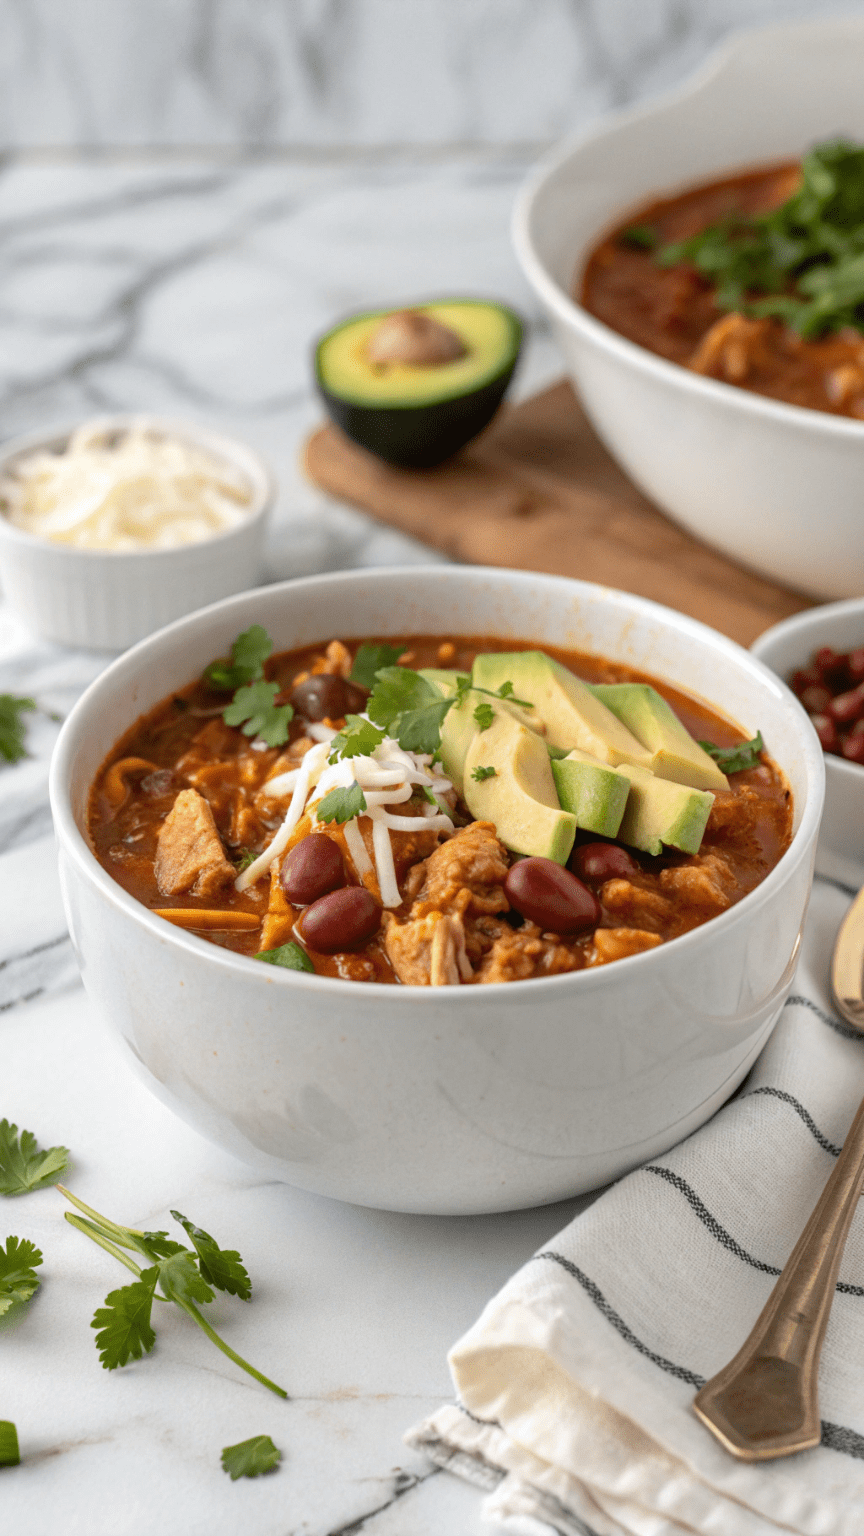
High-Protein Chicken Chili
This High-Protein Chicken Chili is hearty, flavorful, and packed with lean protein. Perfect for meal prep, weeknight dinners, or post-workout fuel.
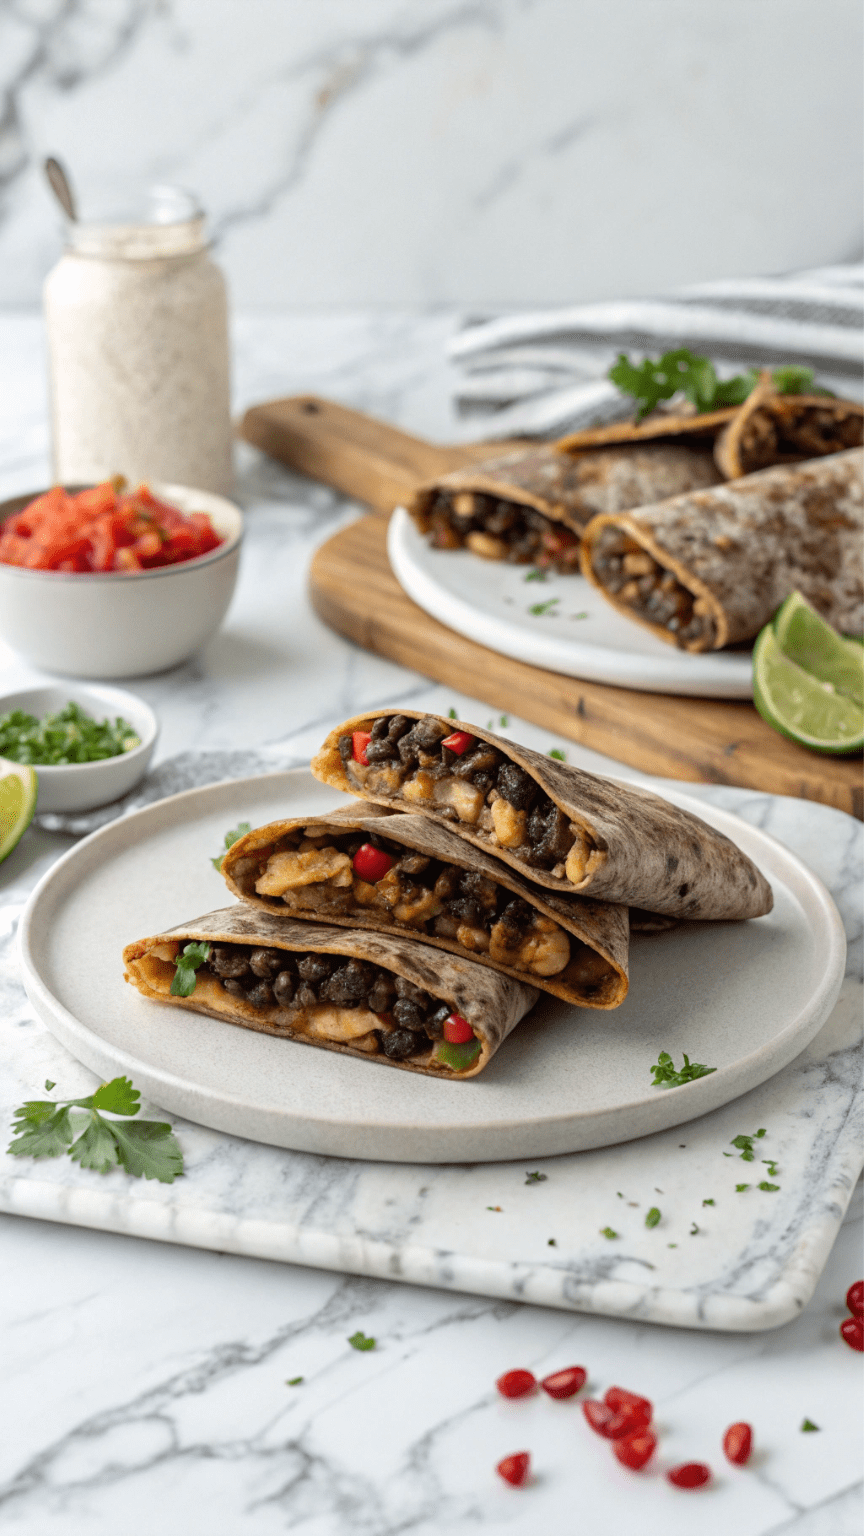
Black Bean Crunch Wraps
These homemade Black Bean Crunch Wraps are a healthier, plant-based twist on a fast food favorite—crispy, satisfying, and packed with flavor! Perfect for lunch or dinner.
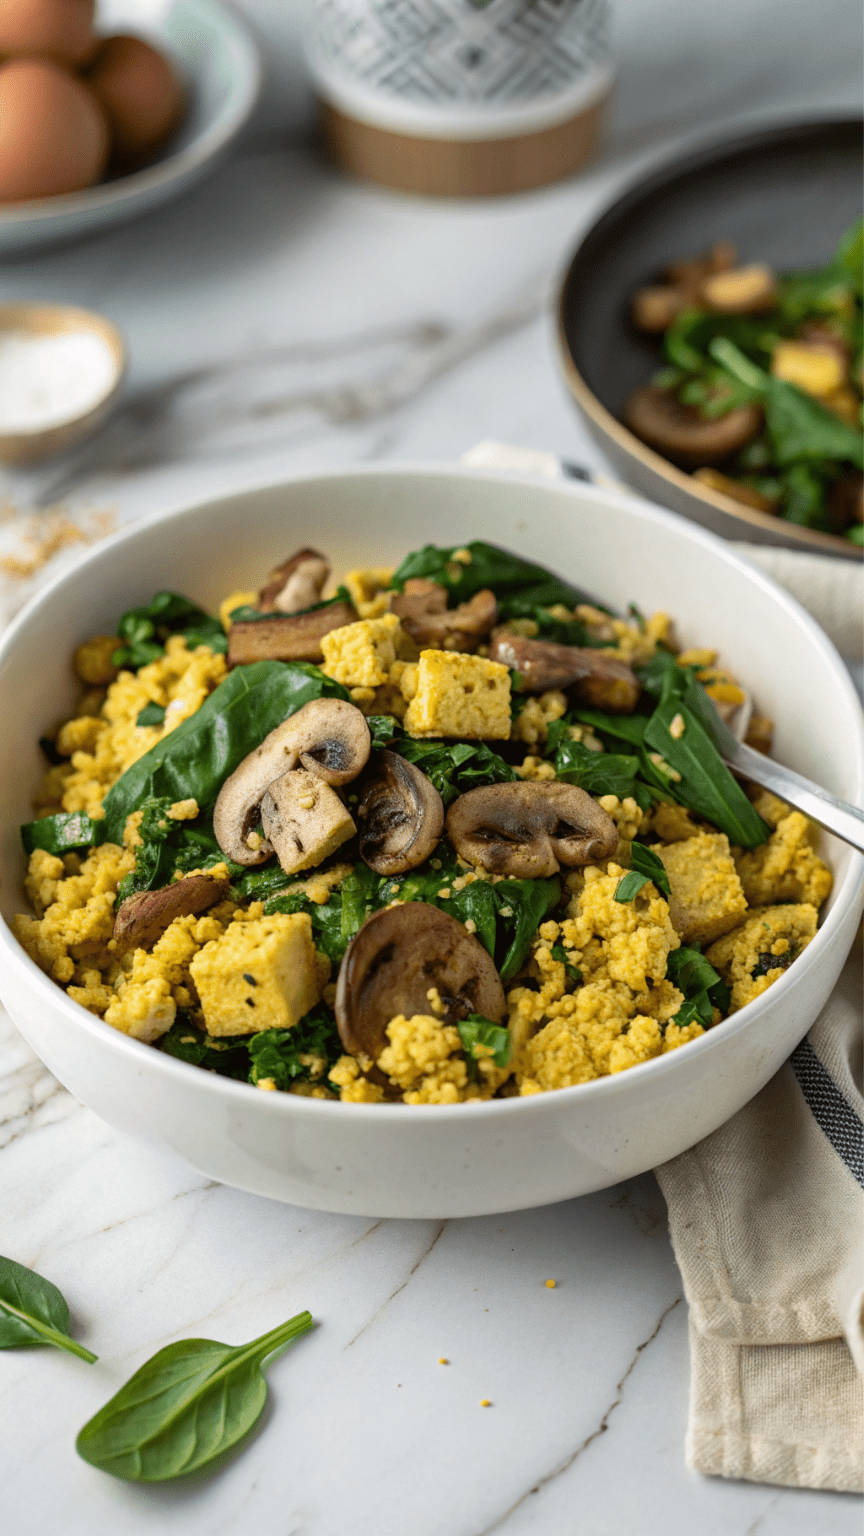
Tofu Scramble with Spinach & Mushrooms
A quick, healthy, and protein-packed tofu scramble with spinach and mushrooms — perfect for a vegan breakfast or savory brunch. Ready in under 20 minutes!
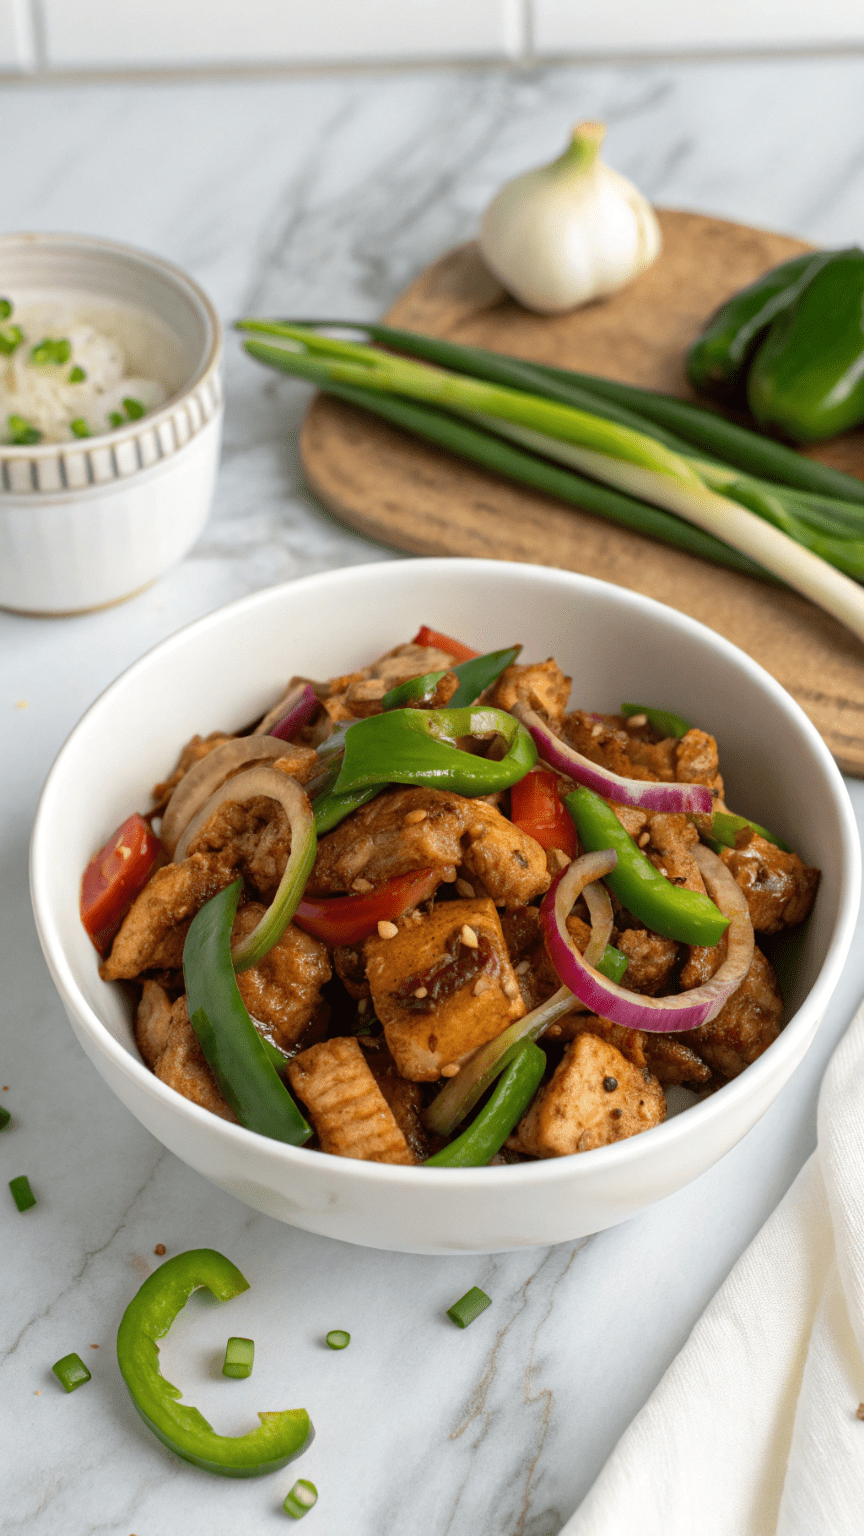
Black Pepper Chicken
Spice up your dinner with this flavorful Black Pepper Chicken! Tender chicken bites in a savory black pepper sauce make for an irresistible meal.
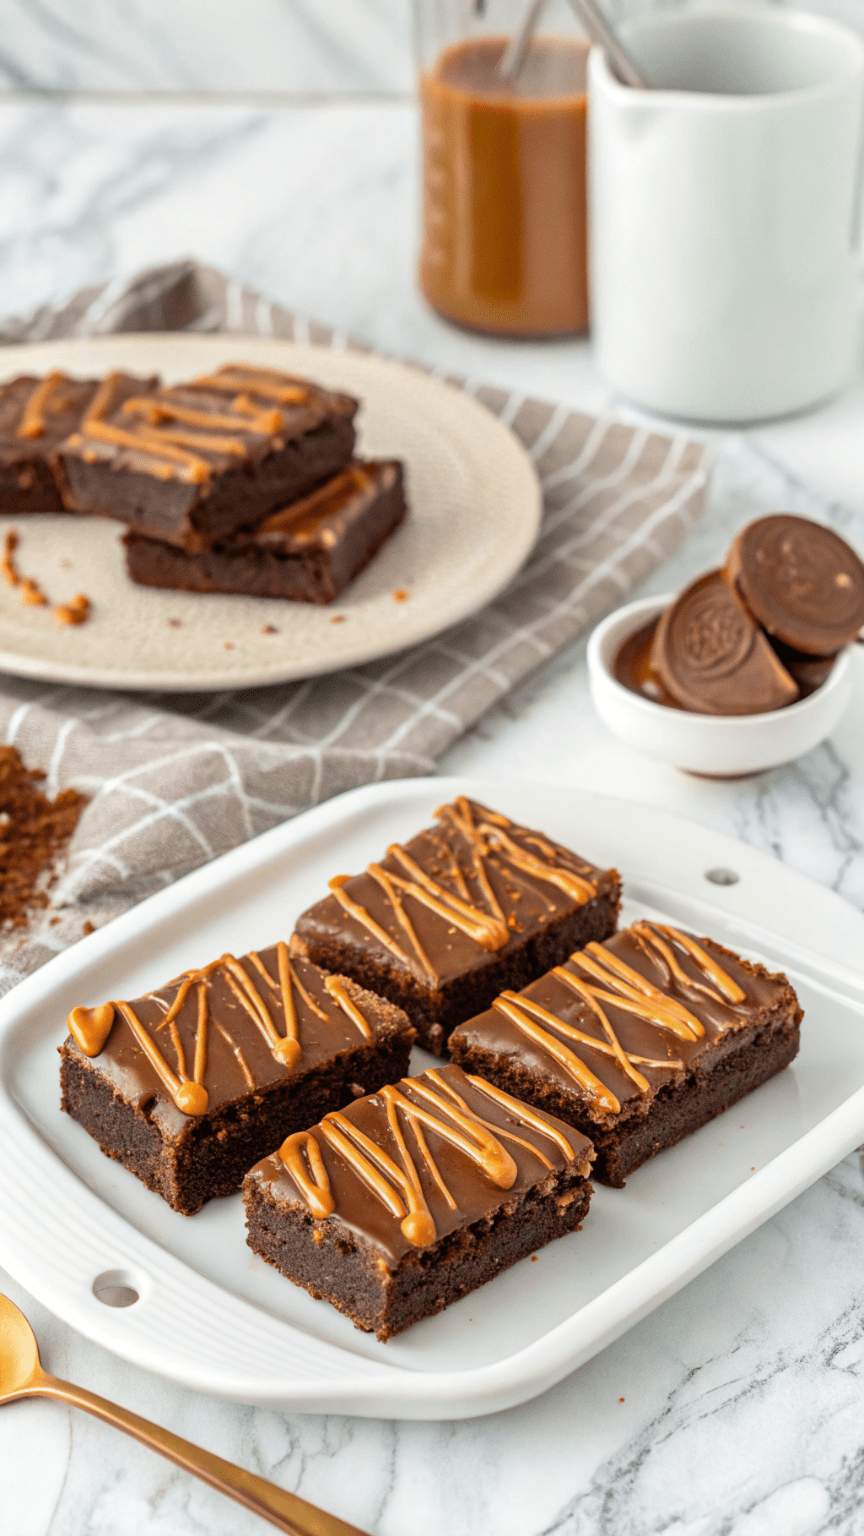
No-Bake Caramel Brownie Bars
Indulge in these rich, no-bake caramel brownie bars! Packed with chocolatey goodness and a gooey caramel layer, they make the perfect guilt-free dessert.
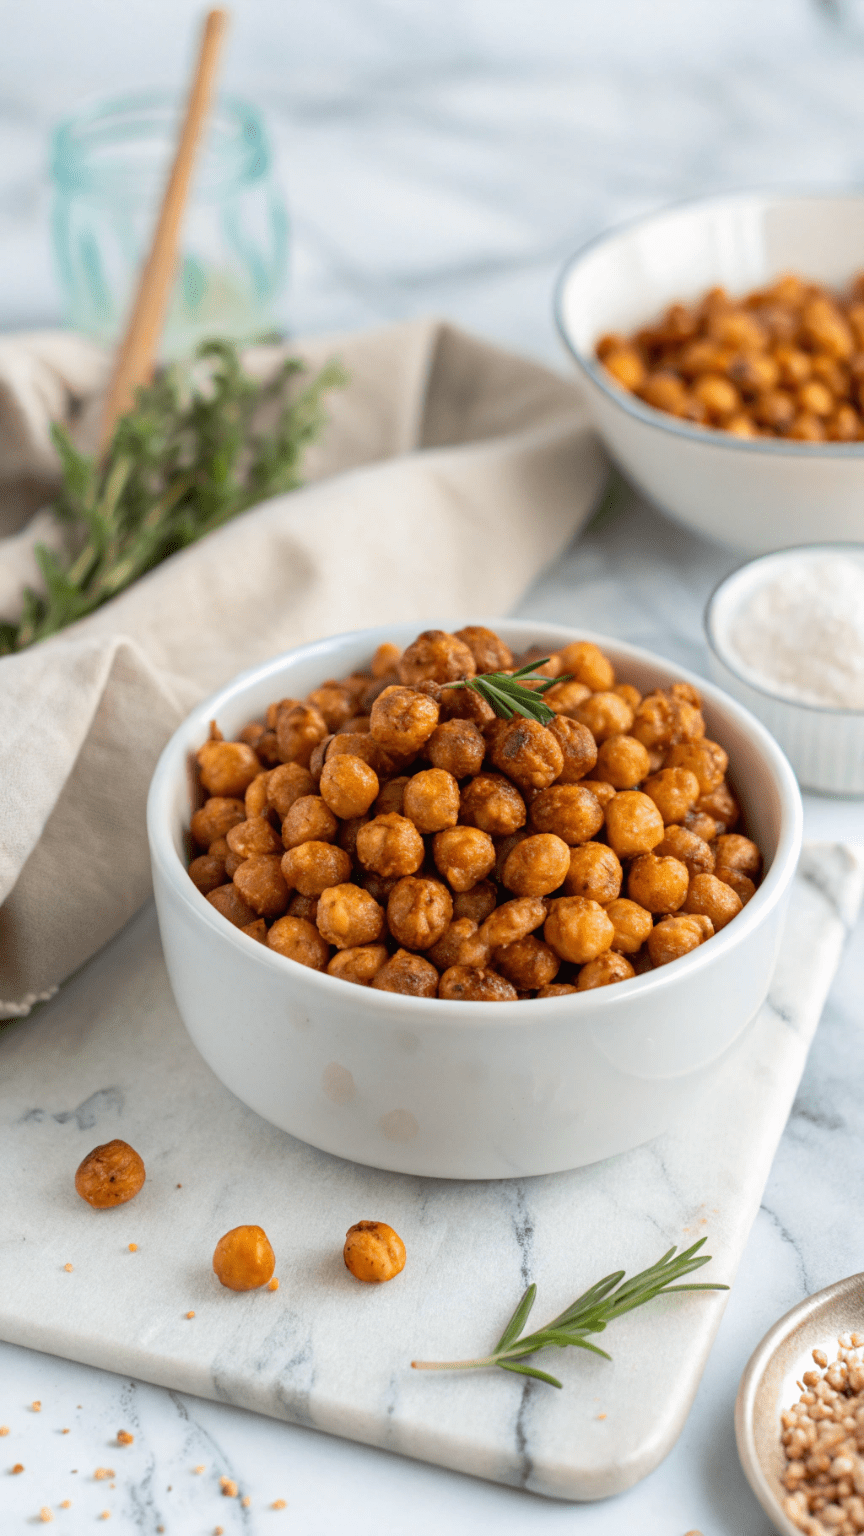
Crispy Roasted Chickpeas
Craving a healthy, crunchy snack? Try these crispy roasted chickpeas! Packed with protein and fiber, they make the perfect guilt-free munchies.
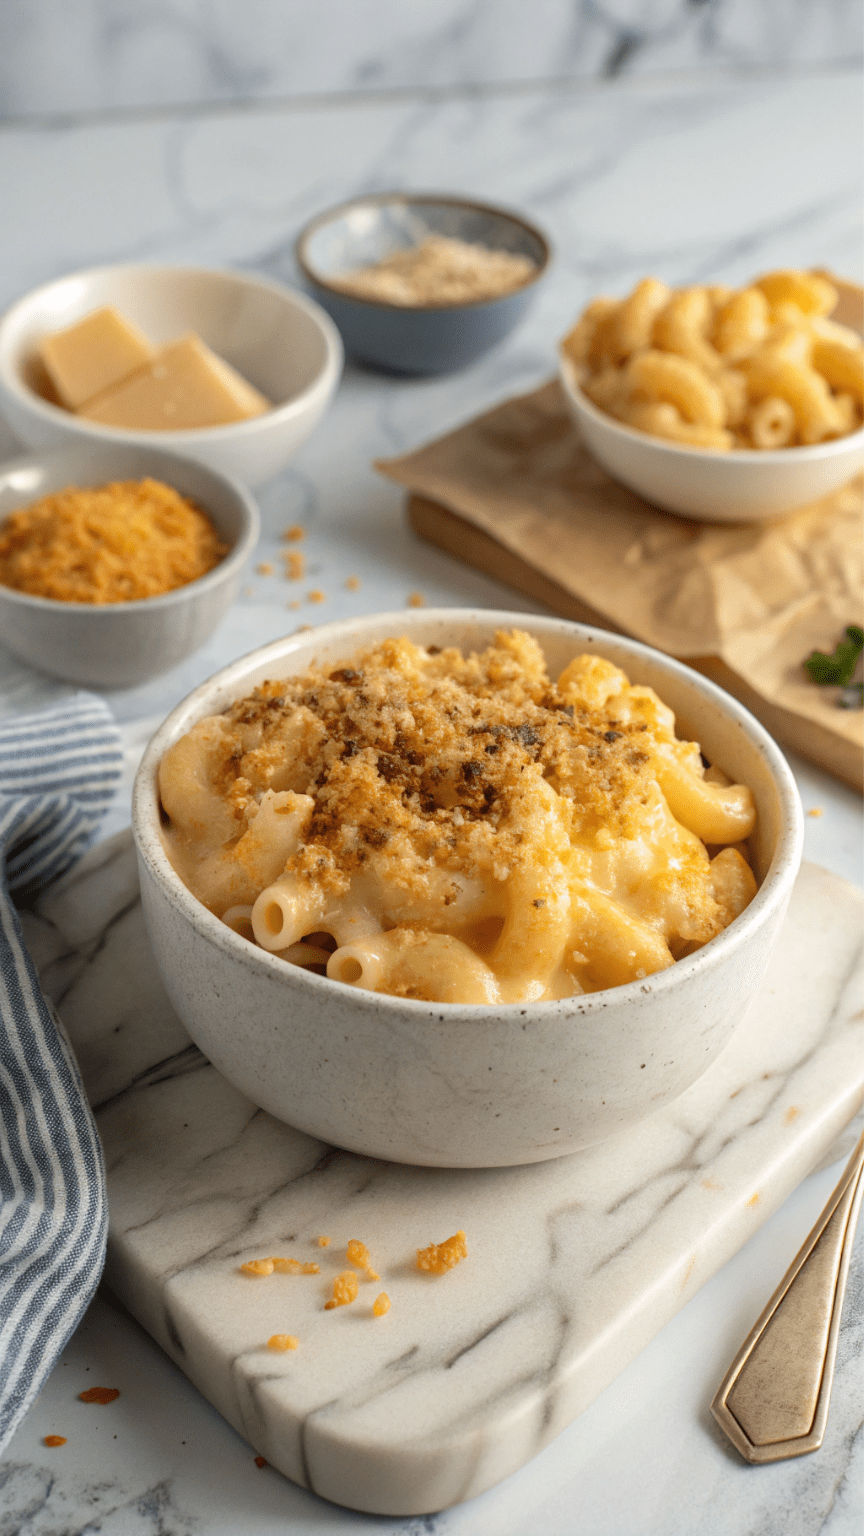
High-Protein Mac & Cheese
This Protein Mac & Cheese is a creamy, cheesy, and protein-packed twist on the classic comfort food! Made with high-protein pasta, cottage cheese, and cheddar, this dish is perfect for a delicious and nutritious meal that supports your fitness goals.
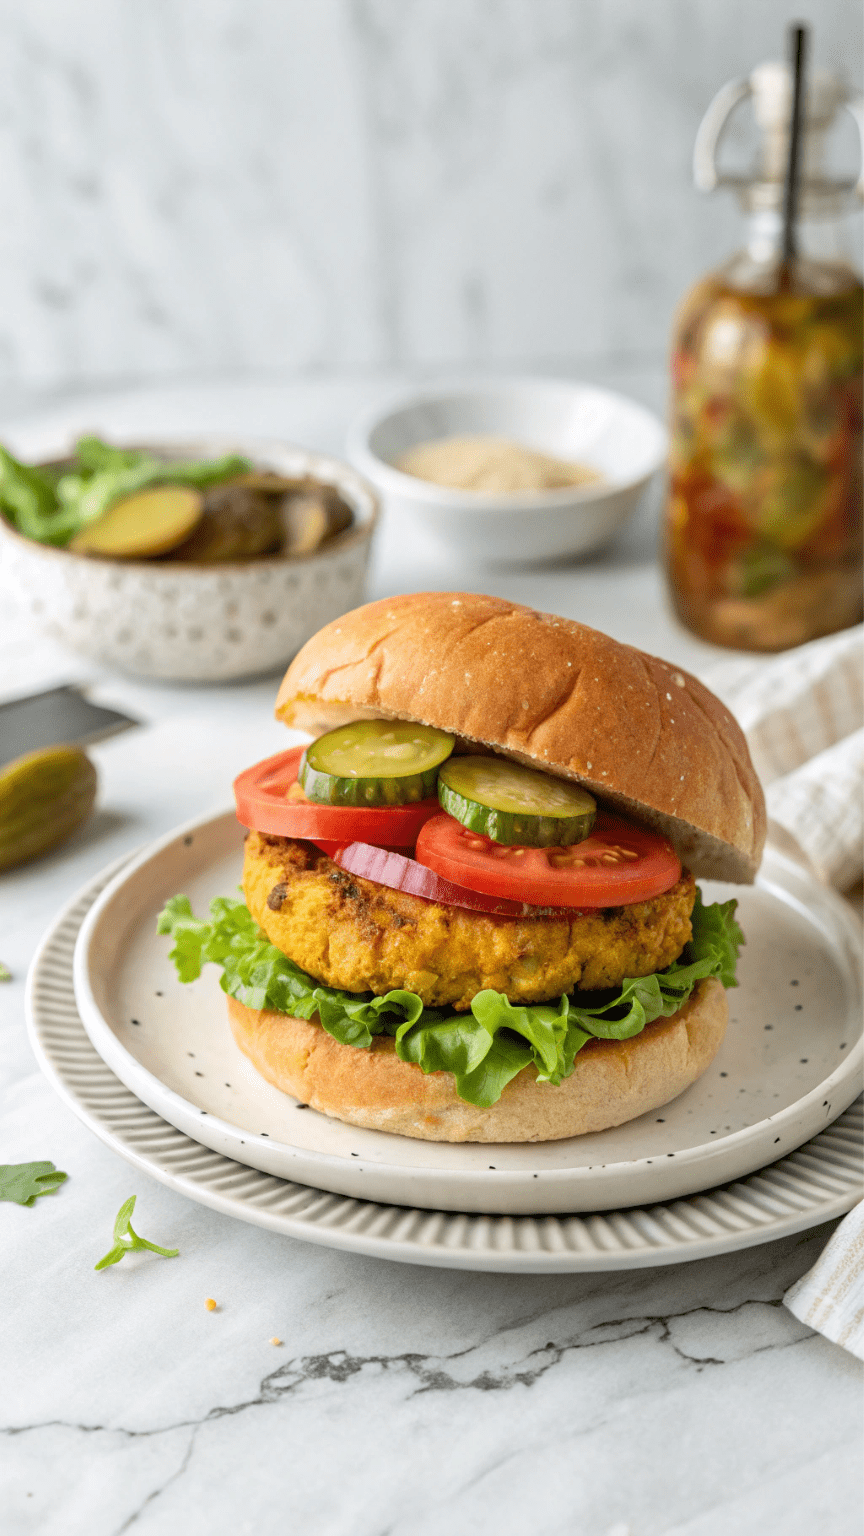
Chickpea Patty Burgers
These Chickpea Patty Burgers are a delicious, protein-packed alternative to traditional burgers, featuring crispy, flavorful patties made with chickpeas, oats, and savory spices. Perfect for a healthy and satisfying meal!
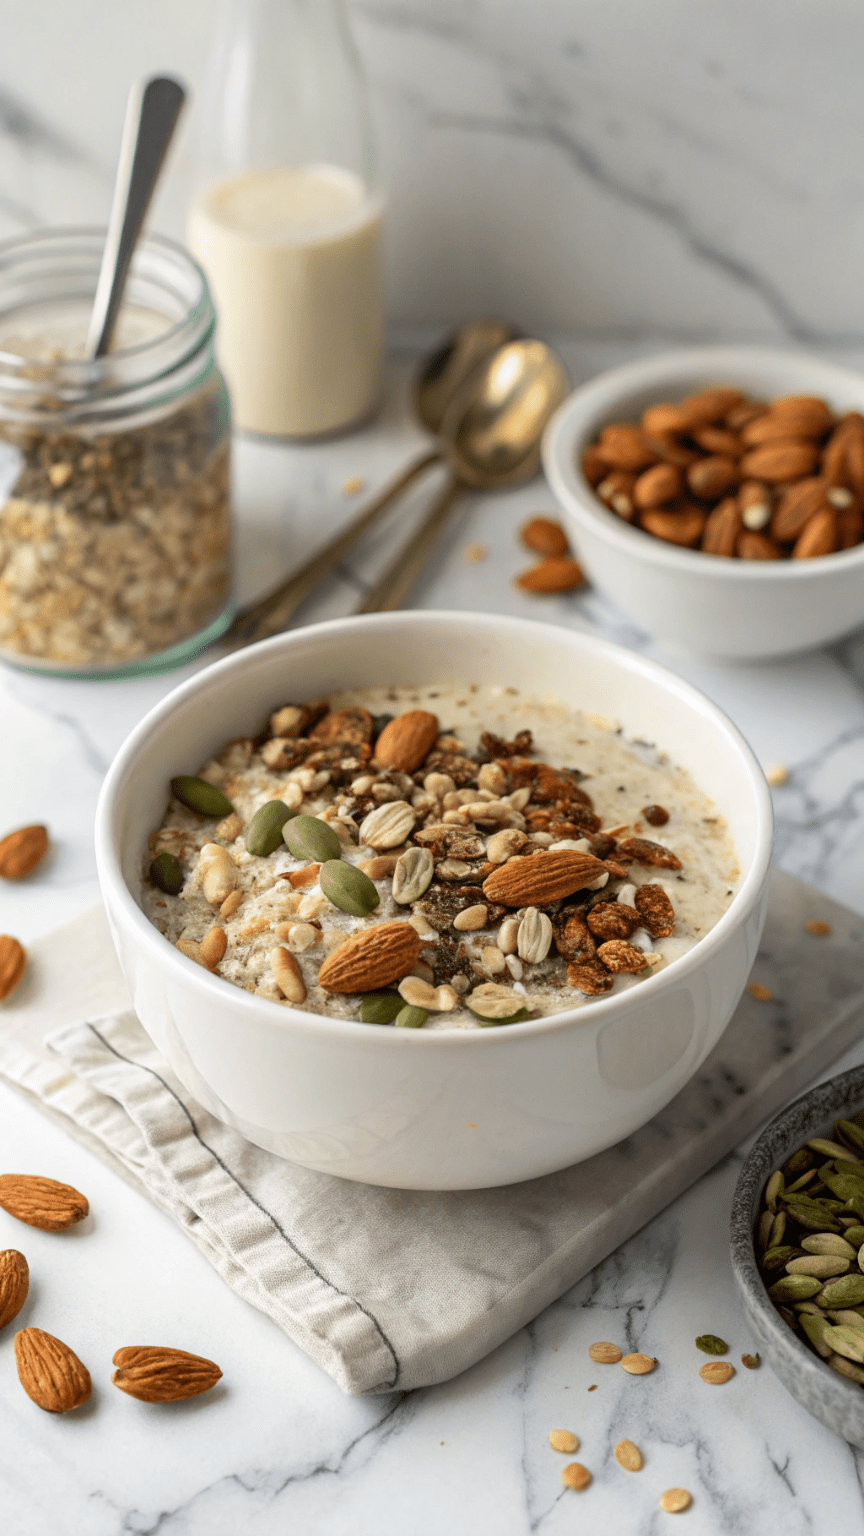
Vegan Overnight Oats with Nuts & Seeds
Start your day with these Vegan Overnight Oats with Nuts & Seeds, a nutritious and delicious make-ahead breakfast packed with fiber, protein, and healthy fats. This easy recipe is perfect for meal prep and can be customized with your favorite toppings!
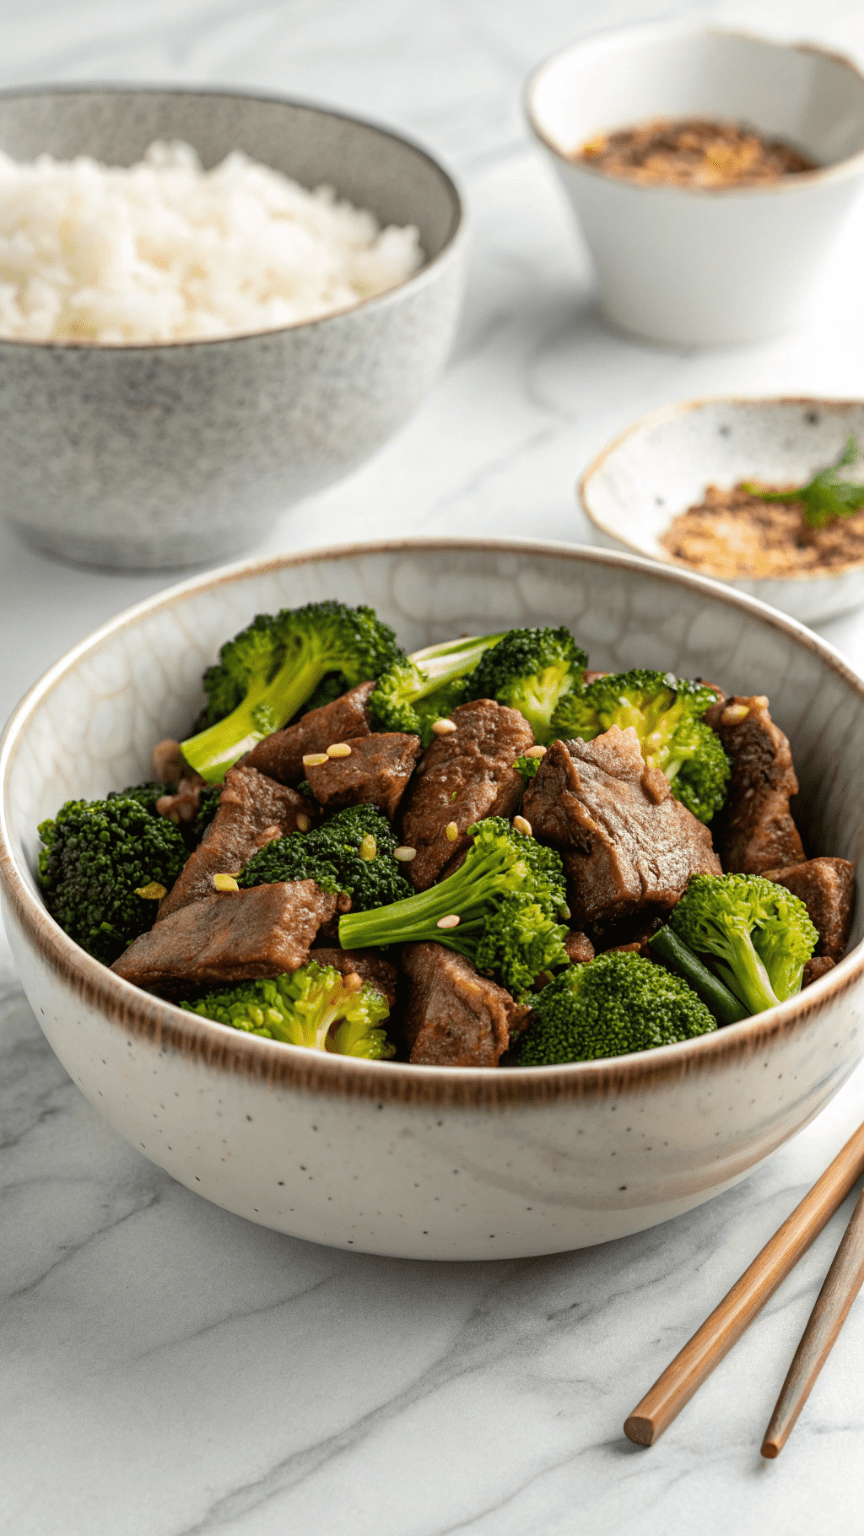
Beef & Broccoli Bowl
Enjoy a delicious and protein-packed Beef & Broccoli Bowl with tender beef slices, crisp broccoli, and a flavorful savory sauce, served over fluffy rice or cauliflower rice. This quick and easy meal is perfect for busy weeknights and is packed with nutrients!
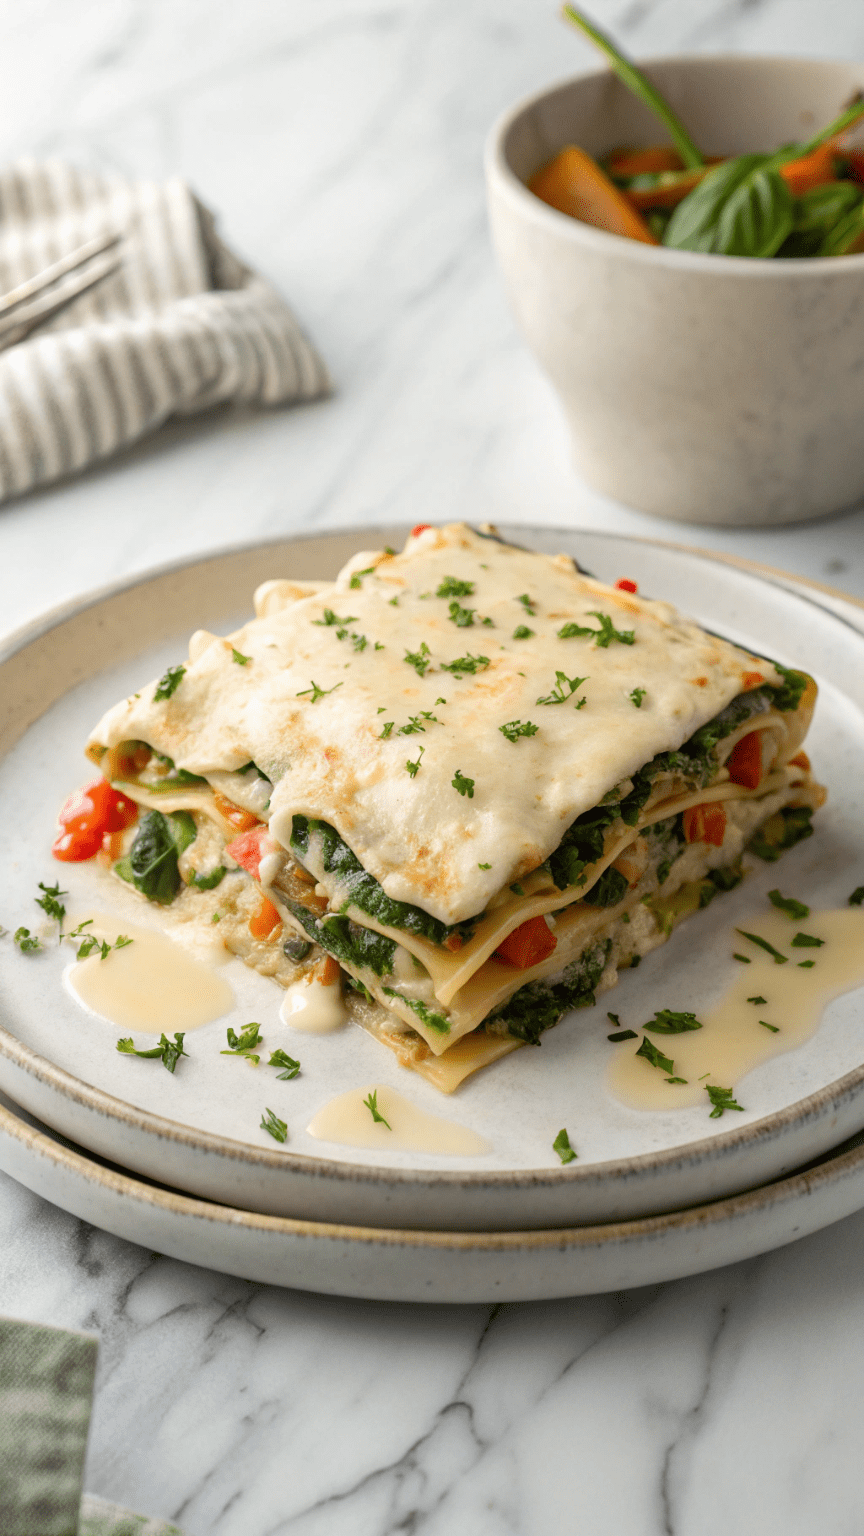
Creamy Veggie Lasagna
Indulge in this Creamy Veggie Lasagna, a rich and satisfying vegetarian dish layered with tender vegetables, creamy béchamel sauce, and gooey cheese. Perfect for a family dinner or meal prep, this recipe is packed with flavor and nutrients!
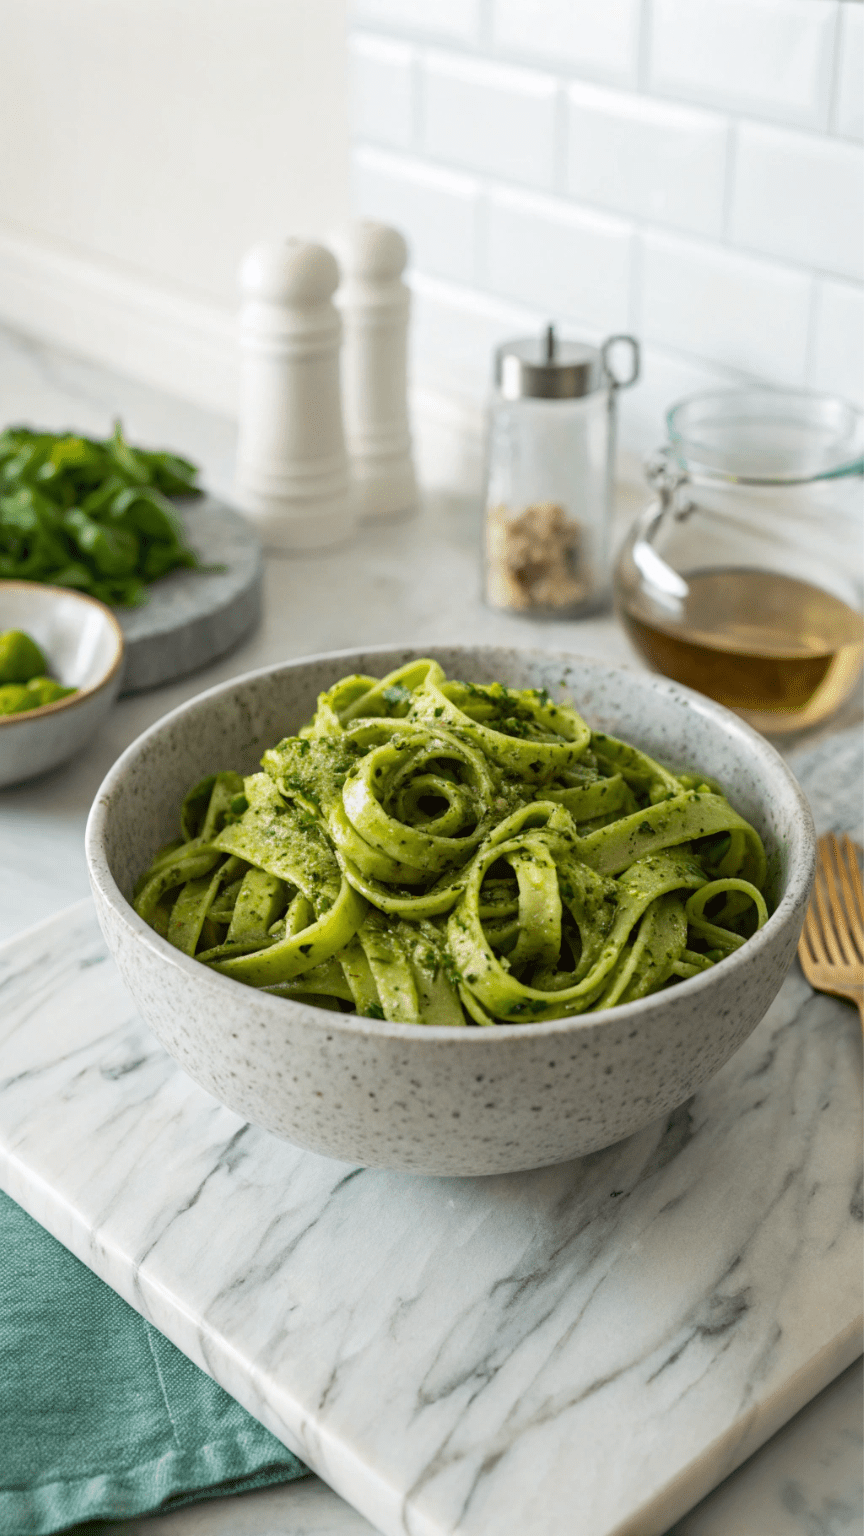
Green Goddess Vegan Pasta
Indulge in this creamy Green Goddess Vegan Pasta, made with fresh herbs, avocado, and a vibrant green sauce. A healthy, flavorful, and easy plant-based meal ready in just 30 minutes!
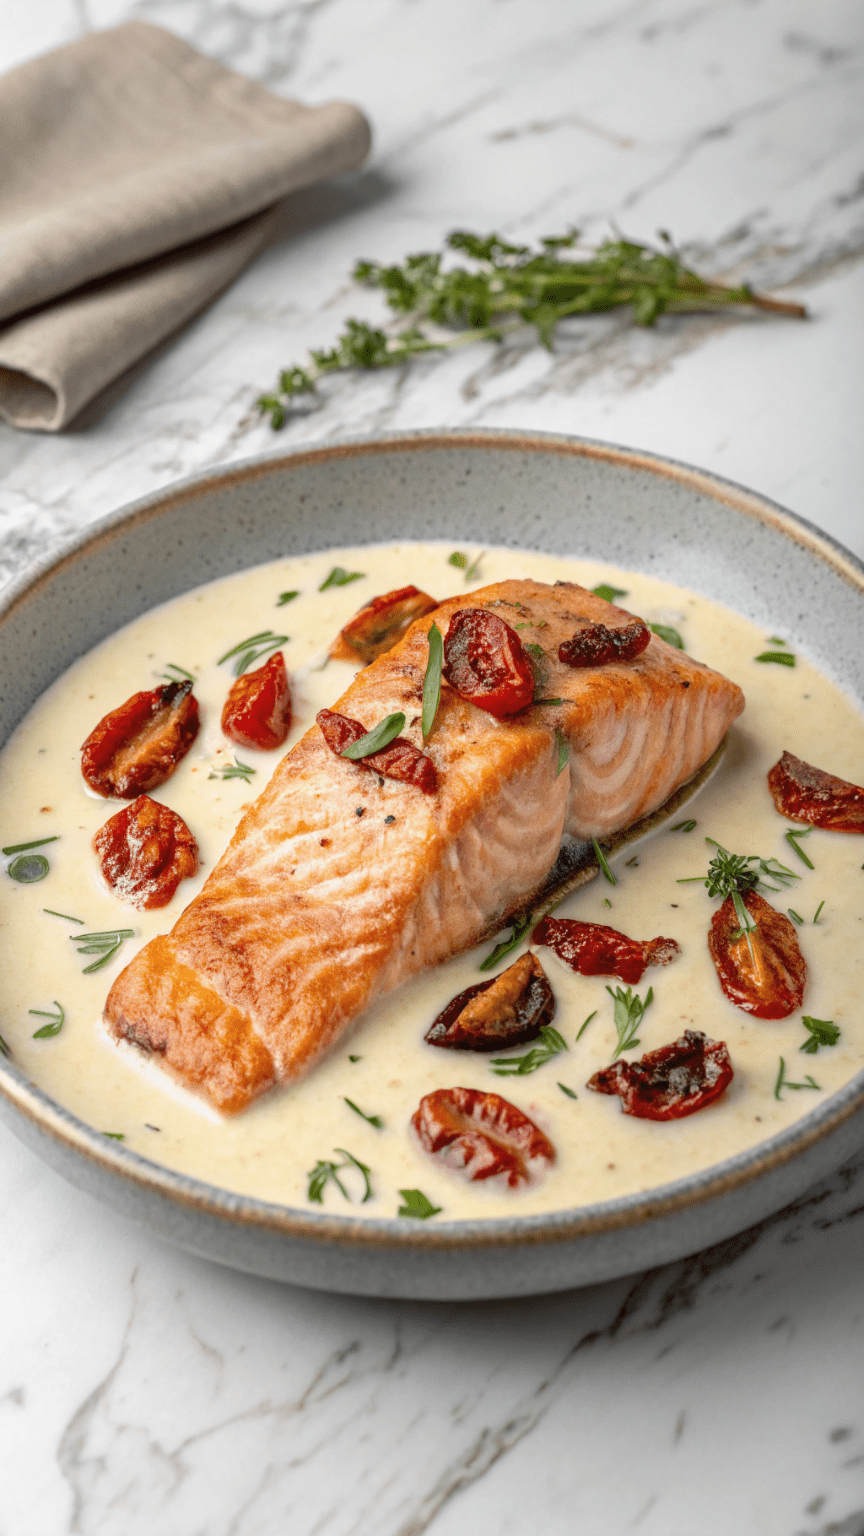
Marry Me Salmon
Marry Me Salmon is a rich and creamy dish featuring perfectly seared salmon in a garlic parmesan sun-dried tomato sauce. Ready in just 30 minutes, this easy and flavorful recipe is perfect for date night or a special dinner!
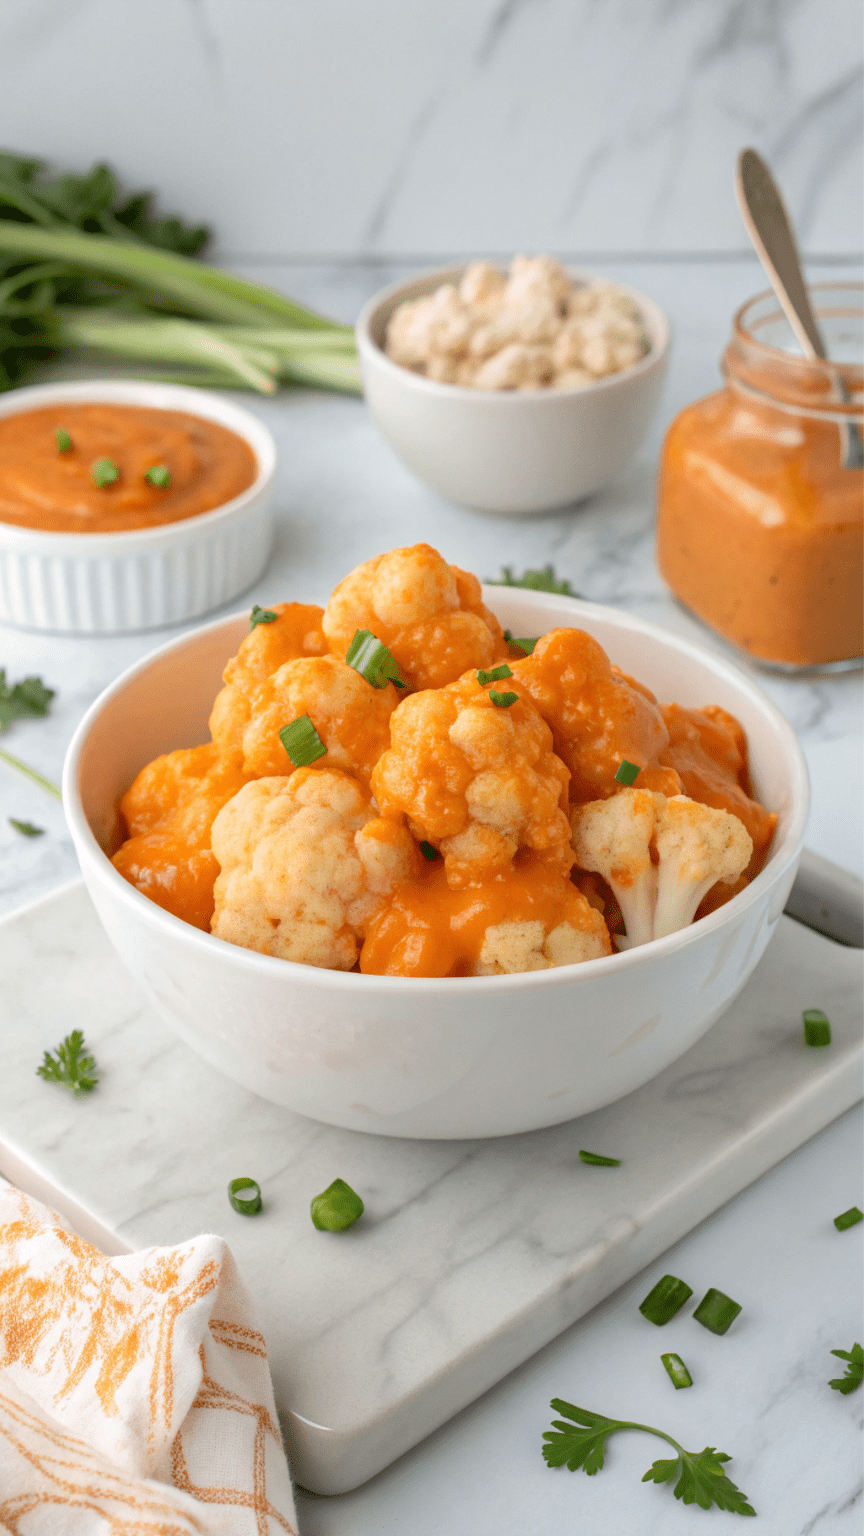
Bang Bang Cauliflower
Crispy, spicy, and delicious, this Bang Bang Cauliflower is coated in a crunchy batter and tossed in a creamy, sweet chili sauce. A perfect vegetarian appetizer or side dish that’s easy to make and packed with flavor!
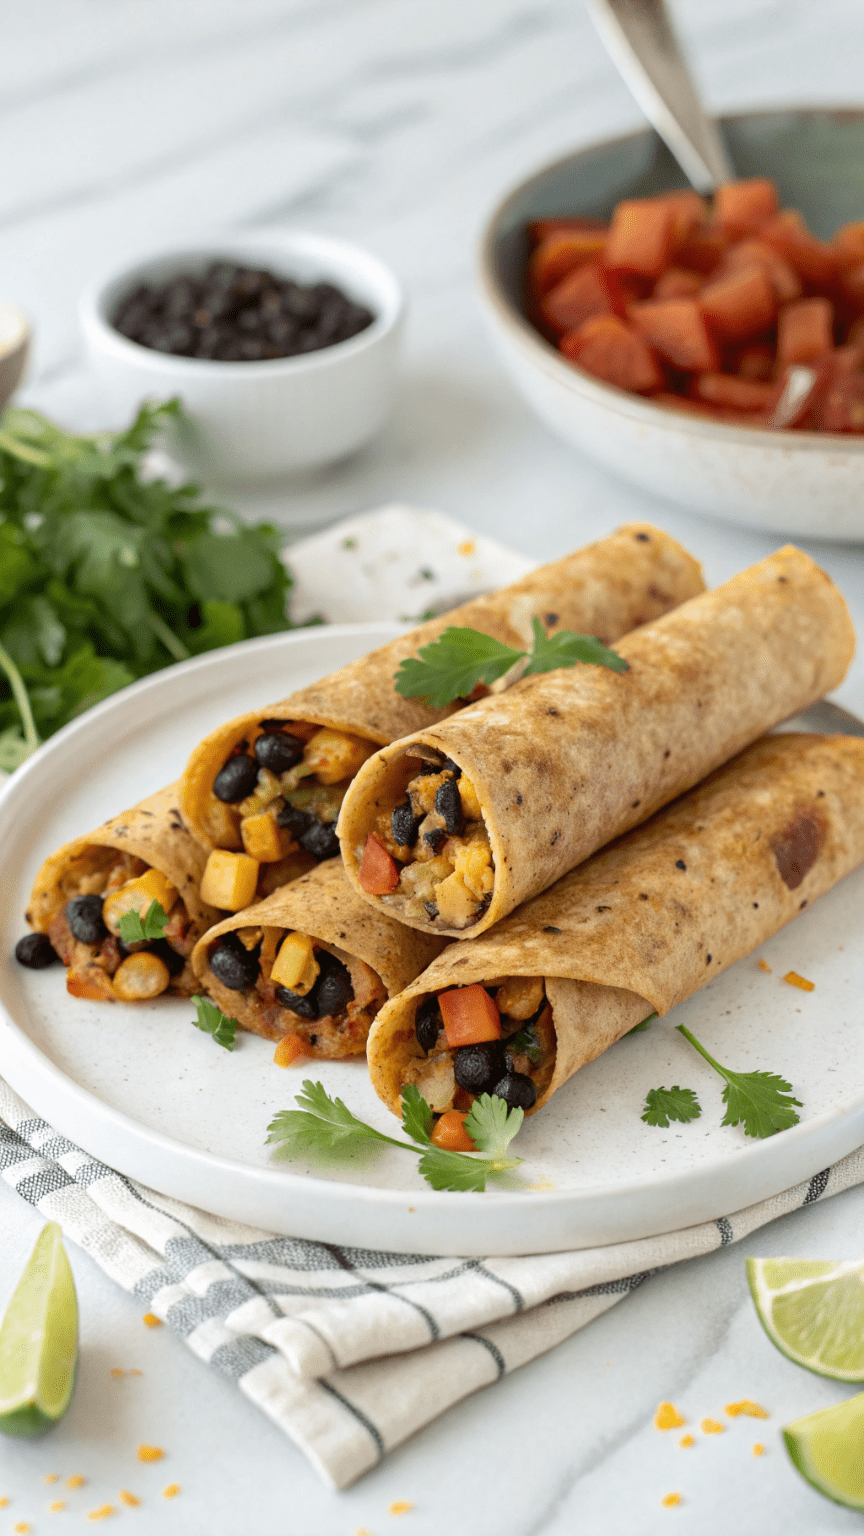
Crispy Vegan Taquitos
Make these crispy vegan taquitos filled with flavorful black beans, sweet potatoes, and spices. Baked or air-fried for a healthier crunch, they’re perfect for a delicious plant-based meal or snack!
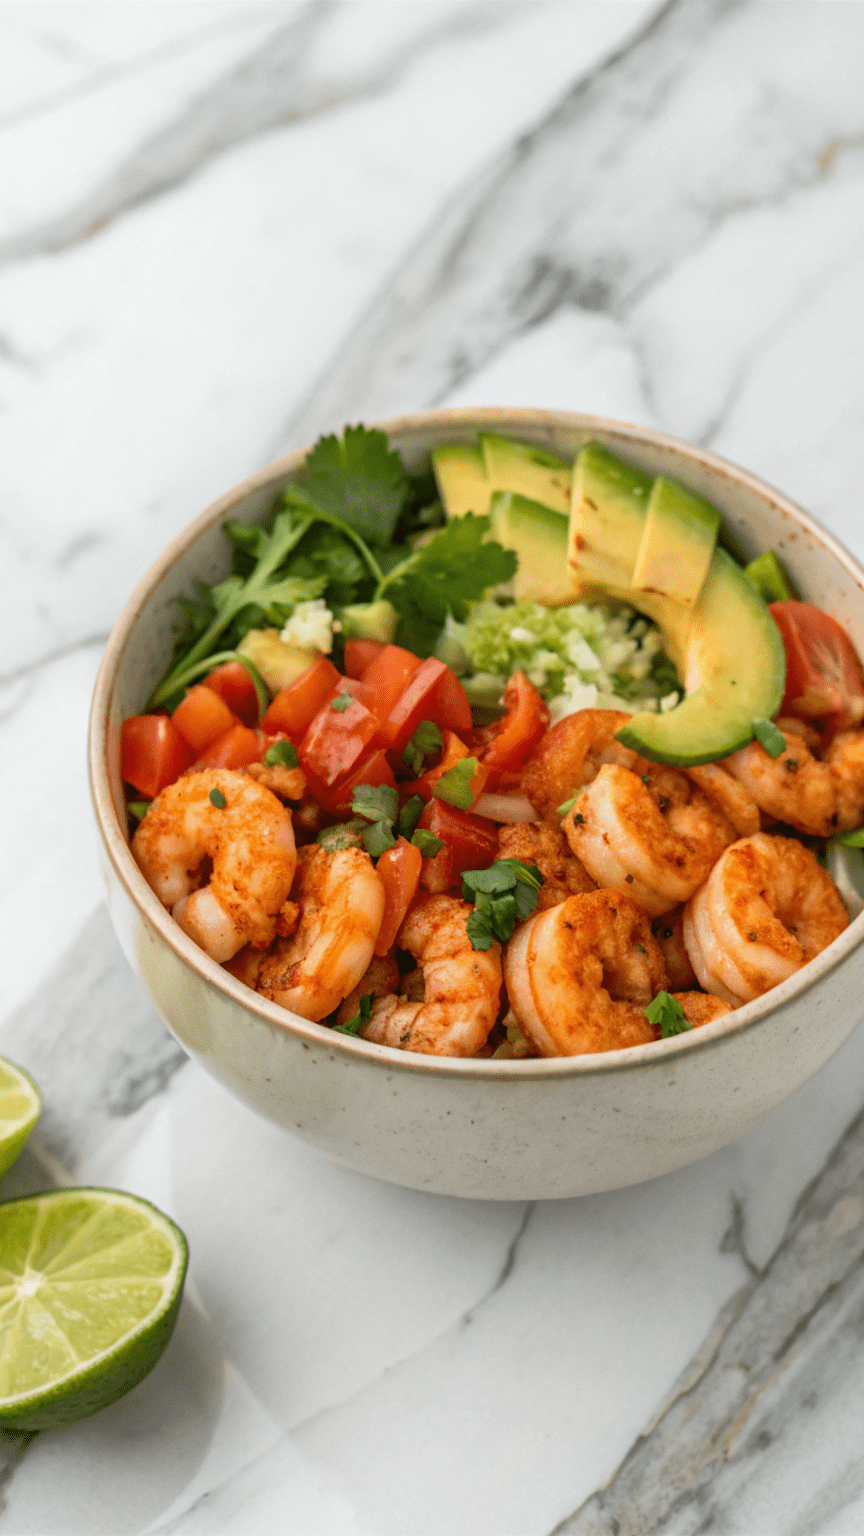
Chili-Lime Shrimp Bowl
This Chili-Lime Shrimp Bowl is a zesty, protein-packed meal with juicy shrimp, rice, black beans, avocado, and fresh veggies. Topped with a tangy lime dressing, it’s a flavorful and healthy dish perfect for lunch or dinner!
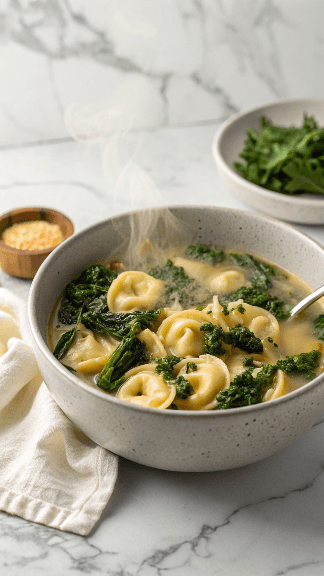
Creamy Vegetarian Tortellini Soup with Kale
This creamy vegetarian tortellini soup with kale is a cozy, flavorful meal packed with cheesy tortellini, tender veggies, and a rich broth. Perfect for a comforting dinner, this easy one-pot recipe is ready in under 30 minutes!
Vegan Pasta with Cashew Cream Sauce
This Vegan Creamy Cashew Pasta is rich, dairy-free, and packed with flavor! Made with a luscious cashew cream sauce, garlic, and nutritional yeast, it’s a delicious plant-based pasta dish perfect for a comforting yet healthy meal.
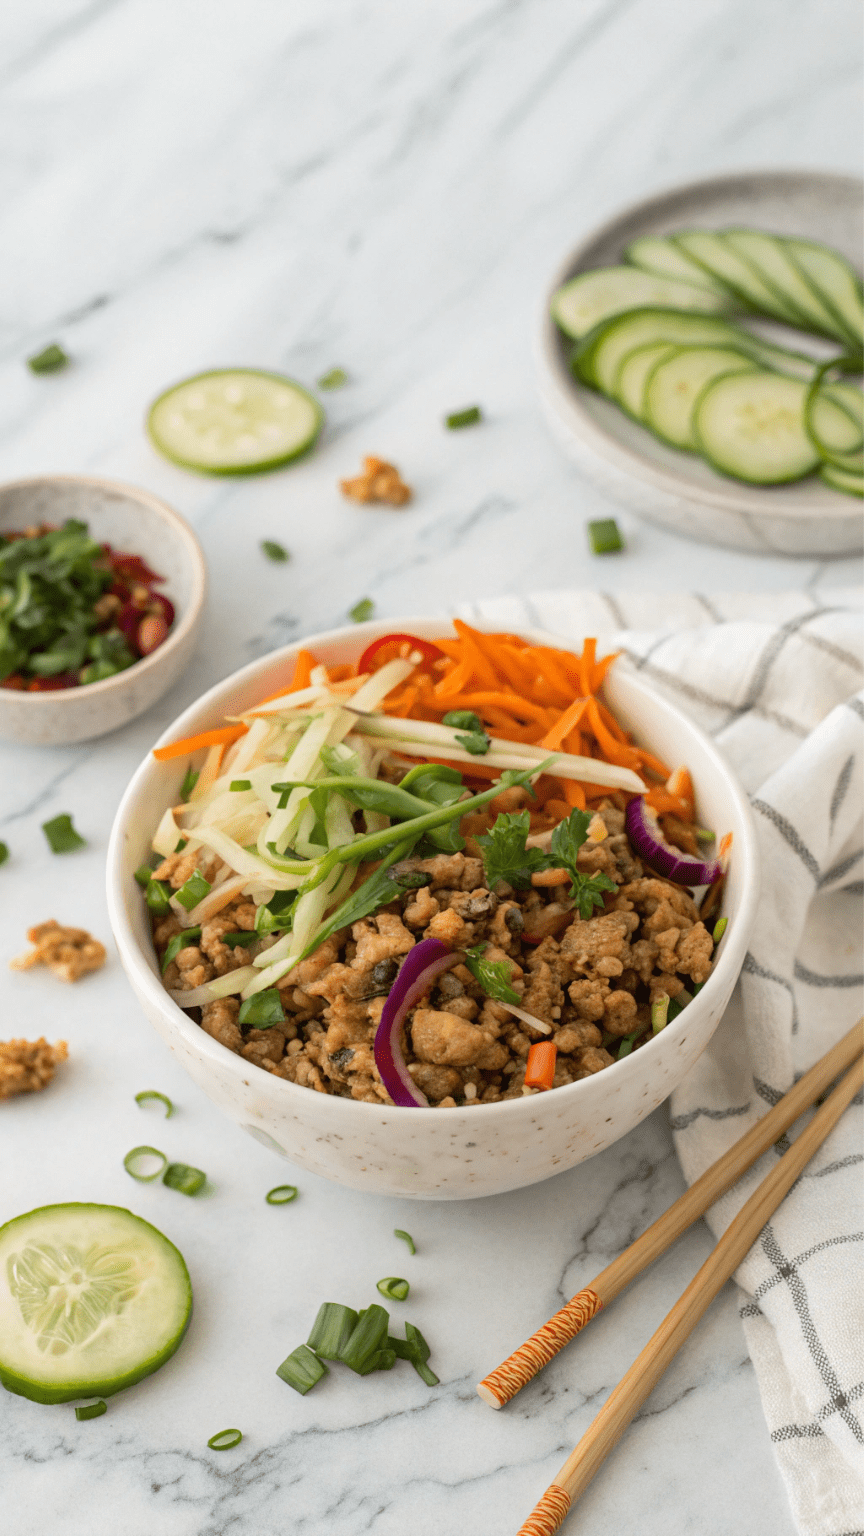
Egg Roll in a Bowl
This Egg Roll in a Bowl is a healthy, low-carb, and high-protein meal packed with savory flavors! Made with ground turkey, cabbage, and a delicious sesame-soy sauce, it’s perfect for weight loss and easy meal prep.
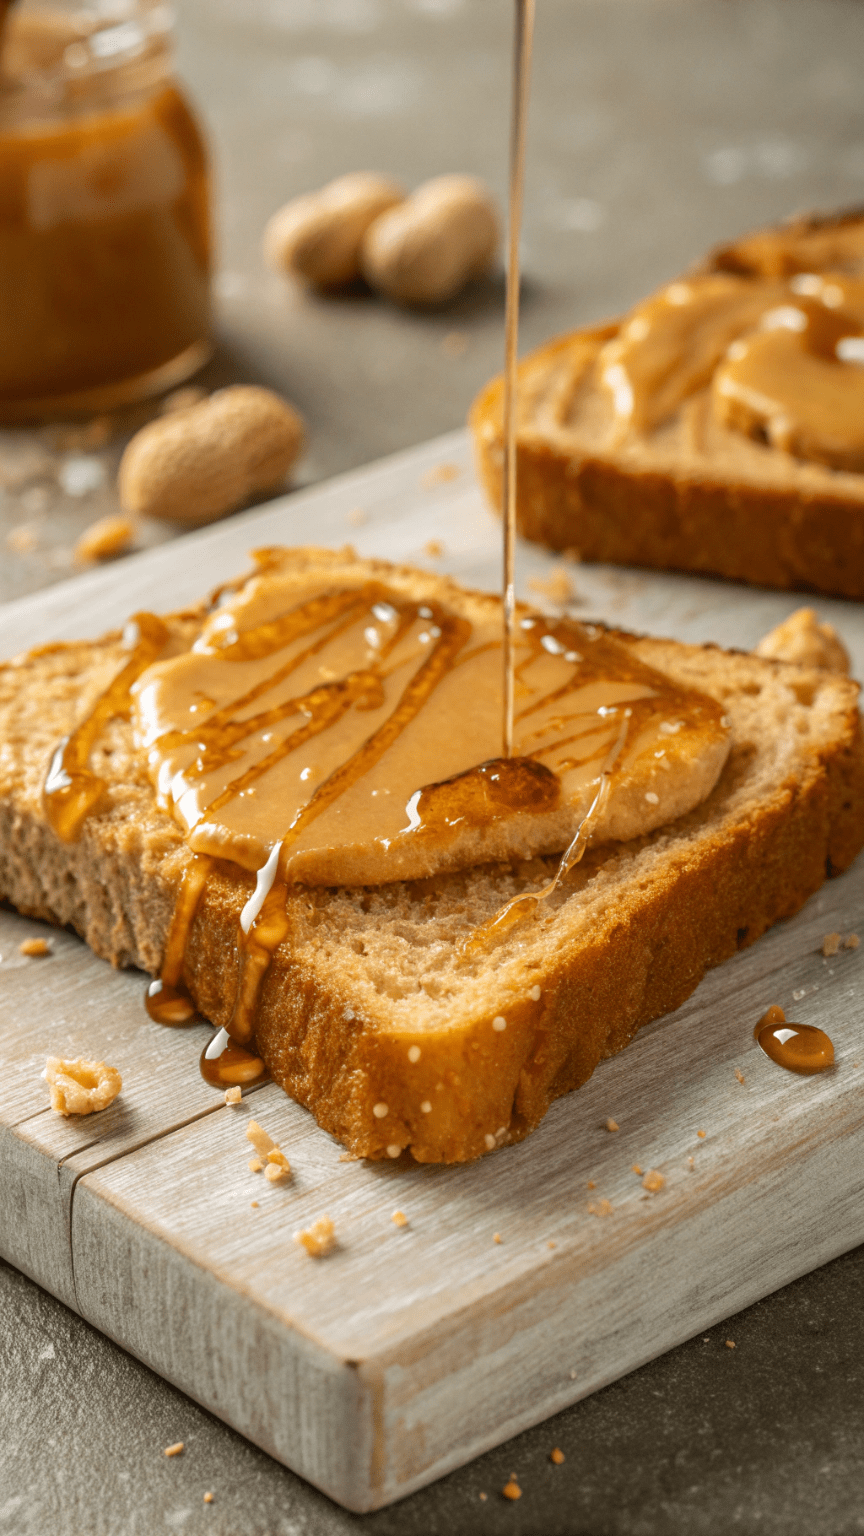
Peanut Butter & Honey Toast
Boost your calorie intake with this High-Calorie Peanut Butter & Honey Toast! Packed with healthy fats, protein, and fiber, this delicious toast is perfect for healthy weight gain and sustained energy.
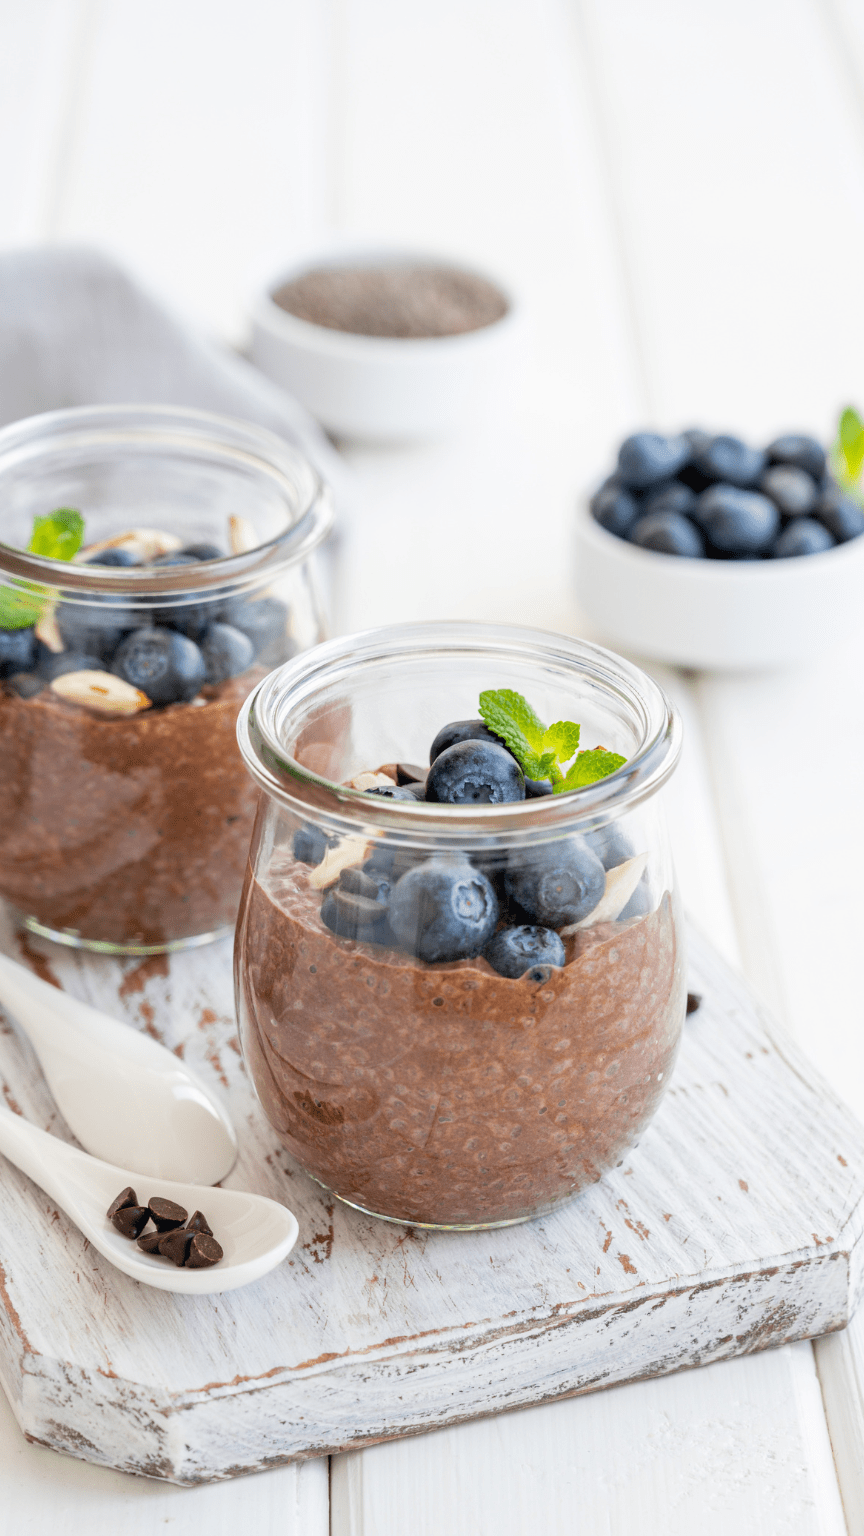
Chocolate Chia Seed Pudding
Indulge in this rich and creamy Chocolate Chia Seed Pudding – a vegan, weight-loss-friendly treat packed with fiber, protein, and healthy fats. Perfect for breakfast, a snack, or dessert!
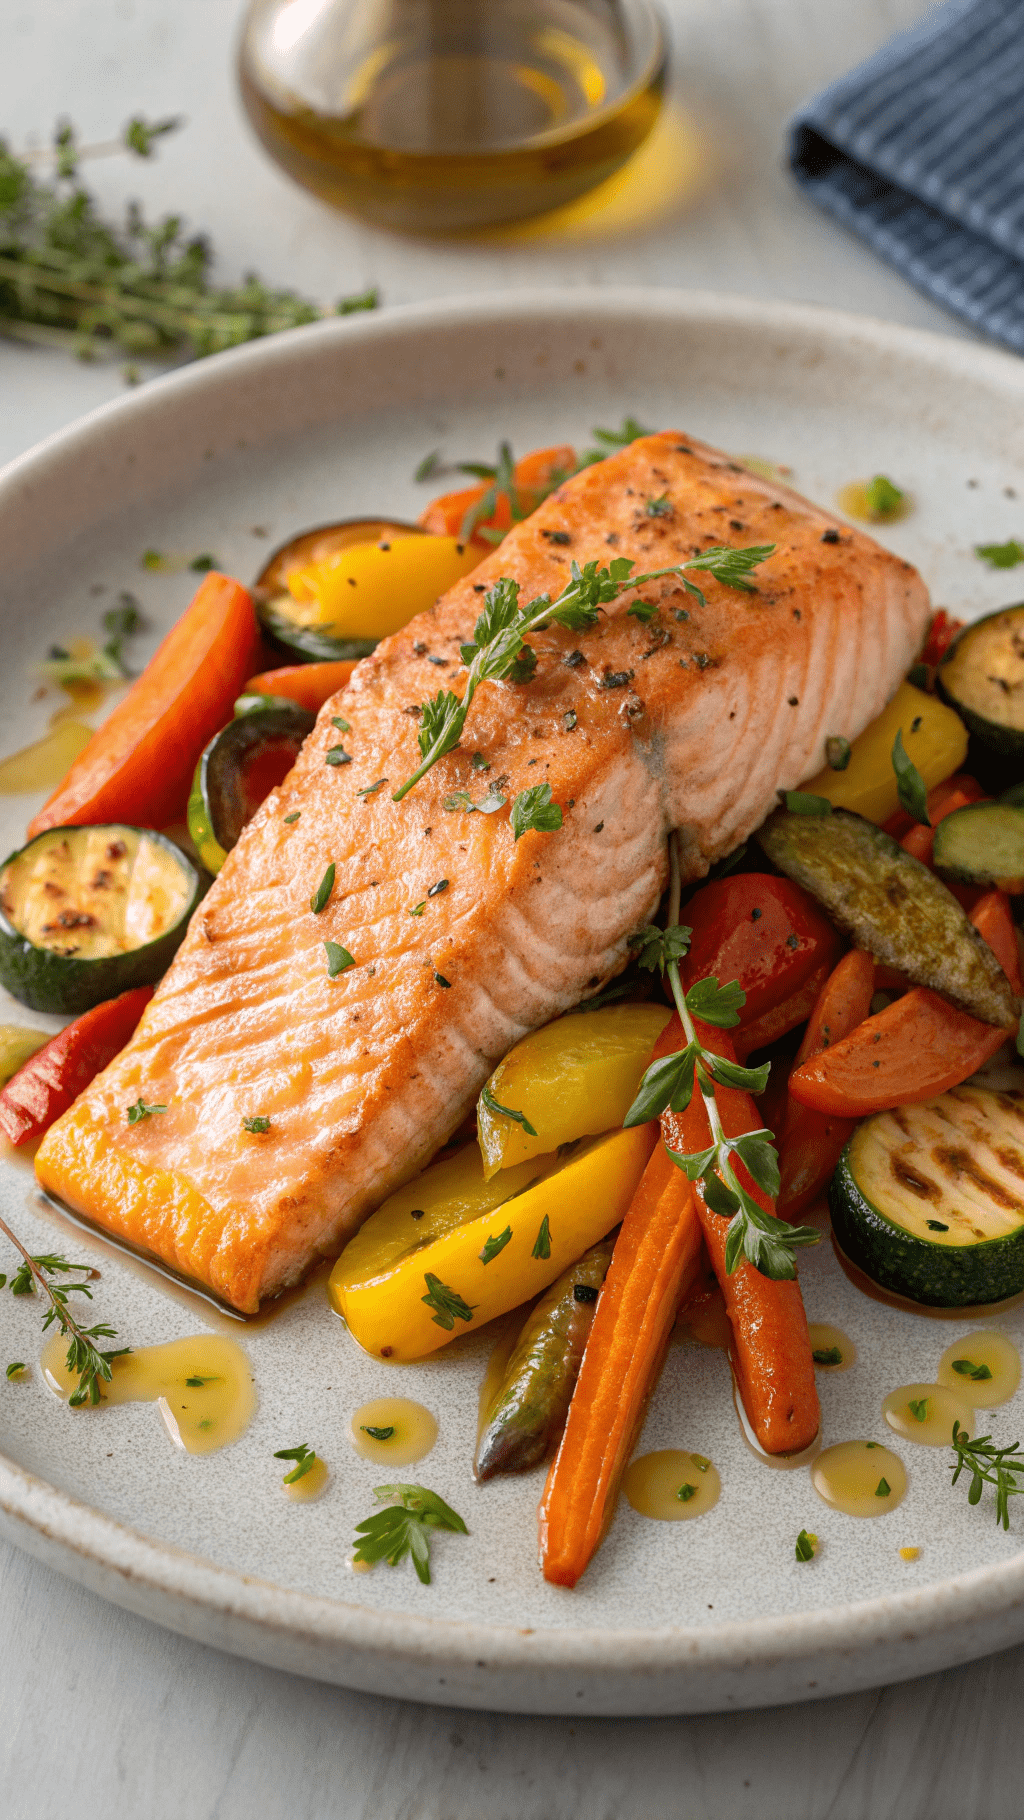
Baked Salmon with Roasted Vegetables
Enjoy our healthy baked salmon with roasted vegetables recipe—packed with omega-3s, vitamins, and flavor for a balanced, nutrient-rich meal perfect for weight loss and wellness.
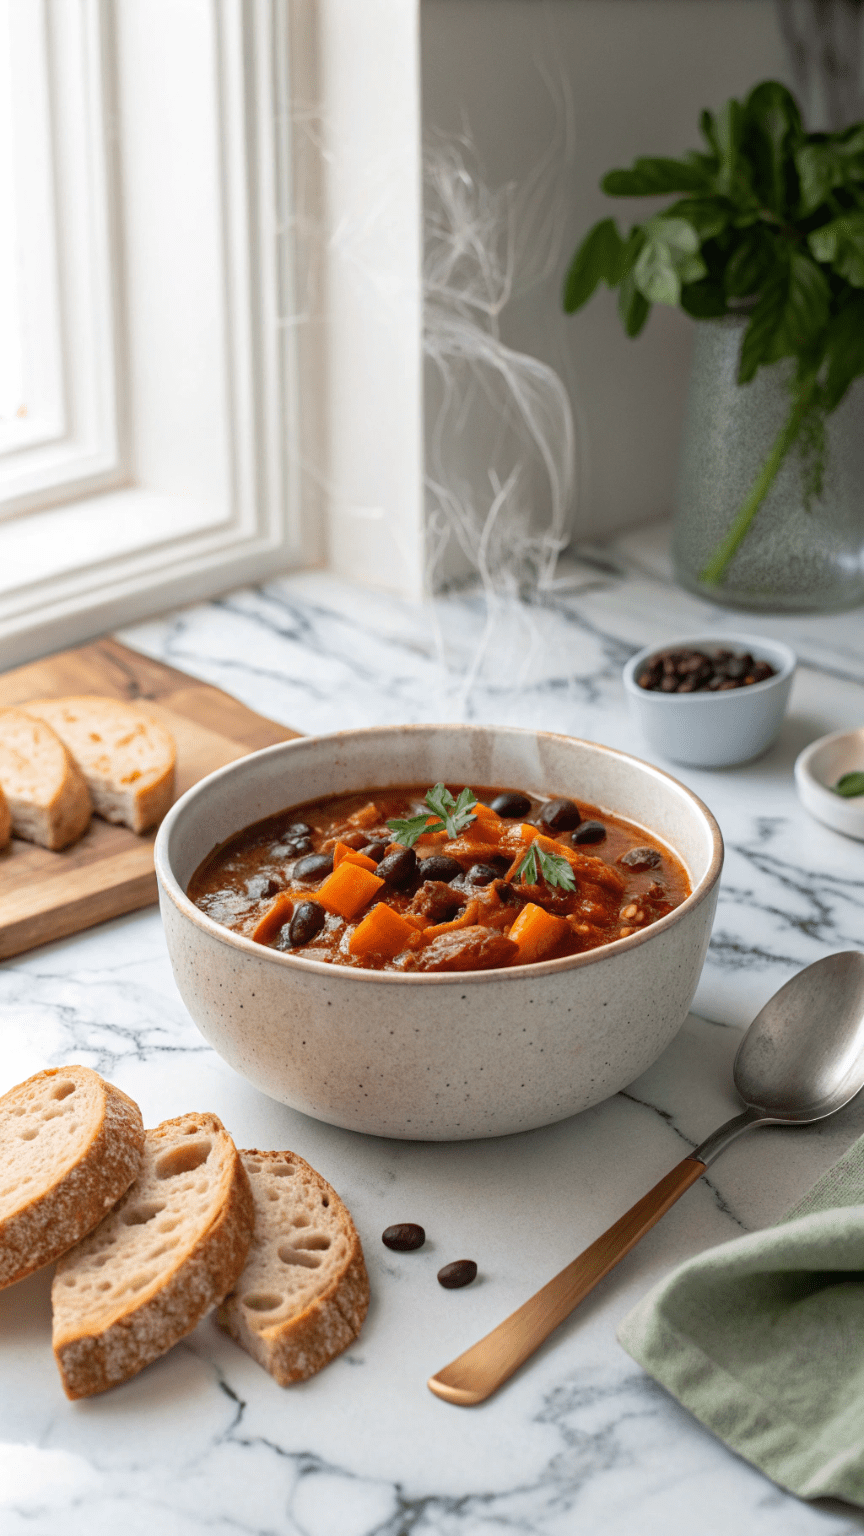
Black Bean and Sweet Potato Chili Soup
This hearty Black Bean and Sweet Potato Soup is a flavorful, nutrient-packed dish perfect for a cozy meal. Rich in fiber and protein, this easy one-pot recipe is both satisfying and healthy—perfect for meal prep or a comforting dinner!
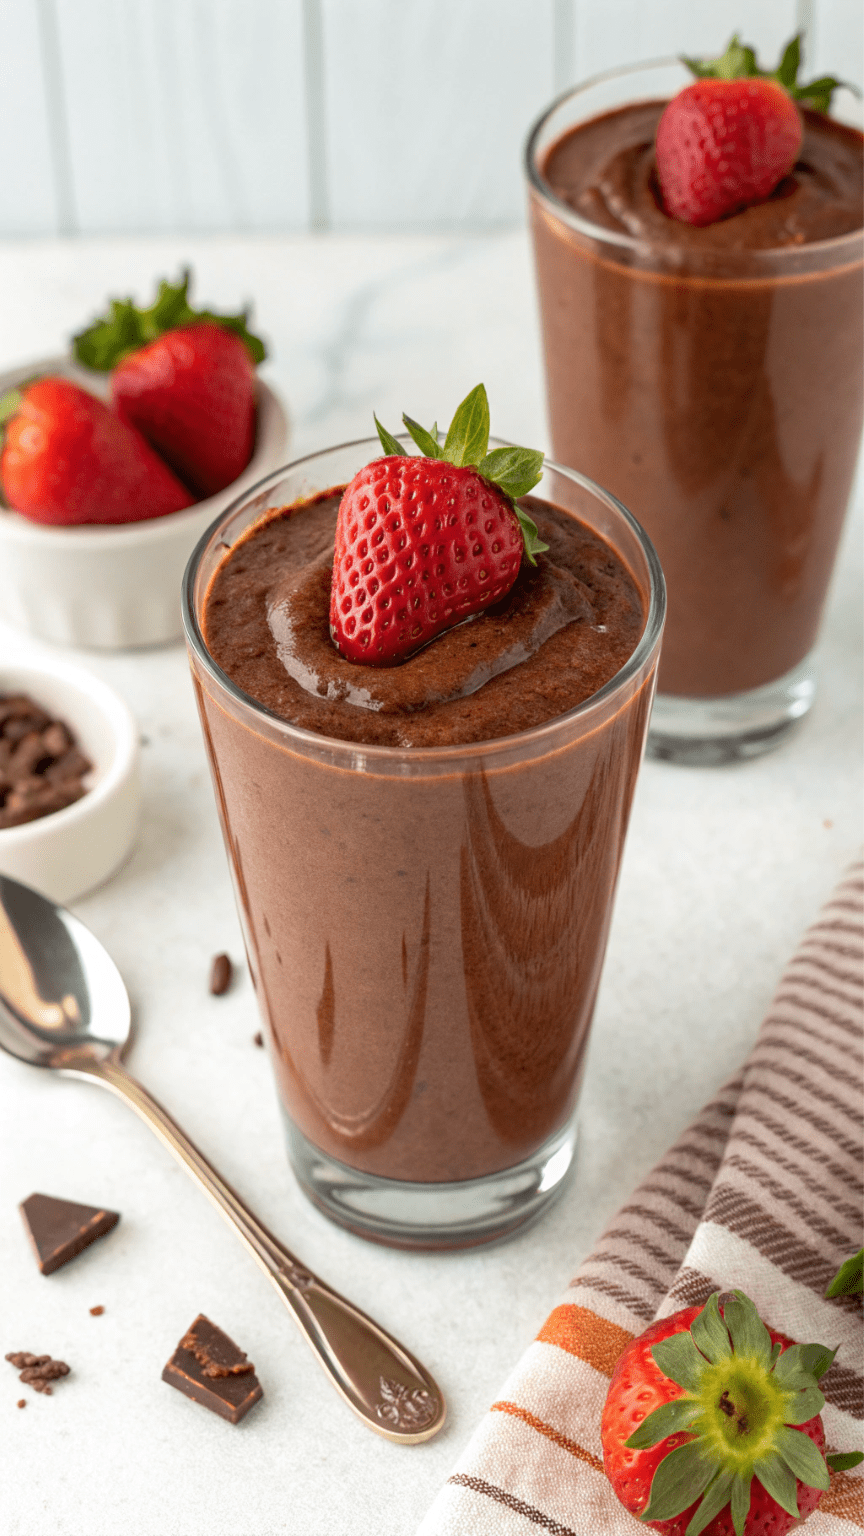
Vegan Chocolate Covered Strawberry Protein Shake
Indulge in a nutritious vegan chocolate covered strawberry protein shake. Our plant-based recipe blends frozen strawberries, cocoa, and vegan protein powder for a delicious post-workout treat that satisfies your sweet cravings while fueling your body.
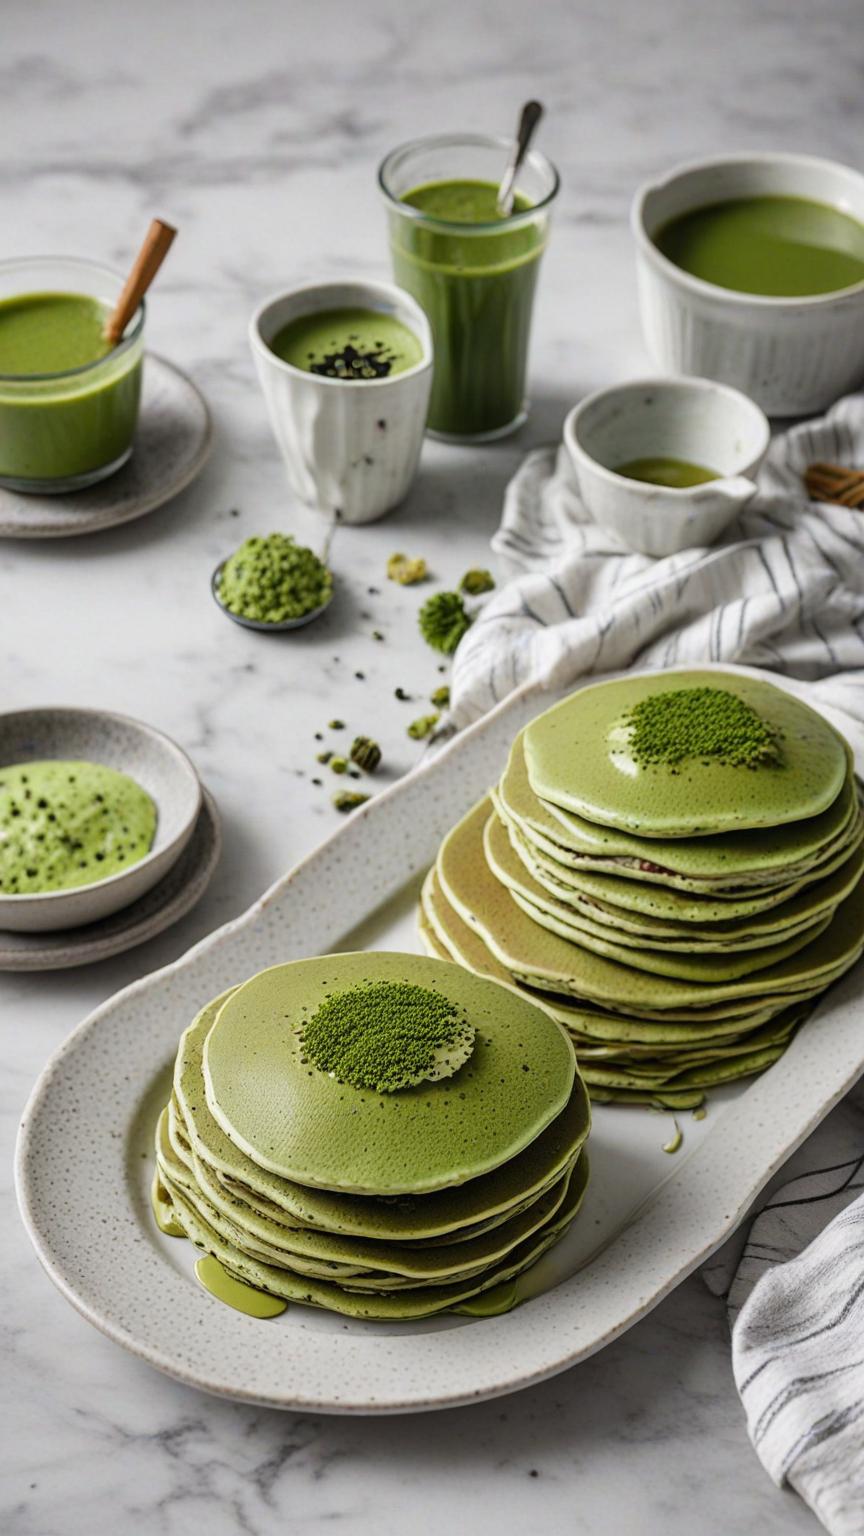
Protein Matcha Pancakes
Protein Matcha pancakes Elevate your breakfast game with these Protein Matcha Pancakes! Bursting with the vibrant green hue of matcha and packed with protein, these pancakes are as nutritious as they are delicious. The blend of oat flour and vanilla protein powder ensures a satisfying and energizing meal, while the subtle matcha flavor adds a unique twist. Lightly sweetened with honey or maple syrup, and topped with fresh berries, banana slices, or a dollop of Greek yogurt, these pancakes make for a perfect start to your day or a post-workout treat. Enjoy the perfect balance of health and indulgence with every fluffy bite! How do I add more protein to this recipe without protein powder? GREEK YOGURT: Add to the Batter: Mix in 1/2 cup of Greek yogurt into the batter. Greek yogurt adds about 10 grams of protein and makes the pancakes extra moist. Serve with Greek Yogurt: Top the pancakes with a dollop of Greek yogurt to add extra protein to each serving. NUT BUTTER: Mix into the Batter: Stir in 2 tablespoons of almond or peanut butter to the batter. This adds approximately 8 grams of protein and a nutty flavor. Top with Nut Butter: Drizzle your favorite nut butter on top for added protein and flavor. PROTEIN RICHED FLOUR: Substitute Flour: Replace some of the oat flour with almond flour or chickpea flour. Both are higher in protein. For example, using 1/2 cup almond flour and 1/2 cup oat flour can increase the protein content. Psst! Matcha Lover? Enjoy the taste of matcha but need a high protein intake? No need to purchase different products! Get one that can do both–just add milk! Shop Now Shop Now Shop Now Shop Now Pin Print Protein Matcha Pancakes Recipe by Custom Curves Servings 4 servingsPrep time 10 minutesCooking time 10 minutesCalories 200 kcal Ingredients 1 cup oat flour (or whole wheat flour) 1 scoop vanilla protein powder 1 tsp baking powder 1/2 tsp baking soda 1/4 tsp salt 1 large 1 large egg 1 cup unsweetened almond milk (or any milk of choice) 1 tbsp honey or maple syrup 1 tsp vanilla extract Coconut oil or cooking spray (for cooking) Toppings Fresh berries (e.g., strawberries, blueberries, raspberries) Sliced banana Greek yogurt Chia seeds Nut butter (e.g., almond or peanut butter) Maple syrup or honey Directions Prepare the Dry Ingredients: In a large mixing bowl, combine the oat flour, vanilla protein powder, matcha powder, baking powder, baking soda, and salt. Mix well. Prepare the Wet Ingredients: In a separate bowl, whisk together the egg, almond milk, honey or maple syrup, and vanilla extract until well combined. Combine Wet and Dry Ingredients: Pour the wet ingredients into the dry ingredients. Stir until just combined, being careful not to overmix. The batter should be slightly thick; if it’s too thick, add a bit more milk until you reach the desired consistency. Preheat the Pan: Heat a non-stick skillet or griddle over medium heat. Lightly grease with coconut oil or cooking spray. Cook the Pancakes: Pour about 1/4 cup of batter onto the skillet for each pancake. Cook until bubbles form on the surface and the edges start to look set, about 2-3 minutes. Flip the pancakes and cook for an additional 1-2 minutes, or until golden brown and cooked through. Serve: Transfer the cooked pancakes to a plate and keep warm. Repeat with the remaining batter, adding more oil to the skillet as needed. Serve the pancakes warm with your favorite toppings such as fresh berries, sliced banana, Greek yogurt, chia seeds, nut butter, and a drizzle of maple syrup or honey. Protein matcha pancakes provide a delicious and nutritious twist on your traditional breakfast favorites. Combining the vibrant flavor of matcha with a protein-packed batter, these pancakes offer a satisfying and energy-boosting start to your day. Their thick, fluffy texture and subtle sweetness make them a delightful treat, while the added protein helps keep you full and supports muscle recovery. Whether enjoyed with fresh fruit, a dollop of Greek yogurt, or a drizzle of nut butter, these pancakes are as versatile as they are wholesome. Indulge in this healthy breakfast option and enjoy a perfect balance of flavor, texture, and nutrition with every bite. Share: Facebook Pinterest Email Shop Now Social Media Facebook-f Youtube Pinterest Instagram Tiktok Most Popular Get The Latest Updates Subscribe To Our Weekly Newsletter No spam, notifications only about new post, updates. Categories On Key Related Posts

5-Minute Grilled Brussel Sprouts
5-minute grilled brussel sprouts Transform your vegetable side dish with these delicious and easy Grilled Brussels Sprouts! Perfectly charred and seasoned with olive oil, garlic, and a hint of smoked paprika, these sprouts deliver a savory, smoky flavor that pairs beautifully with any main course. A splash of balsamic vinegar or lemon juice adds a tangy finish, while a sprinkle of grated Parmesan and fresh parsley takes them to the next level. Nutritious and full of flavor, these grilled Brussels sprouts are sure to become a staple at your table, whether you’re hosting a barbecue or enjoying a weeknight dinner. Enjoy a delightful combination of crispiness and tenderness with every bite! Hey look–ingredients! Just a few ingredients to make your recipe of course! Shop Now Shop Now Shop Now Shop Now Pin Print 5-Minute Grilled Brussel Sprouts Recipe by Custom Curves Course: SidesDifficulty: Easy Servings 4 servingsPrep time 5 minutesCooking time 5 minutesCalories 120 kcal Ingredients 1 Ib (450 g) Brussels sprouts 2 Tbsp olive oil 2 clove garlic, minced 1 tsp salt 1/2 Tsp black pepper 1/2 tsp smoked paprika (optional for a smoky flavor) 1 Tbsp balsamic vinegar or lemon juice (optional for added flavor) Grated Parmesan cheese (optional for garnish) Fresh parsley, chopped (optional for garnish) Directions Prepare the Brussels Sprouts: Trim the ends of the Brussels sprouts and remove any yellow or damaged outer leaves Cut the Brussels sprouts in half lengthwise. Season the Brussels Sprouts In a large bowl, toss the Brussels sprouts with olive oil, minced garlic, salt, black pepper, and smoked paprika (if using). Ensure the Brussels sprouts are evenly coated with the seasoning. Preheat the Grill: Preheat your grill to medium-high heat (around 400°F or 200°C). Grill the Brussels Sprouts: Place the Brussels sprouts cut side down on the grill grates. Grill for about 5-7 minutes on each side, or until the Brussels sprouts are tender and have a nice char. If the sprouts are charring too quickly, reduce the heat slightly. Add Optional Flavor: During the last minute of grilling, drizzle the Brussels sprouts with balsamic vinegar or lemon juice for added flavor. Serve: Remove the Brussels sprouts from the grill and transfer them to a serving platter. Garnish with grated Parmesan cheese and chopped fresh parsley, if desired. Serve immediately while hot. Grilled Brussels sprouts offer a delightful twist on this nutritious vegetable, turning them into a smoky, crispy, and irresistibly savory side dish. The grilling process brings out their natural sweetness and adds a charred depth of flavor that perfectly complements their slightly nutty taste. With a simple seasoning of olive oil, garlic, and a touch of smoked paprika, these sprouts are transformed into a flavorful treat that’s both healthy and satisfying. Whether served alongside your favorite main course or enjoyed as a stand-alone snack, grilled Brussels sprouts are a versatile and delicious addition to any meal, showcasing the perfect balance of taste and nutrition. Share: Facebook Pinterest Email Shop Now Social Media Facebook-f Youtube Pinterest Instagram Tiktok Most Popular Get The Latest Updates Subscribe To Our Weekly Newsletter No spam, notifications only about new post, updates. Categories On Key Related Posts
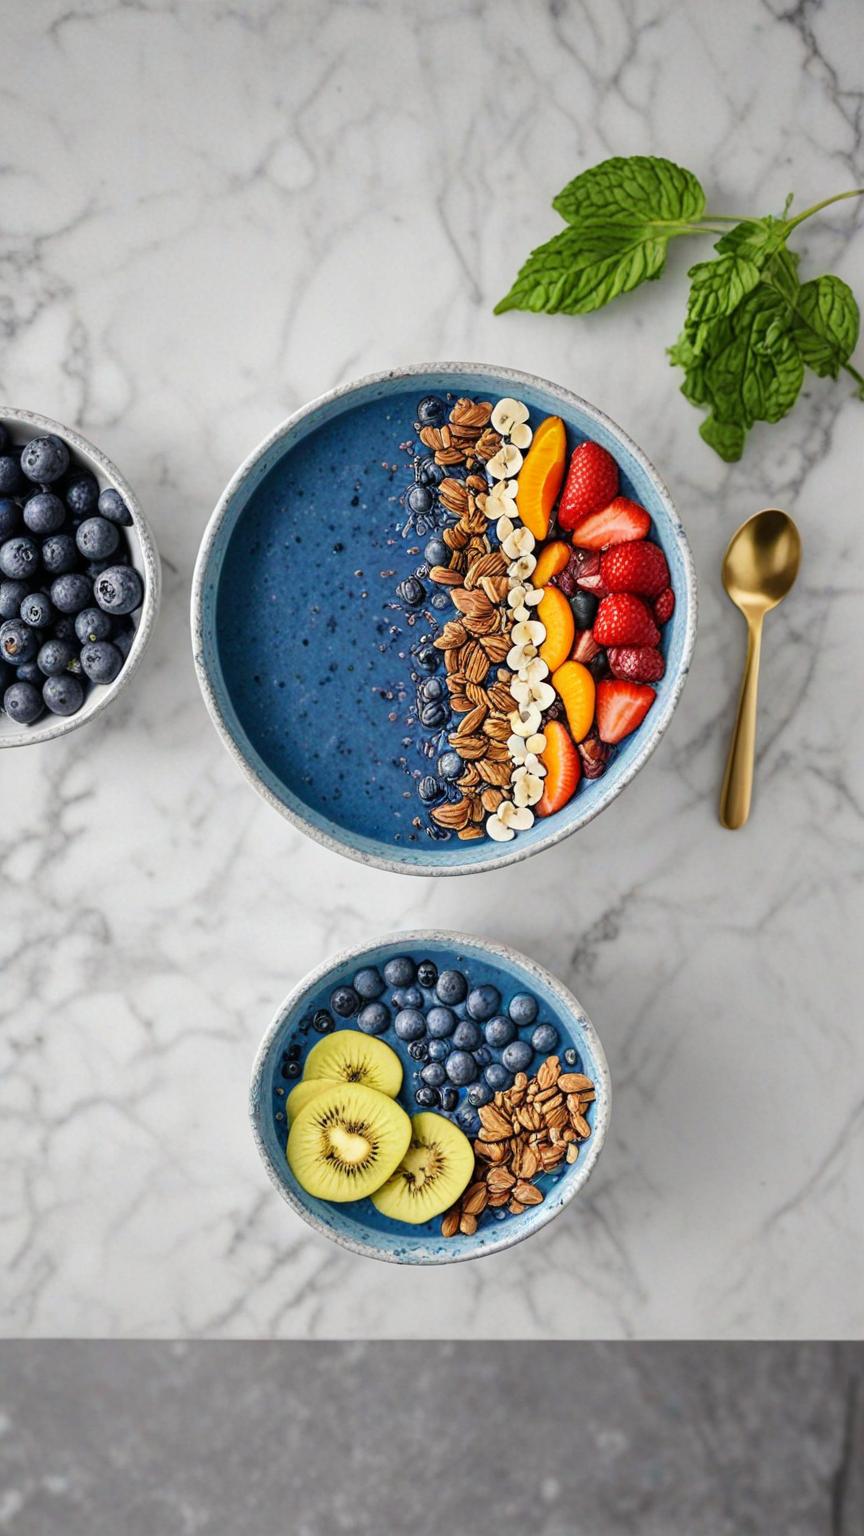
Blue Spirulina Protein Smoothie Bowl
blue spirulina protein smoothie bowl Dive into a bowl of vibrant health with this Blue Spirulina Protein Smoothie Bowl! Perfect for a refreshing breakfast or a post-workout snack, this bowl is packed with antioxidants, vitamins, and protein to keep you energized and satisfied. The creamy blend of frozen banana, pineapple, and mango is elevated with a boost of vanilla protein powder and the striking blue hue of spirulina, which not only adds a beautiful color but also offers numerous health benefits. Customize your bowl with fresh fruits, crunchy granola, coconut flakes, chia seeds, and a drizzle of nut butter for a delightful and nutrient-packed meal. Enjoy the perfect combination of taste, nutrition, and visual appeal with every spoonful! What other toppings can I add to this recipe? Enhance your Blue Spirulina Protein Smoothie Bowl with a variety of additional toppings to add flavor, texture, and extra nutrients. Here are some ideas: Nuts and Seeds: Sliced almonds Walnuts Pecans Pumpkin seeds Sunflower seeds Flaxseeds Dried Fruits: Goji berries Raisins Dried cranberries Dried apricots (chopped) Fresh Fruits: Kiwi Blueberries Pomegranate arils Passion fruit Dragon fruit (sliced) Grapes (halved) Papaya (cubed) Superfood Powders: Matcha powder Acai powder Beetroot powder Maca powder Healthy Fats: Avocado slices Cacao nibs Hemp hearts Sweeteners: Drizzle of agave nectar Maple syrup Date syrup Cereal and Grains: Quinoa puffs Amaranth puffs Oat flakes Buckwheat groats Herbs and Spices: Fresh mint leaves Basil leaves Cinnamon sprinkle Nutmeg sprinkle Extras: Edible flowers Dark chocolate shavings Shredded carrot Psst! Let’s get creative with these toppings! There is no set way to build a smoothie bowl! Be as creative as you wish! Shop Now Shop Now Shop Now Shop Now Pin Print Blue Spirulina Protein Smoothie Bowl Recipe by Custom Curves Course: Breakfast Servings 1 servingsPrep time 10 minutesCooking time 0 minutesCalories 350 kcal Ingredients 1 whole frozen banana 1/2 cup frozen pineapple chunks 1/2 cup frozen mango chunks 1 cup unsweetened almond milk (or any milk of choice) 1/4 cup Greek yogurt (optional for extra creaminess) 1 scoop vanilla protein powder 1 tsp blue spirulina powder 1 tsp honey or maple syrup (optional for sweetness) 1/2 tsp vanilla extract Directions Blend the Smoothie Base: In a high-speed blender, combine the frozen banana, pineapple, mango, almond milk, Greek yogurt (if using), protein powder, blue spirulina powder, honey or maple syrup (if using), and vanilla extract. Blend until smooth and creamy. If the mixture is too thick, add a little more almond milk to reach your desired consistency. Prepare the Bowl: Pour the smoothie mixture into a bowl, using a spoon to spread it out evenly. Add Toppings: Arrange your choice of fresh fruits, granola or muesli, coconut flakes, chia seeds or hemp seeds, nut butter drizzle, and edible flowers on top of the smoothie base. Serve and Enjoy: Serve immediately with a spoon and enjoy your vibrant, nutritious Blue Spirulina Protein Smoothie Bowl! In conclusion, Smoothie bowls offer a fun and nutritious twist on traditional smoothies, combining health benefits with creativity and flavor. They’re perfect for anyone looking to start their day with a nutritious meal or enjoy a refreshing snack that packs a punch. Share: Facebook Pinterest Email Shop Now Social Media Facebook-f Youtube Pinterest Instagram Tiktok Most Popular Get The Latest Updates Subscribe To Our Weekly Newsletter No spam, notifications only about new post, updates. Categories On Key Related Posts
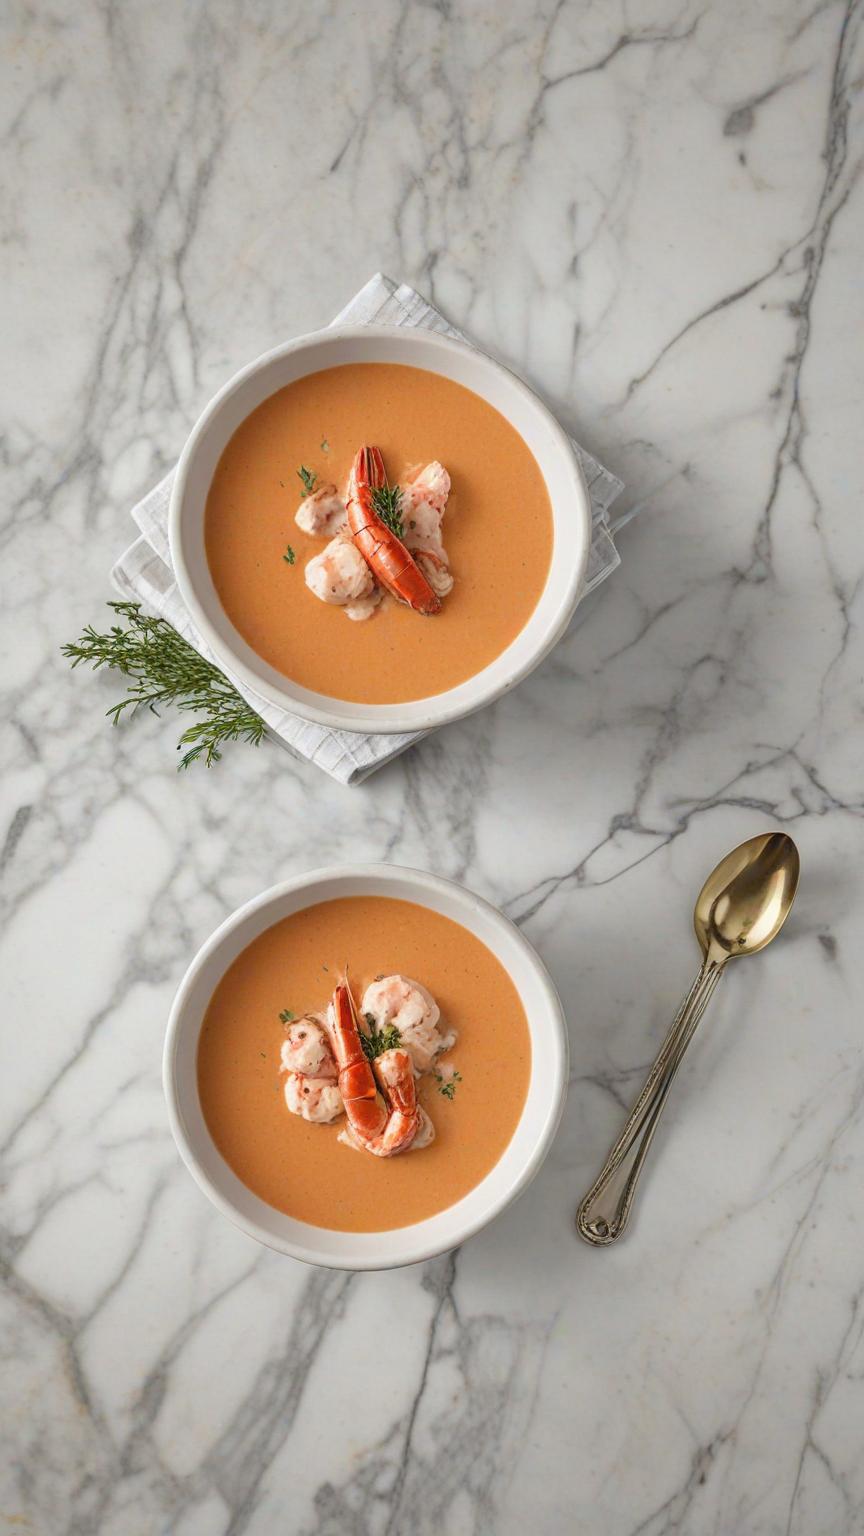
Low-Calorie Lobster Bisque Soup
low calorie Lobster Bisque soup Indulge in the luxurious flavors of lobster bisque without the guilt! This low-calorie version of the classic soup offers a rich and creamy texture with significantly fewer calories. Made with tender lobster meat, a medley of fresh vegetables, and a hint of tomato paste, this bisque is both flavorful and satisfying. A touch of skim milk keeps it creamy, while a splash of white wine adds a layer of sophistication. Perfect for a special occasion or a cozy night in, this lightened-up lobster bisque is sure to impress while keeping your health goals on track. Enjoy a bowl of this delightful soup, garnished with fresh parsley, and savor the taste of the sea in every spoonful. How do I enhance the recipe? Flavor Enhancements: Seafood Stock: Replace part or all of the chicken or vegetable broth with seafood stock to intensify the seafood flavor. Herbs and Spices: Add fresh herbs such as tarragon, dill, or chives for an aromatic boost. Incorporate a pinch of cayenne pepper or a dash of hot sauce for a bit of heat. Citrus Zest: Add a touch of lemon or orange zest to brighten the flavors and add a subtle, refreshing note. Sherry or Brandy: Instead of white wine, use a splash of sherry or brandy for a deeper, more complex flavor profile. Miso Paste: Add a small spoonful of white miso paste for an umami-rich depth that complements the lobster. Texture Enhancements: Creamier Consistency: Blend in a small amount of Greek yogurt or a light cream alternative to achieve a richer, creamier texture without adding too many calories. Veggie Variations: Add more vegetables like leeks or fennel to enhance the texture and flavor of the soup. Garnishes: Top the bisque with a small dollop of low-fat sour cream or Greek yogurt and a sprinkle of fresh chives or microgreens for an elegant presentation. Serving Suggestions: Croutons: Add homemade whole grain croutons for a delightful crunch. Lemon Wedges: Serve with lemon wedges on the side for an optional fresh squeeze of citrus. Lobster Tail: Garnish each bowl with a small piece of lobster tail for a luxurious touch. By incorporating these enhancements, you can elevate the flavor, texture, and presentation of your low-calorie lobster bisque while still keeping it healthy and delicious. Psst! we got your ingredients! Let’s make shopping easy! Shop Now Shop Now Shop Now Shop Now Pin Print Low-Calorie Lobster Bisque Soup Recipe by Custom Curves Difficulty: Easy Servings 4 servingsPrep time 15 minutesCooking time 30 minutesCalories 180 kcal Ingredients 1 lb (450 g) lobster meat, cooked and chopped 1 Tbsp olive oil 1 medium onion, finely chopped 2 cloves garlic, minced 2 medium carrots, peeled and chopped 2 celery stalks, chopped 1/4 cup tomato paste 4 cups low-sodium chicken broth or vegetable broth 1 cup skim milk or unsweetened almond milk 1/2 cup dry white wine (optional) Directions Sauté Vegetables Heat the olive oil in a large pot over medium heat. Add the chopped onion, garlic, carrots, and celery. Sauté until the vegetables are soft, about 8-10 minutes. Add Tomato Paste Stir in the tomato paste and cook for an additional 2-3 minutes, allowing the tomato paste to caramelize slightly Add Broth and Spices Pour in the chicken or vegetable broth and the white wine (if using). Add the bay leaf, dried thyme, and paprika. Bring the mixture to a boil, then reduce the heat and let it simmer for about 20 minutes, until the vegetables are tender. Blend the Soup Remove the bay leaf and use an immersion blender to puree the soup until smooth. If you don’t have an immersion blender, carefully transfer the soup in batches to a regular blender and blend until smooth. Return the blended soup to the pot. Add Milk and Lobster Stir in the skim milk (or almond milk) and the chopped lobster meat. Let the soup simmer for an additional 5 minutes to heat the lobster through. Season and Serve Season the bisque with salt and pepper to taste. Ladle the soup into bowls, garnish with fresh parsley, and serve hot. Enjoy your low-calorie lobster bisque soup! Low-calorie lobster bisque soup offers a refined and satisfying dining experience without the extra calories. With its rich, velvety texture and delicate lobster flavor, this lighter version of a classic bisque proves that you don’t have to sacrifice taste for health. The blend of fresh lobster, aromatic vegetables, and creamy base, enhanced with a touch of brandy and lemon, makes for a deliciously indulgent soup that fits perfectly into a balanced diet. Whether you’re enjoying it as a starter for a special meal or a comforting bowl on a chilly day, this low-calorie lobster bisque is a luxurious yet wholesome choice that will leave you feeling both pampered and nourished. Share: Facebook Pinterest Email Shop Now Social Media Facebook-f Youtube Pinterest Instagram Tiktok Most Popular Get The Latest Updates Subscribe To Our Weekly Newsletter No spam, notifications only about new post, updates. Categories On Key Related Posts
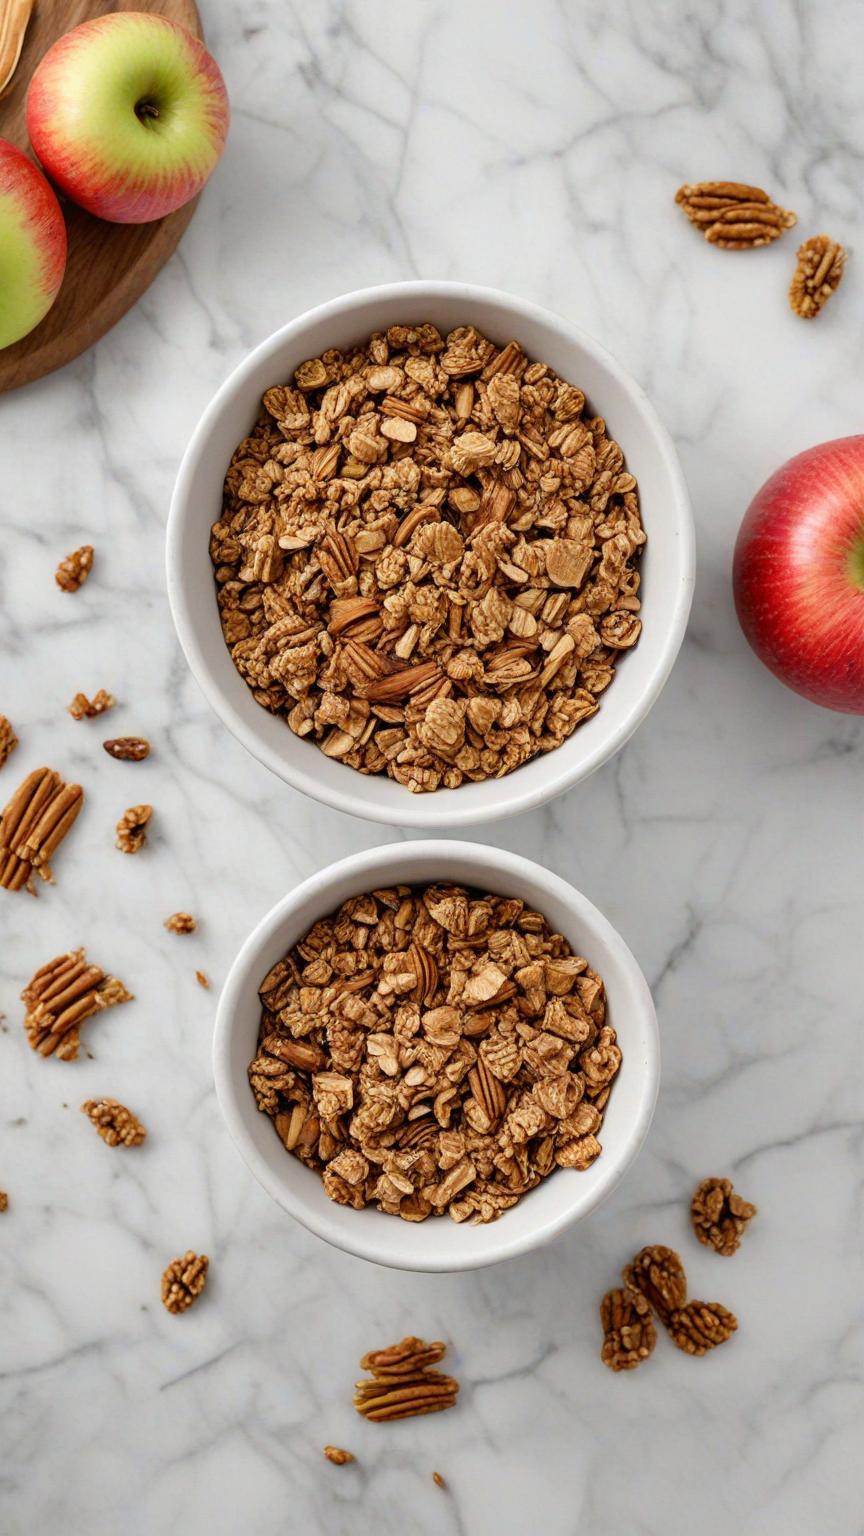
Apple Pie Granola
apple pie granola Experience the cozy flavors of autumn with every bite of Apple Pie Granola. This homemade granola is a delightful blend of rolled oats, crunchy nuts, and sweet dried apples, all coated in a mixture of applesauce, honey, and warming spices like cinnamon, nutmeg, and allspice. Perfect for breakfast or as a snack, this granola brings the nostalgic taste of apple pie to your bowl without any of the fuss. Whether sprinkled over yogurt, paired with milk, or enjoyed straight from the jar, Apple Pie Granola is sure to become a favorite in your pantry. Plus, it’s easy to make and stores well, ensuring you have a wholesome and tasty treat ready whenever you need it. Enjoy the comforting essence of apple pie in a healthier, granola form! Can I use any kind of nuts for this recipe? Sure thing! There is no set way to create this recipe! Use whatever tickles your fancy. How do I make this recipe sweeter? If you wish to sweeten the taste of your granola, just add more sweetener, this includes agave or sugar. How do I enhance the taste of my granola? If you want a different or enhanced taste–add additional ingredients such as apples, cinnamon or sweetener! Let’s go shopping! Enjoy the taste of matcha but need a high protein intake? No need to purchase different products! Get one that can do both–just add milk! Shop Now Shop Now Shop Now Shop Now Pin Print Apple Pie Granola Recipe by Custom Curves Course: Sides, DessertDifficulty: Easy Servings 4 servingsPrep time 10 minutesCooking time 30 minutesCalories 300 kcal Ingredients 3 cups rolled oats 1 cup chopped nuts (such as walnuts, pecans, or almonds) 1/2 cup unsweetened applesauce 1/4 cup agave or maple syrup 1/4 cup coconut oil (melted) 1/2 cup dried apple pieces 1 tsp cinnamon 1 tsp nutmeg 1/4 tsp allspice 1/4 tsp salt 1 tsp vanilla extract Directions Preheat the Oven: Preheat your oven to 325°F (163°C). Line a baking sheet with parchment paper or a silicone baking mat. Mix the Dry Ingredients: In a large bowl, combine the rolled oats, chopped nuts, cinnamon, nutmeg, allspice, and salt. Mix well to distribute the spices evenly. Combine Wet Ingredients: In a separate bowl, whisk together the unsweetened applesauce, honey or maple syrup, melted coconut oil, and vanilla extract until smooth. Mix Everything Together: Pour the wet ingredients over the dry ingredients. Stir well to ensure that all the oats and nuts are evenly coated with the applesauce mixture Spread and Bake: Spread the granola mixture evenly onto the prepared baking sheet. Bake in the preheated oven for about 25-30 minutes, stirring every 10 minutes to ensure even baking. The granola is done when it is golden brown and crisp. Add Dried Apples: Once the granola is done baking, remove it from the oven and stir in the dried apple pieces. Let the granola cool completely on the baking sheet. It will continue to crisp up as it cools. Store and Enjoy: Once the granola is completely cool, transfer it to an airtight container. It can be stored at room temperature for up to two weeks. Notes Enjoy your homemade Apple Pie Granola with milk, yogurt, or as a crunchy topping for your favorite desserts! Granola is a powerhouse of nutrition packed into a deliciously crunchy snack. Made from a blend of oats, nuts, seeds, and dried fruits, it offers a balance of complex carbohydrates, healthy fats, and protein. Incorporating granola into your diet is a delicious way to enjoy a range of health benefits while keeping your snack choices both tasty and nutritious. Share: Facebook Pinterest Email Shop Now Social Media Facebook-f Youtube Pinterest Instagram Tiktok Most Popular Get The Latest Updates Subscribe To Our Weekly Newsletter No spam, notifications only about new post, updates. On Key Related Posts
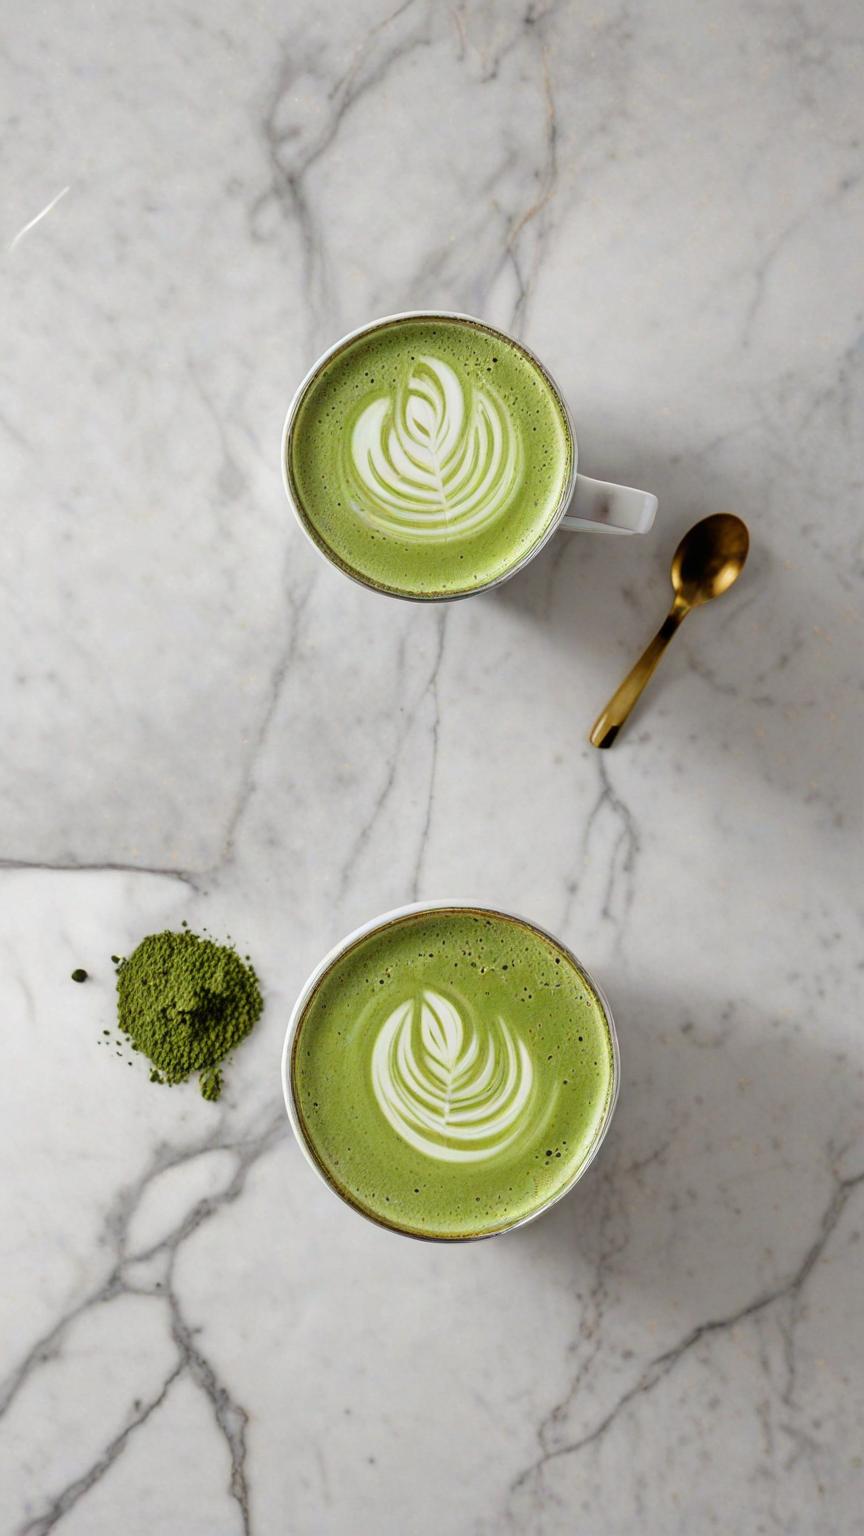
Protein Matcha Milk Tea
Protein Matcha Milk Tea Matcha milk combines the goodness of matcha green tea with the creaminess of milk, offering a unique and delicious way to enjoy the health benefits of matcha. Matcha is rich in antioxidants, which can help protect cells from damage and reduce the risk of chronic diseases. By incorporating matcha into milk, you can boost your antioxidant intake while enjoying a creamy beverage. Matcha contains compounds like caffeine and L-theanine that have been shown to improve attention, memory, and reaction time. When combined with the nutrients in milk, matcha milk can provide a brain-boosting drink to start your day. Studies have suggested that green tea, similar to matcha, may help protect against heart disease. By adding matcha to milk, you can potentially support cardiovascular health while enjoying a tasty drink. Can I use any kind of non-dairy milk for this recipe? To make matcha milk tea, you can us any type of non-dairy milk. This includes almond milk, soy milk or even oat milk. How do I matcha milk tea sweeter? If you wish to sweeten the taste of your matcha milk, just add more sweetener, this includes agave or sugar. If your drink is cold, we recommend agave. If your drink is hot, either sugar or agave should get the job done. How do I enhance the taste of my matcha milk tea? If you want a bolder or “stronger” matcha milk tea, just simply add more matcha for a bolder taste or more vibrant look! Psst! Matcha Lover? Enjoy the taste of matcha but need a high protein intake? No need to purchase different products! Get one that can do both–just add milk! Shop Now Shop Now Shop Now Shop Now Pin Print Protein Matcha Milk Tea Recipe by Custom Curves Course: DrinksCuisine: Vegan Servings 1 servingsPrep time 5 minutesCooking time 0 minutesCalories 280 kcal Ingredients 1 tablespoon of matcha powder 1 scoop of protein powder 1 tablespoon of agave or sugar 1 cup milk of choice dairy or non-dairy Ice optional Directions Mix the sweetener and matcha tea and protein powder together (optional) Heat the milk Whisk the matcha mixture thoroughly into the hot or cold milk, until it is and frothy. This can be achieved with a bamboo whisk or a regular wire whisk. Serve immediately as a hot drink, or pour it over ice for iced matcha milk tea. Notes Need more protein? Add a few more scoops! This recipe can be adjusted to fit your protein/vitamin needs Drinking matcha milk combines the goodness of matcha green tea with the creaminess of milk, creating a delicious and nutritious beverage. Matcha milk provides a unique flavor profile that is both earthy and creamy, making it a popular choice for those looking to enjoy the benefits of matcha in a different form. In conclusion, drinking matcha milk can be a delightful way to reap the numerous health benefits associated with matcha while enjoying a creamy and flavorful beverage. Share: Facebook Pinterest Email Shop Now Social Media Facebook-f Youtube Pinterest Instagram Tiktok Most Popular Get The Latest Updates Subscribe To Our Weekly Newsletter No spam, notifications only about new post, updates. Categories On Key Related Posts
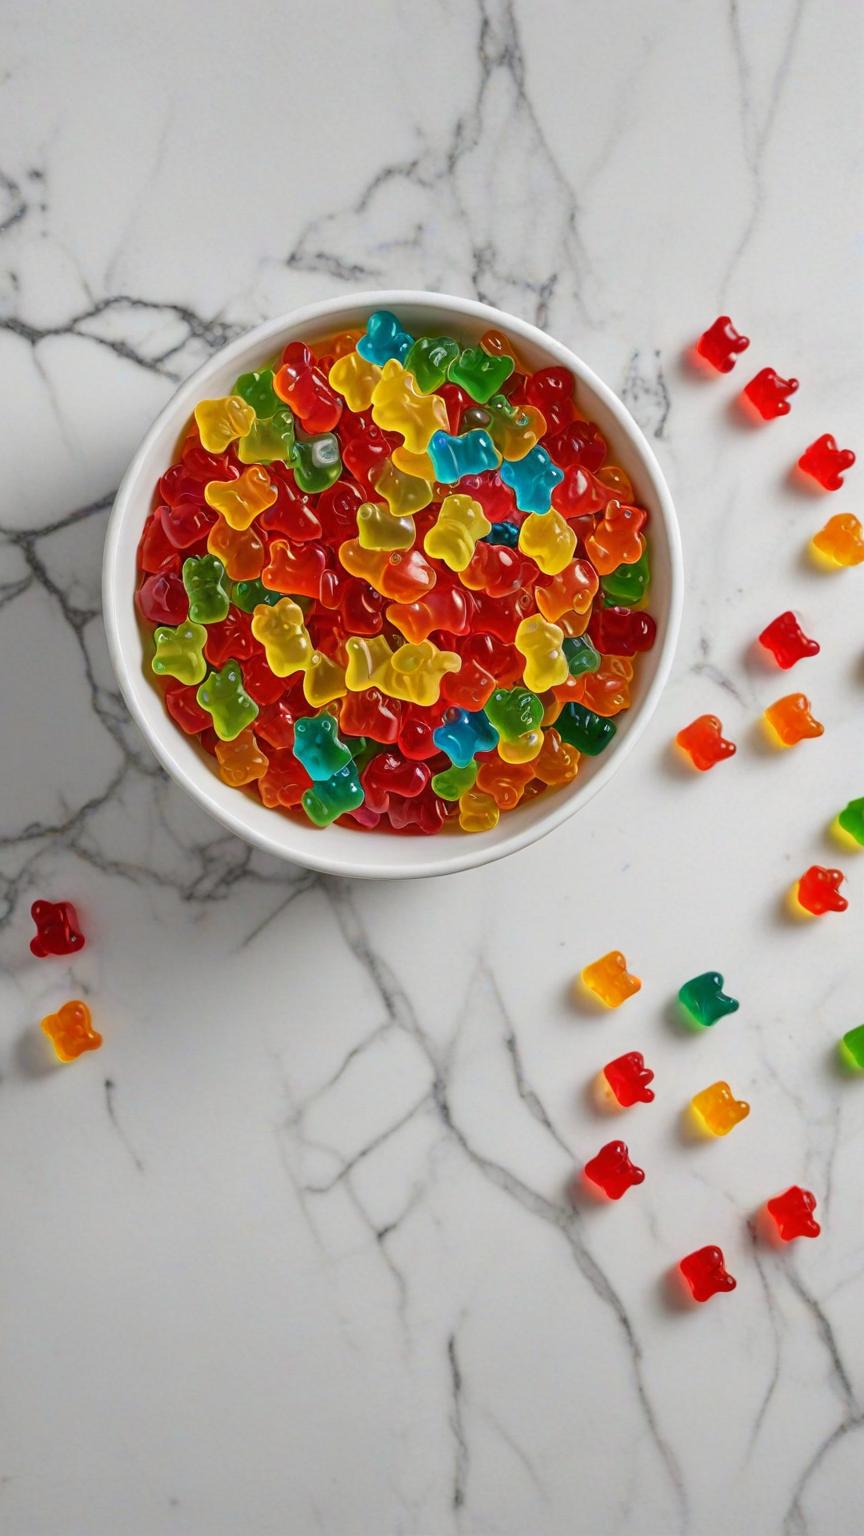
Collagen Protein Gummy Bears
collagen protein gummy bears Recipe Collagen gummies are a popular choice for those seeking a delicious and convenient way to incorporate more collagen into their diet. These gummies are typically made by dissolving gelatin (a form of collagen) in liquid such as fruit juice or water, sweetening it with natural sweeteners like honey or stevia, and then setting it into gummy form using silicone molds. The result is a tasty treat that offers the benefits of collagen without the added sugars and artificial colors commonly found in traditional candy. Some popular flavors for collagen gummies include strawberry lemon, hot cinnamon cream, creamy mango mint, carrot & orange, peaches cream, coconut milk peaches honey, creamy mint chocolate, spiced apple pumpkin spice, raspberry honey frozen raspberries, apple lemon turmeric, and watermelon. These flavors not only make for an enjoyable eating experience but also offer additional health benefits from ingredients like antioxidant-rich fruits and anti-inflammatory turmeric. Can I use any type of juice for a different flavor? Yes, you can use any kind of juice–we prefer an all-natural fruit juice to keep the sugar contents down a little since you are already adding agave or honey. How long will these last? We recommend consuming these within a few days since the agar agar will slow down the shelf life but not completely stop it. Products from the Recipe We got the ingredients! Shop now Shop now Shop now Shop now Pin Print Collagen Protein Gummy Bears Recipe by Custom Curves Course: SnacksDifficulty: Easy Servings 5 servingsPrep time 2 hours 20 minutesCooking time 0 minutesCalories 114 kcal Ingredients 1/2 cup of cold water 1/4 cup of unflavored gelatin powder or agar agar 2 tablespoons collagen protein powder 1/4 cup of honey or agave (adjust to taste) 1/2 cup of fruit juice of your choice (such as orange, apple, or grape) Silicone gummy bear molds Directions I. Prepare the Mixture: In a small saucepan, pour the cold water. Sprinkle the gelatin powder over the water and let it sit for a few minutes to bloom. Once the gelatin has bloomed, place the saucepan over low heat. Stir continuously until the gelatin completely dissolves. Be careful not to let it boil. Once the gelatin is fully dissolved, remove the saucepan from the heat. II. Add Collagen and Sweetener: While the gelatin mixture is still warm, add the collagen protein powder. Stir until the protein powder is fully incorporated. Add honey or maple syrup to sweeten the mixture. Adjust the amount according to your taste preferences. Stir well to combine. III. Add Fruit Juice: Pour the fruit juice into the gelatin mixture. Stir until everything is well combined. The mixture should be smooth and uniform in texture. IV. Fill the Molds: Carefully pour the mixture into gummy bear molds using a dropper or a small spoon. Fill each mold cavity almost to the top, but leave a little space for expansion. Gently tap the molds on the countertop to remove any air bubbles and ensure the mixture settles evenly. V. Set the Gummies Place the filled molds in the refrigerator for at least 1-2 hours to allow the gummies to set. You can also place them in the freezer for faster setting, but be cautious not to freeze them solid. Once the gummies are set, remove the molds from the refrigerator or freezer. VI. Unmold & Enjoy Carefully pop the gummy bears out of the molds. If they’re sticking, you can gently flex the molds to release them.Transfer the gummy bears to an airtight container for storage. Enjoy your homemade collagen protein gummy bears as a nutritious snack or post-workout treat! Notes Experiment with different fruit juices to customize the flavor of your gummy bears.You can add a splash of lemon juice or a pinch of citric acid to enhance the tartness of the gummies. If you prefer firmer gummies, you can increase the amount of gelatin slightly.Store the gummy bears in the refrigerator to maintain their freshness and texture. Collagen gummies can be made at home using high-quality grass-fed gelatin sourced from ethical animal welfare practices. This ensures that the final product contains all the necessary amino acids needed for optimal collagen production and overall health benefits. Additionally, these homemade gummies can be made with low sugar options like stevia or erythritol to further enhance their nutritional value. Compared to traditional candy which often contains high amounts of refined sugars and artificial colors that contribute to inflammation and potential health issues over time, collagen gummies offer a guilt-free dessert option loaded with protein and other essential nutrients that support healthy skin, hair, joints, bones, and overall wellbeing. Furthermore, making your own collagen gummies at home allows you to control the ingredients used ensuring they align with your dietary preferences and goals. Share: Facebook Pinterest Email Social Media Facebook-f Youtube Pinterest Instagram Tiktok Most Popular Get The Latest Updates Subscribe To Our Weekly Newsletter No spam, notifications only about new post, updates. Categories beetroot sugar vs cane sugar 0 breakfast 0 can i take vitamin d and vitamin c together 0 classic 1 collagen 1 dessert 1 dinner 1 drinks 3 gluten-free 0 how can i gain weight quickly 0 lunch 2 non-dairy 5 nut-free 0 oil-free 2 pescatarian 3 protein 1 protein based 0 side 1 sugar-free 0 vegan 7 vegetarian 6 weight gain recipes 0 weight loss 1 weight loss by juicing 0 weight loss recipes 0 On Key Related Posts

Vegan Pumpkin Spice Latte (Lite)
Vegan Pumpkin Spice Latte As the leaves change color and the air turns crisp, there’s nothing quite like indulging in a warm and comforting beverage that embodies the essence of autumn. Enter the vegan pumpkin spice latte – a delightful twist on the classic favorite that caters to those following a plant-based lifestyle. In this blog post, we will explore the ins and outs of creating a delicious vegan pumpkin spice latte at home, complete with all the flavors and aromas that make this seasonal drink so beloved. Can I use any kind of non-dairy milk for this recipe? Yes you may! Additionally, non-dairy milk, such as almond milk, oat milk, or soy milk, is often used to add creaminess. How do I enhance the taste of this coffee? If you are a pumpkin lover, you can always add a little more pumpkin spice or even substitute the pumpkin puree for pumpkin spice syrup. Products from the Recipe Order products and have it shipped straight to your door step! Pin Print Pumpkin Spice Latte (Lite) Recipe by Custom Curves Course: DrinksCuisine: VeganDifficulty: Easy Servings 1 servingsPrep time 5 minutesCalories 90 kcal Ingredients 1 shot of espresso or 1/2 cup of brewed coffee 1/2 cup of unsweetened almond milk 2 tablespoons of pumpkin puree 1/2 teaspoon of pumpkin spice A dash of stevia or your preferred sweetener Directions Mix all ingredients and heat on the stove, then froth the almond milk and pour it over your coffee. A vegan pumpkin spice latte is the perfect way to embrace the flavors of fall while adhering to a plant-based lifestyle. With just a few simple ingredients and some creativity, you can recreate this beloved seasonal beverage in the comfort of your own home. So, grab your favorite mug, cozy up, and savor the delightful flavors of a vegan pumpkin spice latte this autumn. Share: Facebook Pinterest Email Social Media Facebook-f Youtube Pinterest Instagram Tiktok Most Popular Get The Latest Updates Subscribe To Our Weekly Newsletter No spam, notifications only about new post, updates. Categories On Key Related Posts
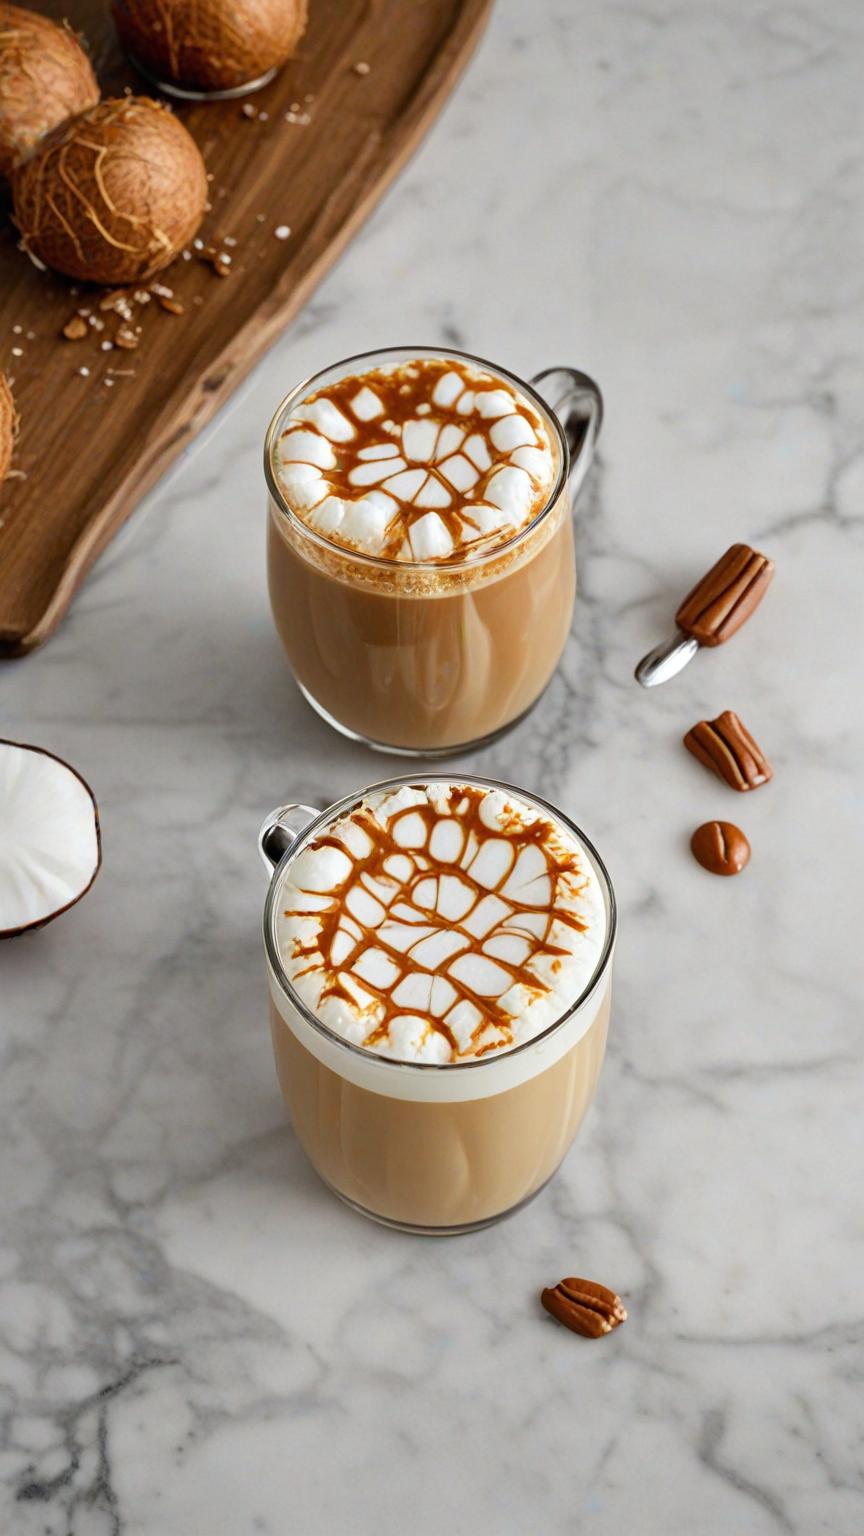
Vegan Coconut Caramel Macchiato
Vegan Coconut Caramel Macchiato Indulging in a delicious cup of coffee is a cherished ritual for many. With countless variations available, one particular concoction has captured the hearts of coffee enthusiasts worldwide – the coconut caramel macchiato. This delightful beverage combines the rich flavors of coconut, caramel, and espresso, resulting in a truly decadent treat. In this blog post, we will explore the origins, ingredients, preparation methods, and variations of the coconut caramel macchiato. Can I use any kind of non-dairy milk for this recipe? Yes you may! Additionally, non-dairy milk, such as almond milk, oat milk, or soy milk, is often used to add creaminess. How do I enhance the taste of this coffee? You can enhance the taste by adding more caramel syrup or a little agave or sugar, but just keep in mind as you enhance the recipe. You will be increasing the calories. Can I make variations of this coffee? While the classic coconut caramel macchiato is undeniably delicious, there are several variations you can explore to suit your taste preferences: 1. Iced Coconut Caramel Macchiato: Simply follow the same preparation steps but pour the mixture over ice instead of hot espresso for a refreshing twist. 2. Traditional Coconut Caramel Macchiato: Replace plant-based dairy products with regular alternatives such as 2 percent milk or whole milk to create a non-restricted version of this delightful beverage. 3. Salted Coconut Caramel Macchiato: Add a pinch of sea salt to your caramel sauce or sprinkle some on top of your macchiato for a delightful sweet-salty combination. Products from the Recipe Order products and have it shipped straight to your door step! Pin Print Coconut Caramel Macchiato Recipe by Custom Curves Course: DrinksCuisine: VeganDifficulty: Easy Servings 1 servingsPrep time 5 minutesCalories 50 kcal Ingredients 1 shot of espresso or 1/2 cup of brewed coffee 1/2 cup of unsweetened coconut milk 1 tablespoon of sugar-free caramel syrup Directions Combine coffee, coconut milk, and caramel syrup. Serve over ice. The coconut caramel macchiato is a truly indulgent coffee creation that combines the tropical flavors of coconut with the rich sweetness of caramel and the boldness of espresso. Whether you enjoy it hot or iced, this delightful beverage is sure to satisfy your cravings for a unique and decadent coffee experience. Share: Facebook Pinterest Email Social Media Facebook-f Youtube Pinterest Instagram Tiktok Most Popular Get The Latest Updates Subscribe To Our Weekly Newsletter No spam, notifications only about new post, updates. Categories On Key Related Posts

Homemade Oil Free Vegan Butter
Homemade Oil-Free Vegan Butter Recipe As the popularity of veganism continues to rise, so does the demand for plant-based alternatives to traditional dairy products. One such staple in many kitchens is butter, which adds richness and flavor to a wide range of dishes. Fortunately, creating a vegan version of this beloved ingredient is easier than you might think. In this blog post, we will guide you through a simple yet delicious recipe for vegan butter that can be made at home. Homemade oil-free vegan butter is a versatile and delicious alternative to traditional dairy butter. It is a oil- free plant-based spread that mimics the creamy texture and rich flavor of butter, making it an excellent choice for those following a vegan or dairy-free diet. This homemade version allows you to have full control over the ingredients, ensuring a healthier and more sustainable option. Can I use any kind of non-dairy milk for this recipe? To make homemade oil-free vegan butter, you will need a few simple ingredients that are easily accessible. Additionally, non-dairy milk, such as almond milk or soy milk, is often used to add creaminess. How do I enhance the taste of homemade oil-free vegan butter? One common ingredient in homemade oil free vegan butter is nutritional yeast. Nutritional yeast not only adds a subtle cheesy flavor but also provides essential nutrients like B vitamins. Other flavorings such as salt, apple cider vinegar, and lemon juice can be added to enhance the taste and mimic the tanginess of traditional butter. One of the advantages of homemade vegan butter is that it allows customization according to personal preferences. By experimenting with different oils and flavorings, individuals can create their own unique variations of vegan butter tailored to their taste buds. What can I use homemade oil-free vegan butter on?Homemade vegan butter can be used in various ways in cooking and baking. It can be spread on toast, used for sautéing vegetables, or incorporated into recipes that call for butter. It can also be used as a substitute for dairy butter in baking, providing moisture and richness to cakes, cookies, and pastries. In addition to being a suitable option for vegans and those with dairy allergies, homemade vegan butter also offers environmental benefits. The production of traditional dairy butter requires significant amounts of water, land, and resources. By opting for homemade oil-free vegan butter, individuals can contribute to reducing their carbon footprint and promoting sustainability. Products from the Recipe You dont have to cook if you dont feel like it. Order Vegan Butter and have it shipped straight to your door step! Pin Print Homemade Oil-Free Vegan Butter Recipe Recipe by Custom Curves Course: SidesDifficulty: Medium Servings 8 servingsPrep time 4 hours Cooking time 2 hours Calories 104 kcal Ingredients 1 cup raw cashews 1/4 cup unsweetened soy milk 2 tablespoons nutritional yeast 1 tablespoon apple cider vinegar 1 teaspoon salt (adjust to taste) 1/2 teaspoon turmeric powder (for color) 1/4 teaspoon garlic powder (optional) Directions Soak the cashews in water overnight or for at least 4 hours. This will help soften them and make them easier to blend. Drain the soaked cashews and rinse them thoroughly. In a high-speed blender or food processor, combine the soaked cashews, unsweetened soy milk, nutritional yeast, apple cider vinegar, salt, turmeric powder, and garlic powder (if using). Blend until smooth and creamy. 4. If the mixture is too thick, you can add a little more soy milk to achieve the desired consistency. Once blended, transfer the mixture into a small container or silicone mold. Place the container in the refrigerator and allow the mixture to set for at least 2 hours or until firm. Once firm, your homemade oil-free vegan butter is ready to use! You can spread it on toast, use it for baking, or melt it for cooking purposes. Notes Store your homemade oil-free vegan butter in an airtight container in the refrigerator for up to two weeks. You can also freeze it for longer storage. Serving size is 2 tbsp for this recipe It is important to note that while homemade oil-free vegan butter can be a healthier alternative to dairy butter, it should still be consumed in moderation. Like any other high-fat food, excessive consumption may lead to weight gain and other health issues. It is always recommended to consult with a healthcare professional or registered dietitian for personalized dietary advice. In conclusion, homemade vegan butter is a versatile and customizable plant-based spread that provides a delicious alternative to traditional dairy butter. With its creamy texture and rich flavor, it can be used in various cooking and baking applications. By making your own vegan butter at home, you have control over the ingredients and can contribute to a more sustainable food system. In conclusion, homemade vegan butter is a versatile and customizable plant-based spread that provides a delicious alternative to traditional dairy butter. With its creamy texture and rich flavor, it can be used in various cooking and baking applications. By making your own vegan butter at home, you have control over the ingredients and can contribute to a more sustainable food system. Share: Facebook Pinterest Email Social Media Facebook-f Youtube Pinterest Instagram Tiktok Most Popular Get The Latest Updates Subscribe To Our Weekly Newsletter No spam, notifications only about new post, updates. Categories beetroot sugar vs cane sugar 0 breakfast 0 can i take vitamin d and vitamin c together 0 classic 1 collagen 1 dessert 1 dinner 1 drinks 3 gluten-free 0 how can i gain weight quickly 0 lunch 2 non-dairy 5 nut-free 0 oil-free 2 pescatarian 3 protein 1 protein based 0 side 1 sugar-free 0 vegan 7 vegetarian 6 weight gain recipes 0 weight loss 1 weight loss by juicing 0 weight loss recipes 0 On Key Related Posts
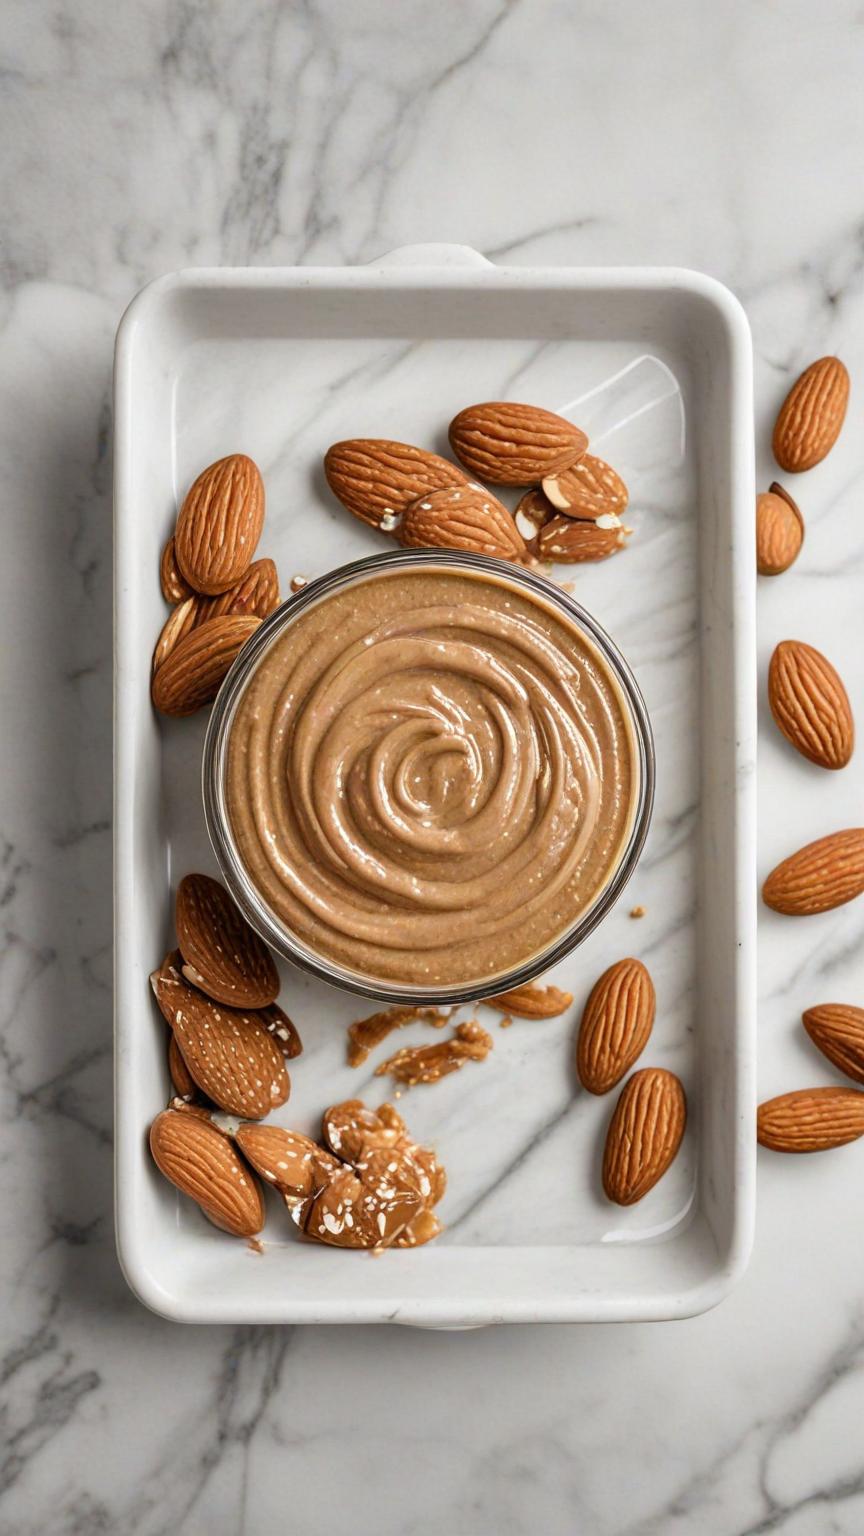
Oil Free Almond Butter
Oil Free Almond Butter Almond butter is a delicious and nutritious spread that can be enjoyed on toast, in smoothies, or as a dip for fruits and vegetables. While traditional almond butter recipes often include added oils, it is possible to make a healthier version without any oil. In this recipe, we will guide you through the process of making oil-free almond butter at home. How do I enhance the taste of homemade oil-free almond butter? Homemade almond butter is a versatile and delicious ingredient that can be used in a variety of ways. Its creamy texture and nutty flavor make it a great addition to both sweet and savory dishes. Here are some ideas on how to use homemade almond butter: 1. Spread: One of the most common uses for almond butter is as a spread. You can use it as a healthier alternative to traditional spreads like peanut butter or Nutella. Spread it on toast, bagels, or crackers for a quick and nutritious snack. You can also add a drizzle of honey or sprinkle some cinnamon on top for extra flavor. 2. Smoothies: Almond butter can be a great addition to smoothies, adding creaminess and richness. Simply blend it with your favorite fruits, vegetables, and liquid base (such as almond milk or coconut water) for a nutritious and filling smoothie. It pairs well with ingredients like bananas, berries, spinach, and cocoa powder. 3. Baking: Almond butter can be used in various baked goods to add moisture and flavor. You can substitute it for other nut butters or even regular butter in recipes like cookies, brownies, muffins, and cakes. It works particularly well in recipes that call for nuts or have a nutty flavor profile. 4. Dips and Sauces: Homemade almond butter can be used as a base for dips and sauces. You can mix it with ingredients like yogurt, lemon juice, garlic, and herbs to create a creamy dip for vegetables or pita chips. It can also be thinned out with water or oil to make a flavorful sauce for noodles or stir-fries. 5. Salad Dressings: Almond butter can be incorporated into salad dressings to add richness and depth of flavor. Combine it with ingredients like olive oil, vinegar, mustard, honey, and herbs to create a creamy dressing that pairs well with salads containing fruits, vegetables, or grains. 6. Protein Bars and Energy Balls: Almond butter can be a key ingredient in homemade protein bars and energy balls. Its natural oils help bind the ingredients together, while its nutty flavor adds depth. Mix it with oats, dried fruits, nuts, seeds, and sweeteners like honey or maple syrup to create a nutritious and portable snack. 7. Stir-Fries: Almond butter can be used as a sauce or garnish for stir-fried dishes. Its creamy texture and nutty taste complement vegetables, tofu, chicken, or shrimp. You can mix it with soy sauce, ginger, garlic, and other seasonings to create a flavorful sauce that coats the ingredients. 8. Oatmeal: Add a spoonful of almond butter to your morning oatmeal for extra creaminess and flavor. It pairs well with toppings like sliced bananas, berries, nuts, seeds, or a drizzle of honey. 9. Ice Cream Topping: Drizzle homemade almond butter over your favorite ice cream flavors for a decadent treat. The combination of cold ice cream and warm almond butter creates a delightful contrast in textures and temperatures. 10. Homemade Granola: Incorporate almond butter into your homemade granola recipe for added richness and flavor. Mix it with oats, nuts, seeds, dried fruits, sweeteners like honey or maple syrup, and bake until golden brown for a crunchy and nutritious breakfast option. Products from the Recipe. You dont have to cook if you dont feel like it. Order Vegan Butter and have it shipped straight to your door step! Pin Print Oil Free Almond Butter Recipe by Custom Curves Course: SidesCuisine: VeganDifficulty: Easy Servings 8 servingsPrep time 20 minutesCooking time 10 minutesCalories 231 kcal Ingredients 2 cups raw almonds 1/4 teaspoon salt (optional) 1 tablespoon honey or maple syrup (optional) Directions Preheat your oven to 350°F (175°C). Spread the almonds evenly on a baking sheet and roast them for about 10 minutes until they become fragrant and slightly golden. This step helps to enhance the flavor of the almonds. Allow the roasted almonds to cool completely before proceeding to the next step. This will prevent them from turning into almond butter too quickly. Once cooled, transfer the almonds to a high-powered blender or food processor. You can also use a mortar and pestle if you prefer a chunkier texture. Blend or process the almonds on high speed for about 5 minutes, scraping down the sides occasionally. At first, the almonds will turn into a fine powder resembling almond flour. As you continue blending, the almonds will release their natural oils and start clumping together. Keep blending until you achieve a smooth and creamy consistency. This may take some time, so be patient. If desired, add salt and sweetener of your choice (honey or maple syrup) to enhance the flavor of your almond butter. Blend for an additional minute to incorporate these ingredients evenly. Once you have reached your desired consistency, transfer the oil-free almond butter to an airtight container and store it in the refrigerator for up to two weeks. Notes It’s important to use raw almonds for this recipe, as roasted almonds may already contain added oils. If you prefer a crunchy almond butter, you can reserve a small portion of the roasted almonds and chop them finely. Stir them into the creamy almond butter once it’s ready. Feel free to adjust the sweetness and saltiness according to your taste preferences. Oil-free almond butter is a type of almond butter that is made without the addition of any oils. Almond butter is typically made by grinding almonds into a smooth and creamy paste, similar to peanut butter. While some commercial brands of almond butter may contain added oils, such as vegetable oil or palm oil, oil-free almond butter is made solely from almonds. Oil-free almond
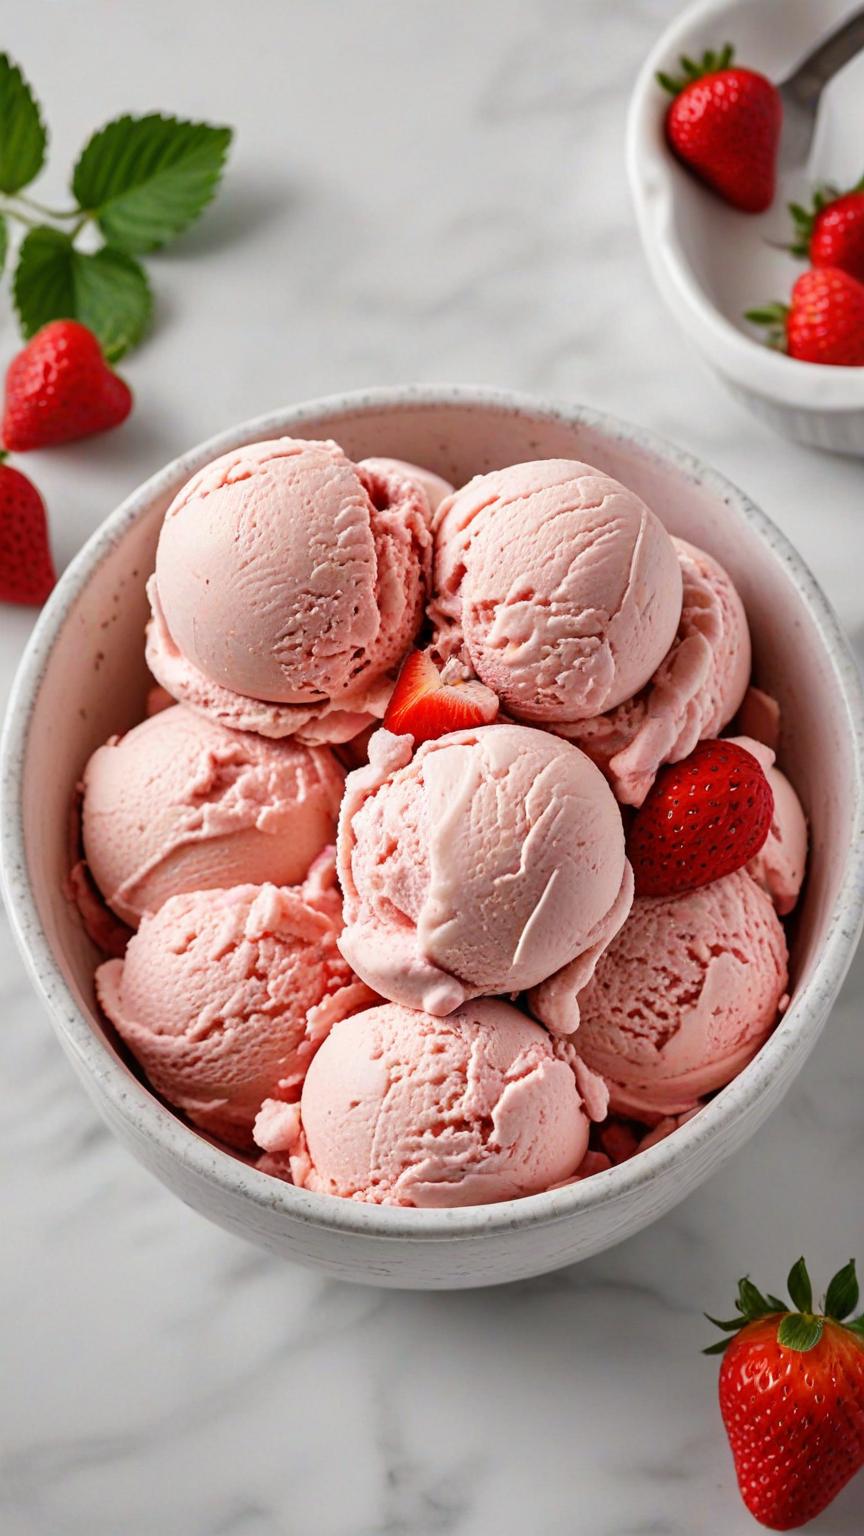
Strawberry Coconut Vegan Ice Cream
Strawberry Coconut Vegan Ice Cream Vegan strawberry ice cream made with a Ninja Creami is a delicious and guilt-free treat that is perfect for those following a plant-based diet or looking for a dairy-free alternative. The Ninja Creami is a versatile and powerful appliance that can create creamy and smooth ice cream without the need for dairy or refined sugars. To make vegan strawberry ice cream with a Ninja Creami, you will need a few simple ingredients. Start by gathering ripe strawberries, coconut milk, a natural sweetener of your choice (such as maple syrup or agave nectar), and a dash of vanilla extract for added flavor. Can I use any kind of non-dairy milk for this recipe? To make homemade vegan ice cream, you will need a few simple ingredients that are easily accessible. The base of this recipe typically consists of plant-based full fat milk. Using full fat coconut milk provide the necessary fat content to achieve the desired texture and consistency. Additionally, non-dairy milk, such a heavy cream or whipping cream could be a alternative solution. How do I enhance the taste of the vegan ice cream? Adding toppings like, sliced strawberries, non-dairy chocolate chips, coconut flakes, non-dairy chocolate syrup can be added to enhance the taste of a homemade vegan ice cream. One of the advantages of homemade vegan butter is that it allows customization according to personal preferences. By experimenting with toppings and flavorings, individuals can create their own unique variations of strawberry ice cream. Items from the Recipe! Order ingredients and have it shipped straight to your door step! Pin Print Strawberry Coconut Vegan Ice Cream Course: DessertCuisine: VeganDifficulty: Easy Servings 8 servingsPrep time 10 minutesCooking time 2 minutesCalories 190 kcal Ingredients 2 cans of full-fat coconut milk 2 cups of fresh or frozen strawberries 1/2 cup of agave nectar or sweetener of choice 1 teaspoon of lemon juice Directions Chill the cans of coconut milk in the refrigerator. Blend together the strawberries, coconut cream, agave nectar, and lemon juice until the mixture is smooth and pink. Transfer the blended mixture to your Ninja Creami and churn according to the manufacturer’s instructions. Once churned, pour the ice cream into a container and freeze until it solidifies. Delight in the refreshing taste of strawberry coconut goodness. The result is a luscious and refreshing vegan strawberry ice cream that is bursting with fruity flavors. The Ninja Creami’s unique technology ensures that you achieve a creamy and smooth texture without the need for traditional dairy products. Plus, the natural sweetness of the strawberries combined with the creaminess of the coconut milk provides a delectable and satisfying dessert option. Feel free to get creative with your vegan strawberry ice cream by adding toppings like fresh sliced strawberries, crushed nuts, or a drizzle of melted dairy-free chocolate. You can also experiment with other flavors and variations by substituting the strawberries with different fruits or adding in mix-ins like chocolate chips or shredded coconut. Overall, making vegan strawberry ice cream with a Ninja Creami is a simple and enjoyable process that allows you to indulge in a creamy and flavorful dessert while adhering to a plant-based lifestyle. Share: Facebook Pinterest Email Social Media Facebook-f Youtube Pinterest Instagram Tiktok Most Popular Get The Latest Updates Subscribe To Our Weekly Newsletter No spam, notifications only about new post, updates. Categories On Key Related Posts
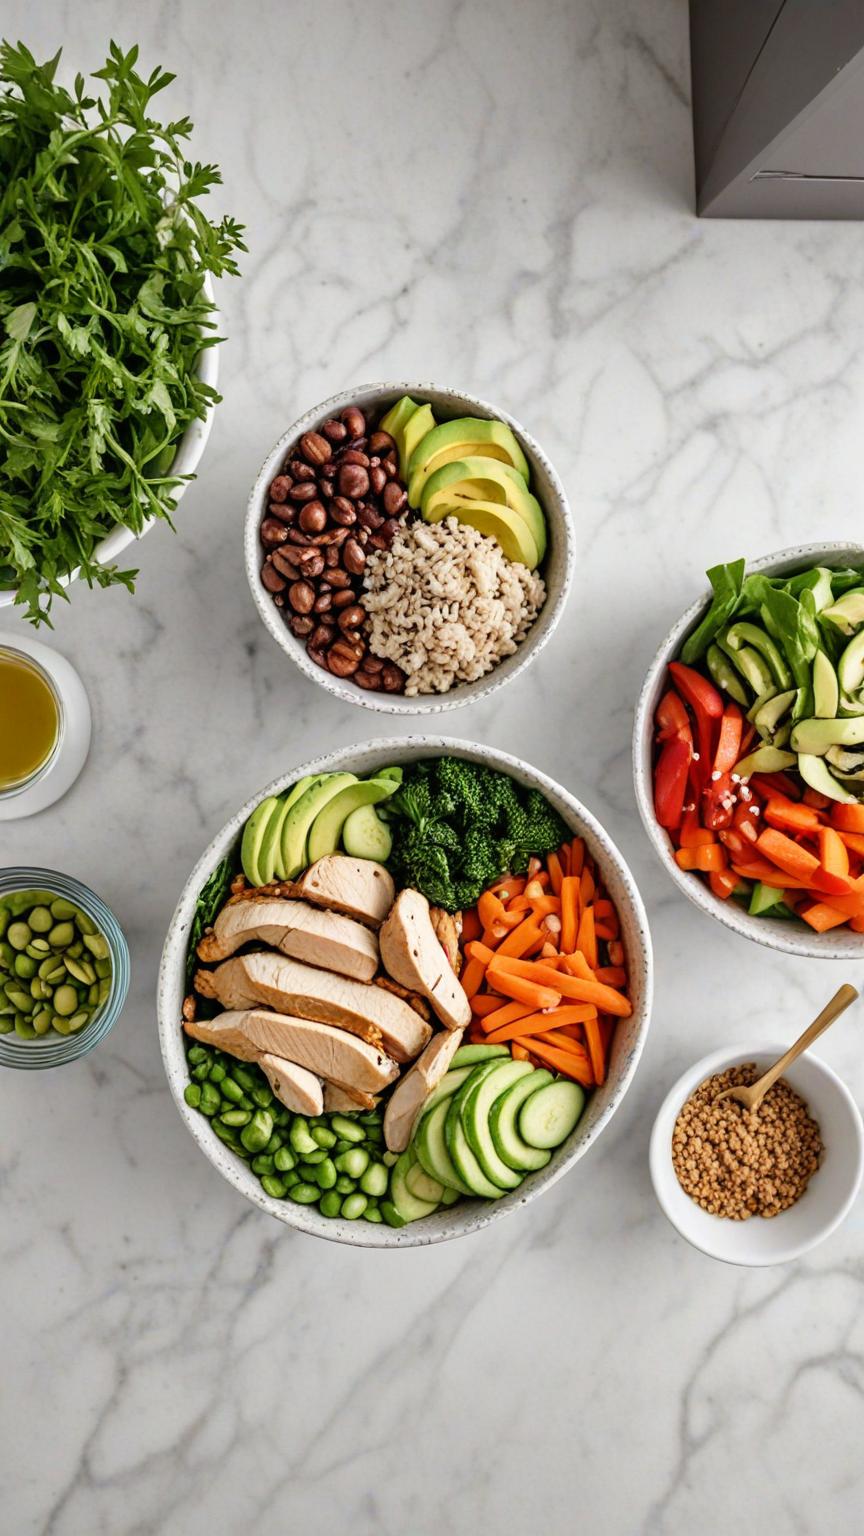
Chicken Buddha Bowl
chicken Buddha Bowl Chicken Buddha bowls are a vibrant and nutritious meal option, perfect for a balanced diet. These bowls typically feature a base of grains like quinoa or brown rice, topped with succulent grilled or roasted chicken. They are packed with an array of fresh and colorful vegetables, such as spinach, carrots, cucumbers, and avocado, offering a variety of textures and flavors. Often finished with a drizzle of tangy dressing or a dollop of hummus, Chicken Buddha bowls provide a satisfying combination of protein, fiber, and healthy fats. Ideal for meal prep or a quick weeknight dinner, they are a delicious way to enjoy a wholesome and balanced meal. Can I use any type of toppings? Of course, the more the merrier! We do recommend if you wish to keep the calorie count down, reframe from additional toppings. Can I make this recipe without chicken? Yes! You can substitute with shrimp, salmon, beef, lamb, or whatever. Or you do not have to substitute at all–just omit the first part of the ingredients and the instructions of this recipe. Psst! Try these dressings! Best thing about budhha bowls is a there are no rules–you dress it how ever you want! Shop Now Shop Now Shop Now Shop Now Pin Print Chicken Buddha Bowl Recipe by Custom Curves Course: Dinner, LunchDifficulty: Medium Servings 4 servingsPrep time 30 minutesCooking time 40 minutesCalories 300 kcal A Nutritious and Flavorful Recipe: Vegetable Buddha Bowl Lunch with Chicken, Quinoa, Chickpeas, Mushrooms, Lettuce, and Tomatoes Ingredients For Chicken 2 whole boneless, skinless chicken breasts 1 Tbsp olive oil 1 tsp paprika 1/2 tsp garlic powder Salt and pepper to taste For the Quinoa 1 cup quinoa 2 cups water or vegetable broth Salt to taste For the chickpeas 1 can (15 ounces) chickpeas (garbanzo beans), drained and rinsed 1 Tbsp olive oil 1/2 tsp ground cumin 1/2 tsp smoked paprika Salt to taste For Mushrooms 8 ounces mushrooms (such as cremini or button), sliced 1 Tbsp olive oil 2 cloves garlic, minced Salt and pepper to taste For Bowl Assembly 4 cups cups mixed lettuce leaves 1 cup cherry tomatoes (halved) Lemon wedges for serving 1 whole avocado, sliced (optional) Directions Preparing the Chicken Preheat your oven to 400°F (200°C). Rub the chicken breasts with olive oil, paprika, garlic powder, salt, and pepper Place the seasoned chicken on a baking sheet and bake for 20-25 minutes or until cooked through. Once done, set aside to cool before slicing. For Cooking the Quinoa Rinse the quinoa under cold water to remove any bitterness. In a medium-sized saucepan, combine the rinsed quinoa, water or vegetable broth, and salt. Bring the mixture to a boil over medium heat, then reduce the heat to low and cover. Simmer for 15-20 minutes or until the liquid is absorbed and the quinoa is tender. Fluff with a fork and set aside. Roasting the chickpeas Preheat your oven to 400°F (200°C). In a bowl, toss the drained and rinsed chickpeas with olive oil, cumin, smoked paprika, and salt Spread the seasoned chickpeas on a baking sheet and roast for 20-25 minutes or until crispy. Stir occasionally for even browning Sautéing the mushrooms: Heat olive oil in a skillet over medium heat. Add minced garlic and sliced mushrooms to the skillet. Sauté for 5-7 minutes or until the mushrooms are tender and golden brown Season with salt and pepper to taste. Assembling the Buddha bowl Divide the mixed lettuce leaves between two bowls as a base Arrange sliced chicken, cooked quinoa, roasted chickpeas, sautéed mushrooms, cherry tomatoes, and any additional vegetables you desire on top of the lettuce. Add any additional topping such as sliced avocado, cabbage or raw broccoli Drizzle your favorite dressing over the bowl or serve it on the side. Squeeze fresh lemon juice over the bowl for an extra burst of flavor. Toss the ingredients together just before eating to combine all the flavors. In conclusion, Chicken Buddha bowls are a versatile and nutritious meal option that combines the best of both taste and health. With a harmonious blend of tender chicken, fresh vegetables, and wholesome grains, these bowls offer a balanced array of nutrients essential for a healthy diet. Their customizable nature allows for endless creativity, making them suitable for various dietary preferences and lifestyles. Whether enjoyed as a quick lunch or a hearty dinner, Chicken Buddha bowls provide a satisfying, delicious, and nutrient-packed dining experience that can easily become a staple in anyone’s meal repertoire. Share: Facebook Pinterest Email Shop Now Social Media Facebook-f Youtube Pinterest Instagram Tiktok Most Popular Get The Latest Updates Subscribe To Our Weekly Newsletter No spam, notifications only about new post, updates. Categories On Key Related Posts
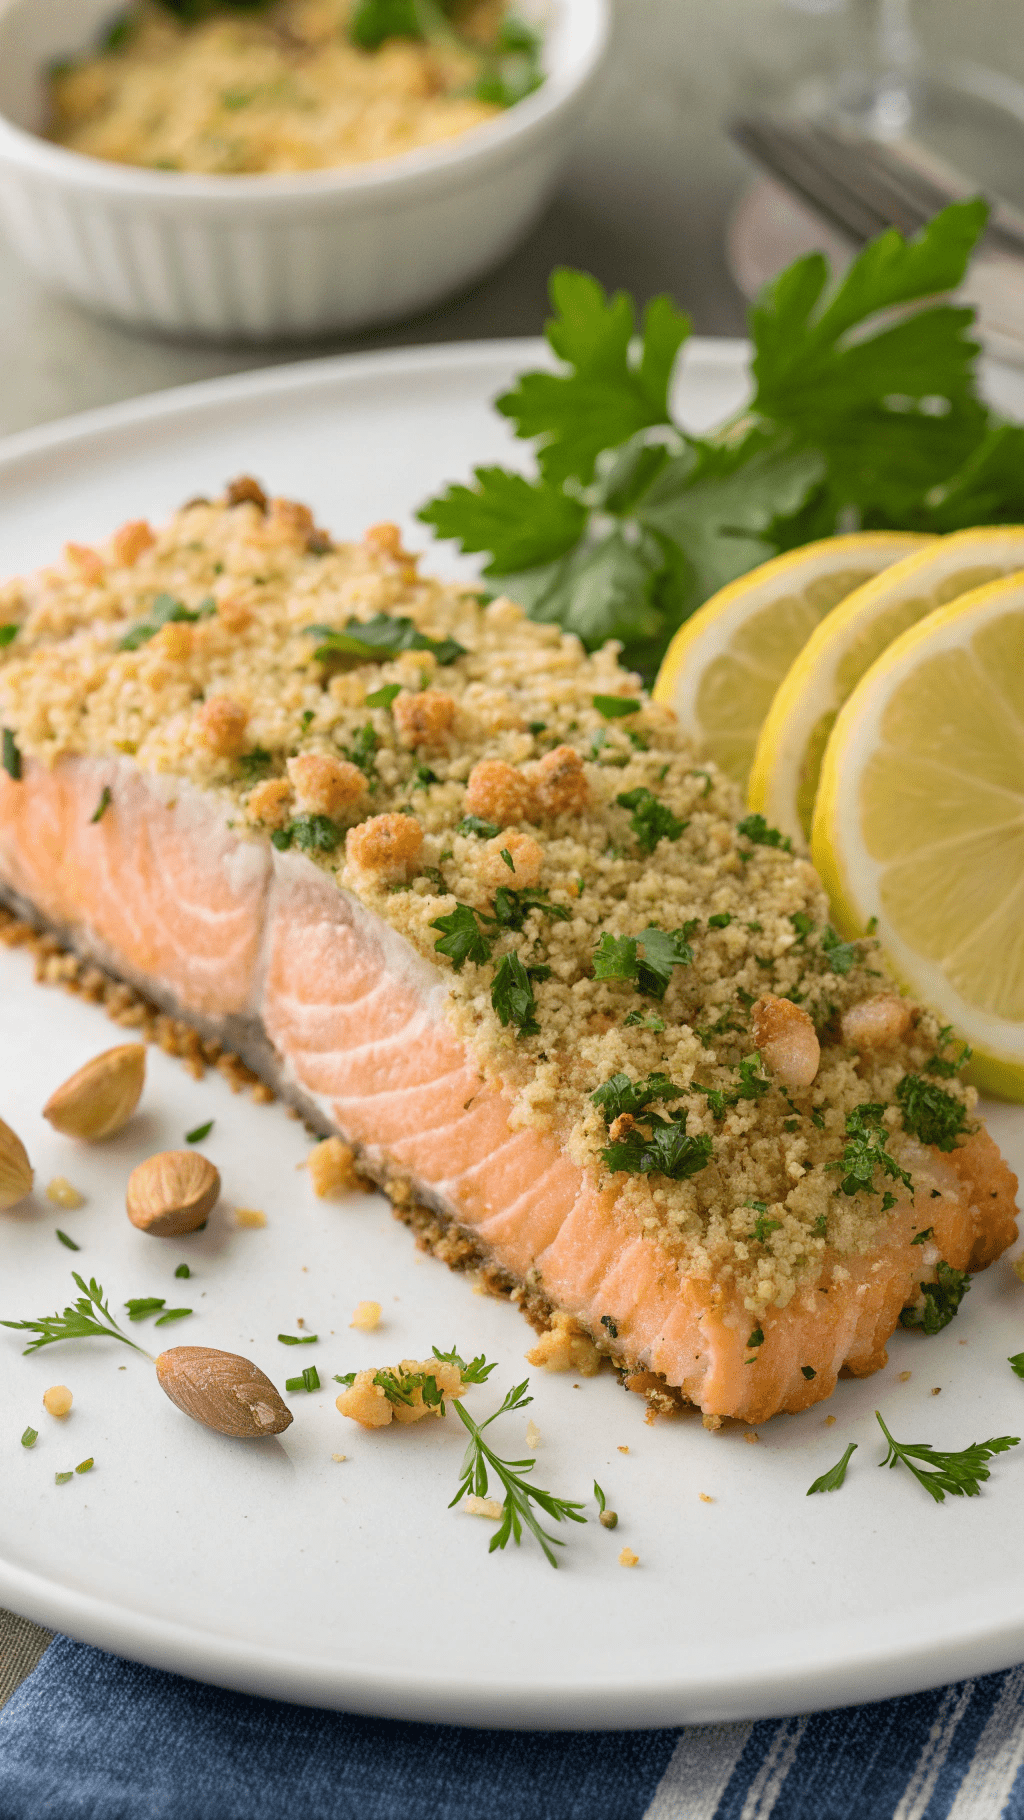
Macadamia Cilantro Crust Baked Salmon
Introduction:Salmon is a versatile and nutritious fish that is loved by seafood enthusiasts worldwide. When combined with a crunchy macadamia-cilantro crust, it takes on a whole new level of flavor and texture. In this blog post, we will guide you through the step-by-step process of preparing a mouthwatering baked salmon dish with a delightful macadamia-cilantro crust. Get ready to impress your family and friends with this delectable recipe! Ingredients:To make this delicious baked salmon with macadamia-cilantro crust, you will need the following ingredients: – 4 salmon fillets (6 ounces each)– 1 cup macadamia nuts, finely chopped– 1/2 cup fresh cilantro leaves, finely chopped– 1/4 cup panko breadcrumbs– 2 tablespoons Dijon mustard– 2 tablespoons honey– 1 tablespoon olive oil– Salt and pepper to taste Instructions: 1. Preheat the oven: Start by preheating your oven to 400°F (200°C). This will ensure that your salmon cooks evenly and develops a beautiful crust. 2. Prepare the macadamia-cilantro crust: In a mixing bowl, combine the finely chopped macadamia nuts, cilantro leaves, panko breadcrumbs, salt, and pepper. Mix well until all the ingredients are evenly distributed. 3. Season the salmon fillets: Place the salmon fillets on a baking sheet lined with parchment paper or aluminum foil. Season both sides of the fillets with salt and pepper according to your taste preferences. 4. Apply Dijon mustard and honey: In a small bowl, whisk together the Dijon mustard and honey until well combined. Brush this mixture evenly over the top of each salmon fillet. 5. Add the macadamia-cilantro crust: Take the macadamia-cilantro crust mixture and press it onto the top of each salmon fillet, ensuring an even coating. Gently pat down the crust to help it adhere to the salmon. 6. Drizzle with olive oil: Drizzle a tablespoon of olive oil over the top of each salmon fillet. This will help the crust turn golden brown and add a touch of richness to the dish. 7. Bake the salmon: Place the baking sheet with the salmon fillets in the preheated oven and bake for approximately 12-15 minutes, or until the salmon is cooked through and the crust is golden brown. 8. Serve and enjoy: Once baked, remove the salmon from the oven and let it rest for a few minutes. Serve your delicious baked salmon with macadamia-cilantro crust alongside your favorite side dishes, such as roasted vegetables or a fresh salad. Conclusion:Baked salmon with macadamia-cilantro crust is a delightful dish that combines the natural flavors of salmon with a crunchy and aromatic topping. The combination of macadamia nuts, cilantro, Dijon mustard, and honey creates a harmonious blend of textures and tastes that will leave you craving more. Whether you’re hosting a dinner party or simply looking to elevate your weeknight meal, this recipe is sure to impress. Give it a try and savor every bite!

Vegan Chocolate Protein Shake
Are you looking for a delicious and healthy way to boost your protein intake? Look no further than a vegan chocolate protein shake! Packed with plant-based protein, essential nutrients, and the rich flavor of chocolate, this shake is not only satisfying but also nourishing. In this blog post, we will guide you through a simple and scrumptious recipe that will leave you energized and ready to take on the day. Ingredients: To create a vegan chocolate protein shake, you will need the following ingredients: – 1 ripe banana – 1 cup of unsweetened almond milk (or any plant-based milk of your choice) – 2 tablespoons of cocoa powder – 1 tablespoon of almond butter (or any nut butter) – 1 scoop of vegan chocolate protein powder – 1 teaspoon of maple syrup or agave nectar (optional, for added sweetness) – A handful of ice cubes Instructions: Now that we have gathered our ingredients, let’s dive into the step-by-step process of making this delectable vegan chocolate protein shake: Step 1: Gather all the ingredients and ensure they are readily available. Step 2: Peel the ripe banana and break it into smaller chunks for easier blending. Step 3: In a blender, combine the banana chunks, unsweetened almond milk, cocoa powder, almond butter, vegan chocolate protein powder, and sweetener (if desired). Step 4: Add a handful of ice cubes to the blender. The ice will help create a refreshing and creamy texture. Step 5: Blend all the ingredients together until smooth and creamy. If needed, scrape down the sides of the blender and blend again to ensure everything is well incorporated. Step 6: Once blended to your desired consistency, pour the vegan chocolate protein shake into a glass. Step 7: Optionally, you can garnish your shake with a sprinkle of cocoa powder or a few chocolate shavings for an extra touch of indulgence. Step 8: Serve immediately and enjoy the delightful flavors of your homemade vegan chocolate protein shake! Benefits of a Vegan Chocolate Protein Shake: This vegan chocolate protein shake offers numerous benefits, making it an excellent choice for those seeking a nutritious and satisfying beverage: 1. Plant-Based Protein: Vegan protein powders derived from sources like peas, brown rice, or hemp provide all the essential amino acids required by the body. They are easily digestible and suitable for individuals following a vegan or vegetarian lifestyle. 2. Nutrient-Rich: This shake is not only high in protein but also contains essential vitamins and minerals found in ingredients like bananas, almond milk, and cocoa powder. These nutrients contribute to overall health and well-being. 3. Satisfying and Energizing: The combination of protein, healthy fats from almond butter, and natural sugars from the banana provides a balanced source of energy that can keep you feeling full and satisfied throughout the day. Conclusion: Incorporating a vegan chocolate protein shake into your daily routine is an excellent way to boost your protein intake while enjoying a delicious treat. This recipe is simple to make, customizable to suit your taste preferences, and packed with essential nutrients. So why not indulge in this guilt-free pleasure and give your body the nourishment it deserves?
Homemade Vegan Butter Recipe
Homemade Vegan Butter Recipe As the popularity of veganism continues to rise, so does the demand for plant-based alternatives to traditional dairy products. One such staple in many kitchens is butter, which adds richness and flavor to a wide range of dishes. Fortunately, creating a vegan version of this beloved ingredient is easier than you might think. In this blog post, we will guide you through a simple yet delicious recipe for vegan butter that can be made at home. Homemade vegan butter is a versatile and delicious alternative to traditional dairy butter. It is a plant-based spread that mimics the creamy texture and rich flavor of butter, making it an excellent choice for those following a vegan or dairy-free diet. This homemade version allows you to have full control over the ingredients, ensuring a healthier and more sustainable option. Can I use any kind of non-dairy milk for this recipe? To make homemade vegan butter, you will need a few simple ingredients that are easily accessible. The base of this recipe typically consists of plant-based oils such as coconut oil, olive oil, or avocado oil. These oils provide the necessary fat content to achieve the desired texture and consistency. Additionally, non-dairy milk, such as almond milk or soy milk, is often used to add creaminess. How do I enhance the taste of homemade vegan butter? One common ingredient in homemade vegan butter is nutritional yeast. Nutritional yeast not only adds a subtle cheesy flavor but also provides essential nutrients like B vitamins. Other flavorings such as salt, apple cider vinegar, and lemon juice can be added to enhance the taste and mimic the tanginess of traditional butter. One of the advantages of homemade vegan butter is that it allows customization according to personal preferences. By experimenting with different oils and flavorings, individuals can create their own unique variations of vegan butter tailored to their taste buds. What can I use homemade vegan butter on? Homemade vegan butter can be used in various ways in cooking and baking. It can be spread on toast, used for sautéing vegetables, or incorporated into recipes that call for butter. It can also be used as a substitute for dairy butter in baking, providing moisture and richness to cakes, cookies, and pastries. In addition to being a suitable option for vegans and those with dairy allergies, homemade vegan butter also offers environmental benefits. The production of traditional dairy butter requires significant amounts of water, land, and resources. By opting for homemade vegan butter, individuals can contribute to reducing their carbon footprint and promoting sustainability. Feeling Lazy? You dont have to cook if you dont feel like it. Order Vegan Butter and have it shipped straight to your door step! Pin Print Vegan Butter Recipe Recipe by ccthefitnessblogDifficulty: EasyServings 24 servingsPrep time 5 minutesCooking timeminutesCalories 40 kcal Ingredients 1 cup refined coconut oil 1/2 cup unsweetened plant-based milk (such as almond or soy milk) 1/4 cup refined liquid coconut oil 1 teaspoon apple cider vinegar 1/2 teaspoon salt 1/4 teaspoon nutritional yeast (optional, for a slightly cheesy flavor) 1/4 teaspoon turmeric powder (optional, for a yellow color reminiscent of traditional butter) Directions Melt the coconut oil In a small saucepan, melt the refined coconut oil over low heat until it becomes completely liquid. Be careful not to overheat it. Combine the ingredients In a blender or food processor, combine the melted coconut oil, plant-based milk, liquid coconut oil, apple cider vinegar, salt, nutritional yeast (if using), and turmeric powder (if using). Blend on high speed until all the ingredients are well combined and the mixture is smooth and creamy. Chill and solidify Transfer the mixture into a container or mold of your choice. You can use an empty butter dish or silicone molds for individual portions. Place the container in the refrigerator and allow it to chill for at least two hours or until it solidifies. Store and use Once the vegan butter has solidified, it is ready to use. You can store it in the refrigerator for up to two weeks or freeze it for longer shelf life. Use it as a spread on bread, in baking recipes, or for sautéing and frying. Notes For Storing, You can store it in the refrigerator for up to two weeks or freeze it for longer shelf life. Use it as a spread on bread, in baking recipes, or for sautéing and frying. For Spreading, You can scoop out desired amount, sit out of fridge for a few minutes to soften up like regular butter. It is important to note that while homemade vegan butter can be a healthier alternative to dairy butter, it should still be consumed in moderation. Like any other high-fat food, excessive consumption may lead to weight gain and other health issues. It is always recommended to consult with a healthcare professional or registered dietitian for personalized dietary advice. In conclusion, homemade vegan butter is a versatile and customizable plant-based spread that provides a delicious alternative to traditional dairy butter. With its creamy texture and rich flavor, it can be used in various cooking and baking applications. By making your own vegan butter at home, you have control over the ingredients and can contribute to a more sustainable food system. In conclusion, homemade vegan butter is a versatile and customizable plant-based spread that provides a delicious alternative to traditional dairy butter. With its creamy texture and rich flavor, it can be used in various cooking and baking applications. By making your own vegan butter at home, you have control over the ingredients and can contribute to a more sustainable food system. Share: Facebook Pinterest Email Social Media Facebook-f Youtube Pinterest Instagram Tiktok Most Popular Get The Latest Updates Subscribe To Our Weekly Newsletter No spam, notifications only about new post, updates. Categories On Key Related Posts